



Features of the device
The car is equipped with a tilt-adjustable, trauma-safe steering column and a rack-and-pinion steering mechanism with hydraulic booster.
The power steering system consists of an electric pump, a power steering gear, and low and high pressure pipelines. The electric pump is mounted on the side member in the front part of the right front wheel arch and is covered by the arch mudguard.
The steering gear is mounted on the front suspension subframe at the lower rear of the engine compartment.
The steering gear consists of two horizontal steering rods and levers on the steering knuckles. The length of each steering linkage rod is adjusted by rotating the rod in the outer end and is fixed with a lock nut.
Removal
Place the vehicle on the work post and apply the parking brake.
Block the airbag control unit using a diagnostic tool in accordance with the requirements of TI 3100.25100.12044.
Turn off the ignition and disconnect the ground wire terminal from the battery (spanner 10).
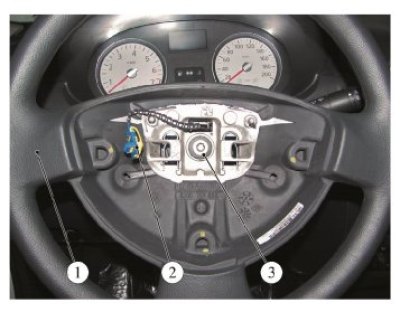
Figure 2-1 - Removing the steering wheel: 1 - steering wheel; 2 - steering column switch unit wiring harness; 3 - steering wheel mounting bolt
Remove the driver airbag module (DAM) in accordance with the requirements of TI 3100.25100.20598.
Set the front wheels to a position that corresponds to the straight-ahead movement of the vehicle.
Loosen bolt 3, Figure 2-1, of the steering wheel mount and remove steering wheel 1. When removing the steering wheel, carefully remove the 2 wire harness from the steering column switch unit to the airbag module through the hole in the hub (torx T50 replacement bit, extension and ratchet).
Installation
Caution: Re-use of the steering wheel mounting bolt to the steering shaft is not permitted. The bolt must be replaced.
Make sure that the front wheels of the vehicle are in a position that corresponds to the straight-ahead movement of the vehicle.
Check and, if necessary, set the contact disk of the rotating block of the steering column switches to the middle position in accordance with paragraph. 3 real TI.
Install the steering wheel onto the steering shaft and secure it with a new bolt. Bolt tightening torque 44 Nm (4.4 kgf·m) (torx T50 replacement bit, extension and ratchet, torque wrench).
When installing the steering wheel, route the wiring harness from the steering column switch assembly to the airbag module through the hole in the hub.
Install the driver airbag module (DAM) in accordance with the requirements of TI 3100.25100.20598.
Connect the ground wire terminal to the battery and turn on the ignition (spanner 10).
Unlock the airbag control unit using a diagnostic tool in accordance with the requirements of TI 3100.25100.12044.
Check the operation of the rotating block of steering column switches, for which:
- turn the steering wheel to the extreme left position;
- turn the steering wheel to the extreme right position;
- return the steering wheel to the center position;
- make sure that there is no fault message displayed on the instrument cluster.
Present the vehicle to the Quality Control Department. The Quality Control Department will check the vehicle for compliance with the requirements of TU 017200-254-00232934, paragraphs 1.19.20, 1.19.21 in the scope of work performed.