Car repair AvtoVAZ Car repair Renault Car repair Hyundai Car repair Ford Car repair Volkswagen Car repair Audi Car repair Chevrolet
English Русский
Български
Беларускі
Український
Српски
Hrvatski
Română
Polski
Slovenský
Magyar
articles sitemap contacts bookmark
LadaMan.ru


Kalina Granta Priora Vesta Largus XRAY
Largus 1 (2012-2023)

Water pump — removal and installation (Largus 1)

  • Main
  • Largus
  • Largus 1
  • Power unit
  • Cooling and lubrication system
  • Water pump — removal and installation
0
Contents: Removal ⇣ Installation ⇣
There is no regulation prescribing periodic replacement of the water pump (s). However, it is recommended to inspect it every time the timing belt is replaced. The pump shaft has additional play, which becomes obvious after removing the timing belt from the pump pulley. The pulley should rotate easily, without noise, and without jamming. In addition, a leak of coolant, as well as a bearing sound in the form of a squeak or whistle, the frequency of which is proportional to the engine speed, may indicate that the pump is out of order.

See also Defects in the water pump (s).
For 8kl engine

For 8kl engine
For 16-valve engine

For 16-valve engine

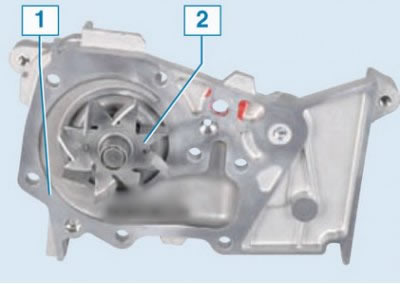
Coolant pump: 1 – body; 2 – impeller


For replacement part numbers, see here and here (8-valve and 16-valve engine pumps are not interchangeable).


Removal


Place the vehicle on a two-post lift, apply the parking brake, turn off the ignition and disconnect the ground wire from the battery.

Remove the engine crankcase guard (see here).

Drain the fluid from the engine cooling system (see above).

Remove the right front wheel.

Remove the accessory drive belt (see here).

Remove the timing belt (see here).

Remove the timing belt tension roller (see ibid).

Loosen bolts 1, figures 13-9 and 13-10, securing the water pump (replaceable heads 8 and 10, extension, ratchet wrench).

Remove water pump 2.
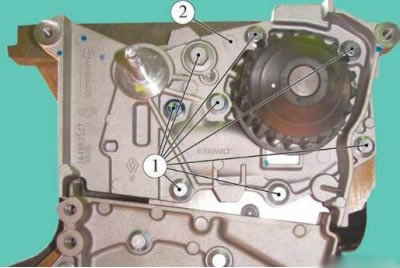
Figure 13-9 - Removing the water pump on a vehicle with a K4M engine: 1 - mounting bolt; 2 - water…

Figure 13-9 - Removing the water pump on a vehicle with a K4M engine: 1 - mounting bolt; 2 - water pump
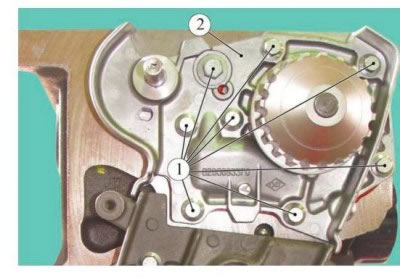

Figure 13-10 - Removing the water pump on a vehicle with a K7M engine: 1 - mounting bolt; 2 - water…

Figure 13-10 - Removing the water pump on a vehicle with a K7M engine: 1 - mounting bolt; 2 - water pump


For cars with K7M engine


Remove the water pump gasket. The water pump gasket needs to be replaced.

Installation


Clean the mating surfaces of the water pump and cylinder block from gasket residue and degrease.

For cars with K4M engine


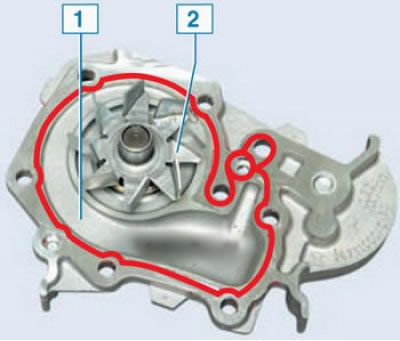
Apply adhesive (sealant) to the water pump with a roller 0.6...1 mm wide in accordance with Figure 13-11 (adhesive composition, part number 7711427907).
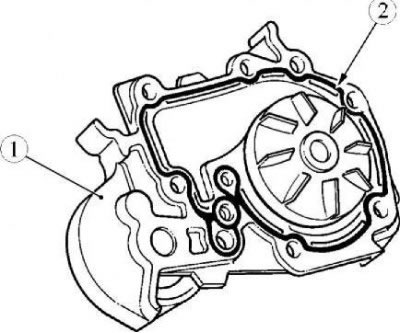
Figure 13-11 - Applying sealant to the water pump of the K4M engine: 1 - water pump; 2 - sealant

Figure 13-11 - Applying sealant to the water pump of the K4M engine: 1 - water pump; 2 - sealant


Apply one or two drops of the composition "FRENETANCHE" on bolts 1 and 4, Figure 13-12, fastening the water pump.
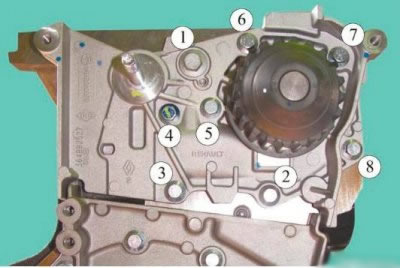
Figure 13-12 - Tightening order of the K4M engine water pump mounting bolts: 1...8 - water pump…

Figure 13-12 - Tightening order of the K4M engine water pump mounting bolts: 1...8 - water pump mounting bolts


Install the water pump.


Install and tighten the water pump mounting bolts to the specified torque in the prescribed order in accordance with Fig. 13-12 (replaceable heads 8 and 10, extension, ratchet wrench, torque wrench):
  • bolt 1 (M8) fastening water pump 27 Nm (2.7 kgf·m);
  • bolts 2... 8 (Mb) for fastening the water pump 10 Nm (1.0 kgf·m).

For cars with K7M engine


Install the water pump with a new gasket.
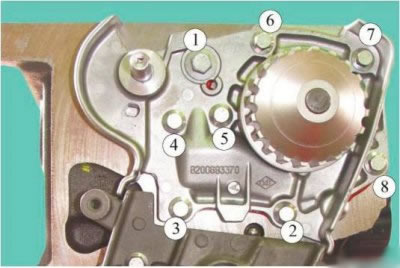
Figure 13-13 - Tightening order of the K7M engine water pump mounting bolts: 1...8 - water pump…

Figure 13-13 - Tightening order of the K7M engine water pump mounting bolts: 1...8 - water pump mounting bolts


Install and tighten to the required torque in the prescribed order in accordance with Figure 13-13 the water pump mounting bolts:
  • bolt 1 (M8) fastening water pump 22 Nm (2.2 kgf·m);
  • bolts 2...8 (Mb) for fastening the water pump 11 Nm (1.1 kgf·m).

Operations for all vehicle configurations


Install the timing belt tension roller.

Install the timing belt.

Install the accessory drive belt.

Install the right front wheel.

Fill the engine cooling system (see above).

Install the engine crankcase guard.

Connect the ground wire terminal to the battery.

Bleed air from the engine cooling system (see above).


This article is available at russian, bulgarian, belarusian, ukrainian, serbian, croatian, romanian, polish, slovak, hungarian
This article has been reviewed: Daniil Markelov
Share with friends:
◀ Previous
Lada Largus 1: Cooling and lubrication system
Next ▶

Removal and installation the cooling system radiator
Replacing the coolant (antifreeze)
Cooling system — design description
Lubrication system pressure
Oil pump — removal and installation
Water pump malfunctions
Thermostat — removal and installation
Electric fan of the engine cooling system
More articles with information from manuals for Lada:

• Replacing the water pump Lada Kalina Sedan (2004-2013, VAZ-1118)
• Oil pump — removal, inspection and installation Lada Granta 1 (2011-2023, VAZ-2190)
• Replacing the water pump Lada Priora 1 (2007-2018, VAZ-2170)
• Oil pump — removal, inspection and installation Lada Vesta 1 (2015-2023, VAZ-2180)
• Checking the condition and replacing the power steering pump drive… Lada X-Ray 1 (2015-2022)
Link to this article in various formats
Reviews and comments of visitors
No comments yet


Add up two numbers: 50 + 23


Largus 1 (2012-2023) 
  • General information
  • Vehicle device
  • User manual
  • Maintenance
  • Power unit
  • Engine repair
  • Cooling and lubrication system
  • Supply system
  • Ignition system
  • Exhaust system
  • Spare parts catalog
  • Transmission
  • Clutch
  • Car gearbox
  • Drive shafts
  • Spare parts catalog
  • Chassis (running gear)
  • Suspension and wheels
  • Steering
  • Brake system
  • Spare parts catalog
  • Body and interior
  • Exterior (external elements)
  • Interior (internal elements)
  • Doors, locks and windows
  • Heating and ventilation
  • Spare parts catalog
  • Electrical equipment
  • Equipment and devices
  • Power devices
  • Lighting and signaling
  • Spare parts catalog
  • Electrical circuits
LadaMan.ru © 2018–2026 | Mobile version | About Lada | Sitemap: EN BG BY UA RS HR RO PL SK HU | Contacts with admin | | Add to bookmarks
Kalina Hatchback (2004-2013) | Kalina Sedan (2004-2013) | Granta 1 (2011-2023) | Priora 1 (2007-2018) | Vesta 1 (2015-2023) | Largus 1 (2012-2023) | X-Ray 1 (2015-2022) |
This site uses cookies to ensure everything runs smoothly.