
Place the car in the workplace, brake with the parking brake and prepare for work: raise the hood, lower the sliding door windows, disconnect the wire terminal "masses" from battery (flathead screwdriver, wrench "on 10").
To disassemble the passenger compartment to remove the windshield glass:
- remove the wiper arms, unscrew the screws securing the windscreen frame facings, remove the facings (wrench 13, Torx T20 screwdriver);
- remove the upholstery of the pillars of the wind window (flat screwdriver);
- remove interior rear view mirror (flat screwdriver);
- unscrew two screws each and remove the sun visors with holders (Phillips screwdriver);
To disassemble the passenger compartment to remove the side windows:
- fold back the rear seat;
- remove the facings of the bolts of the upper mounting of the rear side seat belts, unscrew the bolts (interchangeable head 17, knob);
- remove rear upholstery (Torx T20 screwdriver, flat head screwdriver).
For the left loading door, remove the wiper arm.
Protect the paintwork of the body in the area adjacent to the glass from damage when cutting the adhesive seam, as shown in Figure 16-1 (adhesive tape).
Removing
Pierce the adhesive line and pass a twisted wire saw through the punctured hole, cut the adhesive line or cut the adhesive line with a vibroelectro (pneumatic) knife with a long cutting part 45...55 mm (technological firmware, twisted wire saw TU 64-1-749-80 or holder ZEPK 05 according to catalog f. Henkel, or vibrating pneumatic knife type USAG, Italy, or vibrating electric knife type FEIN·model 53602, Germany).
Remove glass from opening (holders - suction cups).
Operations for cutting the adhesive seam and removing the glass should be performed with an assistant.
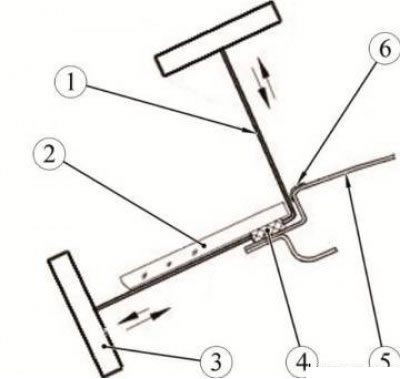
Figure 16-1 - Device for cutting the adhesive joint of car windows: 1 - wire saw L=300... 500 mm; 2 - car window glass; 3 - saw handle; 4 - glue line; 5 - car body; 6 - adhesive tape
Installation
Prepare bonding surfaces (the technological sequence of operations for surface preparation is shown on the example of the adhesive system of the company "Terozon").
Check the size of the gaps around the perimeter of the fit of the windshield to the frame of the windshield. Checking is carried out with the help of technological windshield. The size of the gaps should be no more than 2 mm (probe set). If necessary, edit the window opening (straightening tool set).
Place the removed or new glass using the suction cups on the work table with the outer side down (table type BS-152 coated with felt or linoleum).
Evenly cut off the remaining glue line on the window frame and the removed glass, leaving a layer 1...2 mm thick (technological knife or vibroelectro (pneumatic) knife with a shortened length of the cutting part of the knife (16...18 mm).
If in the process of cutting the glass there are sections of the window opening that are open to the metal, degrease these areas, then apply primer to the degreased surfaces. Allow the soil to dry for 15 minutes in natural conditions (white spirit, cleaning rags, primary primer, brush).
Apply enamel primer to the primed edges of the window opening (from the delivery set of the adhesive system), preventing the primer from getting on the remnants of the old glue and on the front surfaces of the body. Dry the applied primer for at least three minutes in natural conditions.
Degrease the layer of old adhesive with isopropyl alcohol.
To ensure the required thickness of the adhesive seam, in the places indicated in Figures 16-5, 16-6, 16-8, 16-10, install distance spacers with a thickness: for the windshield and loading door glasses - 3+1 mm; for side windows - 6+1 mm.
In case of installing new glass, treat the perimeter of the glass with a cleaner (from the delivery set of the adhesive system) or isopropyl alcohol, then apply a glass primer (from the delivery set of the adhesive system) along the edge of the glass with a strip 18... 20 mm wide at the place where the glue is applied in accordance with the diagrams shown in Figures 16-7, 16-9, 16-11, 16.12. After applying the primer, dry the coating for at least three minutes in natural conditions.
Degrease the edge of the edging adjacent to the adhesive seam and install the edging on the lower end of the windshield, ensuring that the edging fits snugly to the glass (white spirit or degreaser supplied).
Pierce the exit hole in the tube, put the tip supplied in the kit on the tube (technological firmware). If the tip of the glue tube requires preparation, then prepare it for work, as shown in Figure 16-2 (technological knife, ruler). Install the tube with glue in the syringe gun.
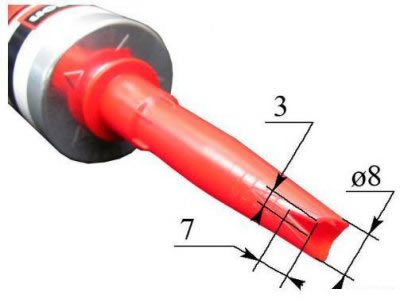
Figure 16-2 - Diagram of cutting the tip of the tube
Apply the adhesive to the glass with a uniform, continuous triangular bead as shown in Figure 16-3 over the applied primer (metal ruler, syringe gun, glue from the Monopac Evolution, SP Kit, Bipac Evolution glass gluing kit or glue "Trostat UHV/M". or "Betasil 170G').
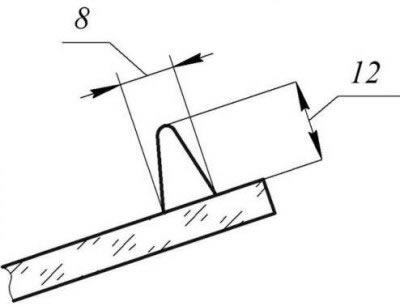
Figure 16-3 - Shape of the adhesive bead before installation on the body
It is allowed to apply glue on the flange of the window opening.
Adhesive consumption rate for one car: for a wind window - 400 ml; for glass of the left loading door - 150 ml, for glass of the right loading door - 100 ml; for side glass - 150 ml.
Make sure that the holders, Figure 16-4, are securely fastened to the glass. Install the glass on the window opening, ensuring a uniform gap around the perimeter between the end of the glass and the body. The maximum allowable holding time of the applied adhesive before installing the glass on the body is 15... 20 minutes.
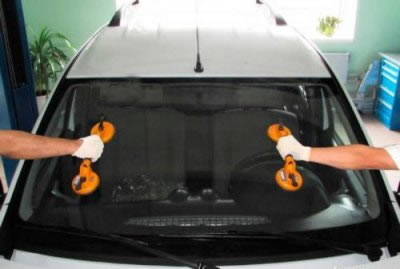
Figure 16-4 - Mounting the glass with holders
Evenly and carefully press the glass against the opening, ensuring even crushing of the adhesive bead.
Attention:
- it is forbidden to mix materials of different adhesive systems;
- it is forbidden to use the materials after the expiration date;
- reducing the thickness of the adhesive between the glass and the body, less than specified, is unacceptable, as this leads to a glass crack in operation;
- the presence of glue on the front surfaces of the body and glass is not allowed. Remove excess adhesive if necessary (rags, white spirit);
- perform glass installation operations with an assistant;
- optimal adhesive polymerization mode: air temperature 23°C, humidity 50%, at low temperature and humidity, the adhesive polymerization time increases.
To avoid "sliding" glass down, fix it with three pieces of adhesive tape to the body with a length of 250-300 mm.
To avoid shifting the glass, it is forbidden to move the car and abruptly close the doors within 7... 8 hours after installing the windows. Keep the sliding windows of the doors open so that when the doors are closed, there is no air pressure on the glass. Works related to the application of forces to the glass can be started 14 hours after gluing. The optimal strength of the adhesive bond is achieved, depending on weather conditions, after 4...6 days.
Check vehicle for leaks. To do this, it is necessary to shed the adhesive seam of the installed glass with a jet of water (hose washer). Leakage along the adhesive seam is not allowed.
Install upholstery, lining and other parts removed from the vehicle in the reverse order of removal. Clean glass on both sides (rags, isopropyl alcohol, or supplied cleaner).
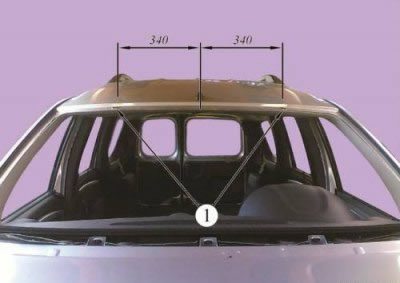
Figure 16-5 - Scheme of sticking spacers on the wind window opening: 1 - remote laying of a wind window
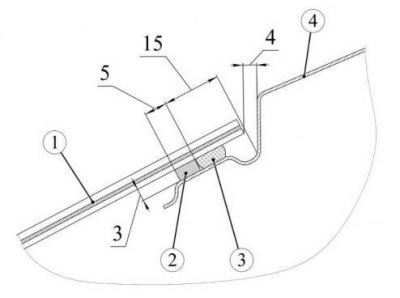
Figure 16-6 - Cross-section at the place where the spacers of the wind window are affixed: 1 - glass; 2 - remote laying of the wind window; 3 - glue line; 4 - car body
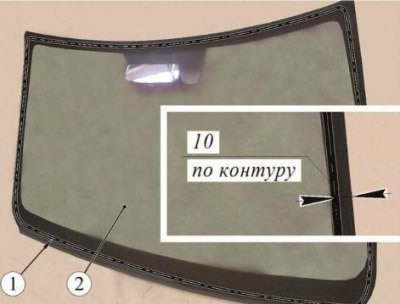
Figure 16-7 - Scheme of applying the adhesive seam on the windshield glass: 1 - glue line; 2 - windshield glass
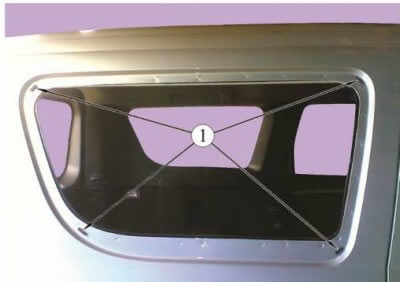
Figure 16-8 - Scheme of sticking spacers on the side window opening: 1 - side window spacer
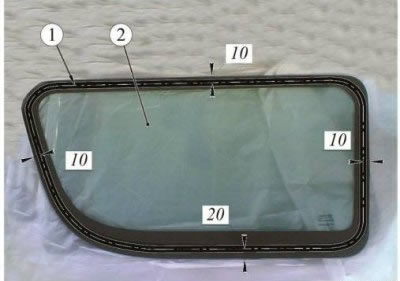
Figure 16-9 - Scheme of applying the adhesive seam on the glass of the side window: 1 - glue line; 2 - side window glass
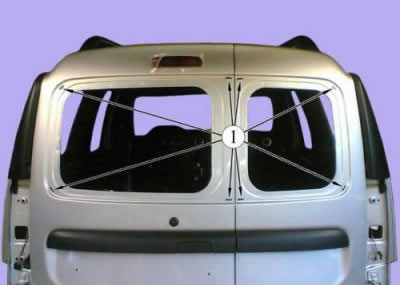
Figure 16-10 - Scheme of gluing spacers on window openings of loading doors: 1 - remote laying of windows of loading doors
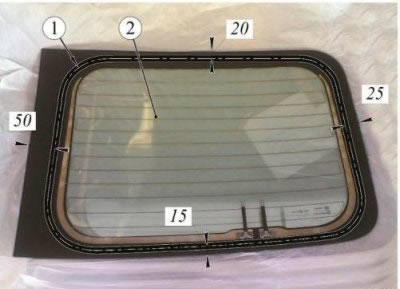
Figure 16-11 - Scheme of applying the adhesive seam on the glass of the window of the loading door of the left: 1 - glue line; 2 - window glass loading door left
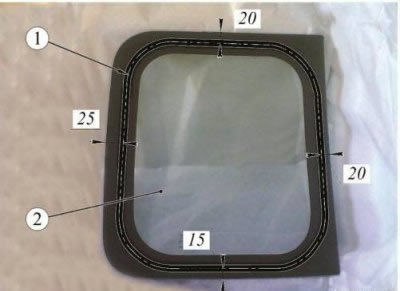
Figure 16-12 - Scheme of applying the adhesive seam on the window glass of the loading door on the right: 1 - glue line; 2 - window glass loading door right