



Removal
Place the vehicle in the work area. Disconnect the ground wire terminal from the battery.
Loosen screw 1, Figure 7-1, securing the inner handle 2 for opening the left or right door.
Loosen the 4 screws securing the left door trim.
Overcoming the resistance of the holders, remove the trim 3 of the left or right door.
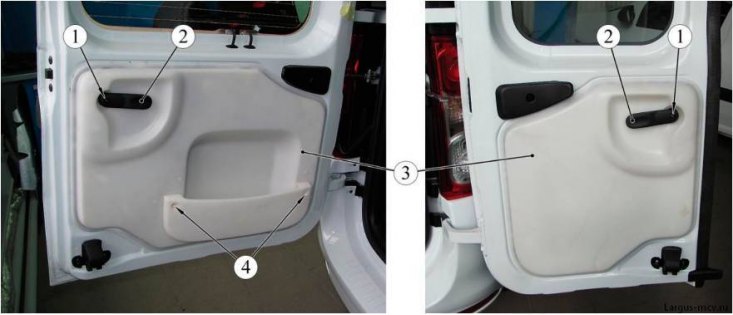
Figure 7-1 - Fastening the loading door trims: 1 - screw for fastening the inner door opening handle; 2 - internal door opening handle; 3 - loading door trim; 4 - upholstery mounting screw
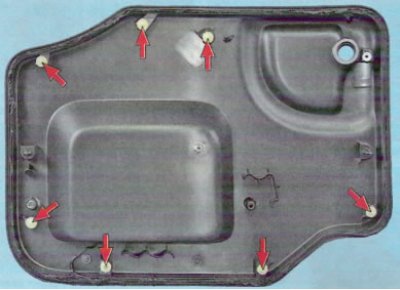
Location of the fastening clips for the trim of the left door leaf of the rear compartment (view from the inside)
Fold back the protective cap of nut 3, Figure 7-2, securing arm 2 of the windshield wiper, unscrew the nut, remove the arm (spanner 13).
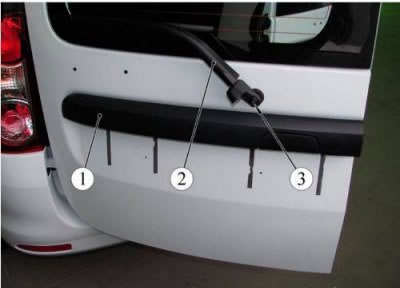
Figure 7-2 - Wiper arm mounting: 1 - Rear left loading door trim; 2 - windshield wiper lever; 3 - Windscreen wiper arm mounting nut
Disconnect the wiring harness connector from windshield wiper 2, Figure 7-3. Drill out rivets 1, remove windshield wiper (drill, drill bit).
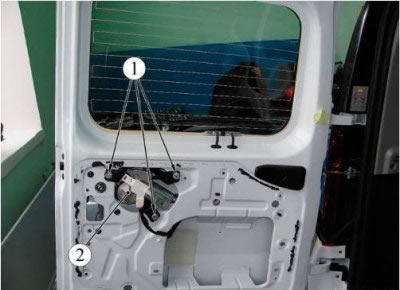
Figure 7-3 - Wiper blade mounting: 1 - windshield wiper mounting rivet; 2 - windshield wiper
Unscrew bolts 1, Figure 7-4, securing the upper and lower door locks on the left or right, remove the locks by disconnecting the lock drive cables from them (torx T30 replaceable head, ratchet).
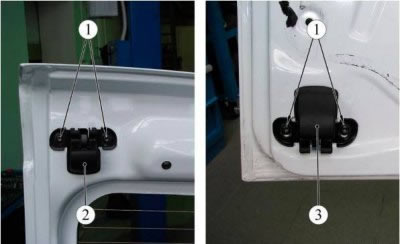
Figure 7-4 - Fastening the loading door clamps: 1 - clamp fastening bolt; 2 - upper retainer; 3 - lower retainer
Unscrew bolts 2, Figure 7-5, and nuts 3 securing cover plate 1, (see figure 7-2), loading doors, remove the cover plate by disconnecting the lock rod from the door lock switch (replacement head 10, ratchet).
Loosen bolts 1 securing the loading door lock, remove the lock assembly with the upper and lower lock drive cables (torx T30 replaceable head, ratchet).
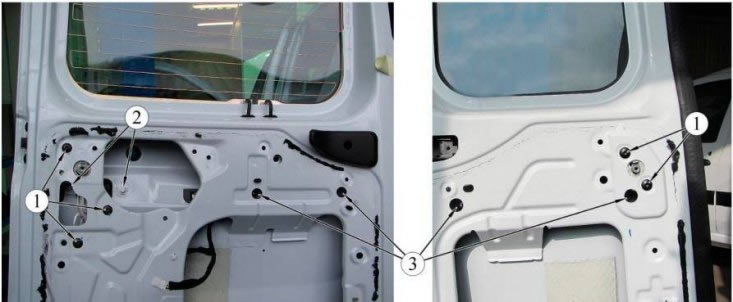
Figure 7-5 - Removing the loading door covers: 1 - screw for fastening the left or right loading door lock; 2 - bolt for fastening the lining; 3 - lining mounting nut
Remove the additional brake light.
Disconnect the wire connectors from the rear window heating element and from the license plate light.
Remove the wiring harness and rear window washer tube from the door cavity.
Unscrew the two upper and two lower bolts 1, Figure 7-6, securing the left or right loading door to the hinges, remove the door (replaceable head 13, ratchet).
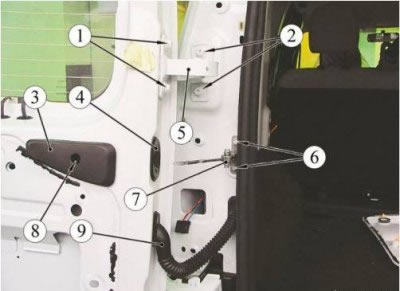
Figure 7-6 - Fastening the loading door limiter: 1 - bolt for fastening the loading door to the hinges; 2 - bolt for fastening the loading door hinges to the body; 3 - handle of the limiter lock; 4 - limiter seal; 5 - loading door hinge; 6 - bolt for fastening the limiter to the body; 7 - loading door limiter; 8 - screw for fastening the handle of the limiter lock; 9 - protective tube of the wiring harness of the left loading door
(Source link - website: LadaMan.ru)
Loosen screw 8, remove handle 3 of limiter lock 7. Remove seal 4 of limiter. Unscrew two nuts 1, Figure 7-7, remove the lock 2 of the limiter through the technological opening in the door.
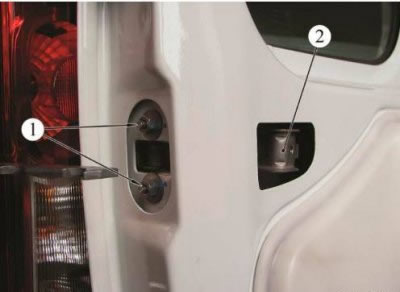
Figure 7-7 - Fastening the loading door limiter lock: 1 - loading door limiter lock fastening nut; 2 - loading door limiter lock
If it is necessary to replace the hinges and limiter:
- remove the tail light
- unscrew the two bolts 6 securing the limiter 7 of the loading door, remove the limiter (torx T30 replaceable head, ratchet).
- unscrew the three screws securing the upper trim 1, Figure 7-8, of the rear light, remove the left or right trim.
- unscrew the two upper and two lower bolts 2 (see figure 7-6) fastening hinges 3 to the body, remove hinges (replaceable head 13, ratchet).
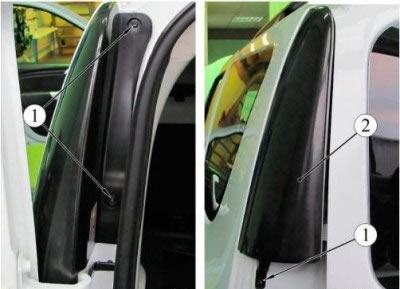
Figure 7-8 - Fastening the upper rear light trim: 1 - screw for fixing the lining; 2 - Upper rear light trim
Installation
Installation of units and parts of loading doors should be carried out in the reverse order of disassembly, while:
- lubricate the rubbing parts of the windshield wiper, sliding surfaces in the door lock, door opening limiter, rod joints and hinges (cIATIM-201 grease, consumption rate -5 g);
- secure the windshield wiper with rivets (rivet 7703072362, rivet gun type KPM-24M;
- before installing the door trim, temporarily connect the ground wire terminal to the battery, check and, if necessary, adjust the operation of the door lock and windshield wiper;
- if necessary, restore or replace the sealing gasket on the end of the trim;
- ensure uniformity of the gap between the doors and mating body panels.