



Removal
Place the vehicle in the work area, disconnect the ground wire terminal from the battery, open the door and lower the window to the lower position.
Loosen screw 3, Figure 5-1, securing handle 4 of the inner rear door; disconnect the lock rod from the handle, remove the handle.
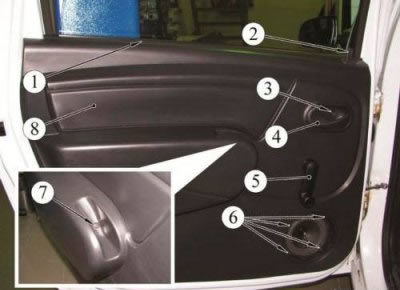
Figure 5-1 - Fastening the rear door trim: 1 - horizontal glass seal; 2 - door lock button; 3 - screw for fastening the inner rear door handle; 4 - rear door handle inside; 5 - window lift handle; 6 - self-tapping screw for fastening the loudspeaker of the acoustic system; 7 - self-tapping screw for fastening door trim; 8 - rear door trim
Unscrew the self-tapping screw 7 securing the door trim to the armrest.
Remove the trim and unscrew the four self-tapping screws 6 securing the speaker of the acoustic system, disconnect the wiring harness connector and remove the speaker.
Remove cover 1 and window lift handles from the door trim, remove retaining clip 2, and remove handle 3.
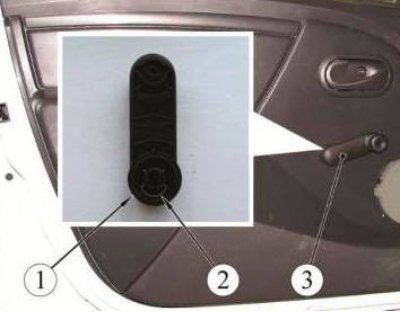
Overcoming the resistance of the holders, detach the trim 8, Figure 5-1, from the door, remove the lock button 2 from the hole in the trim.
Remove seals 1.
Temporarily install the window lift handle, lift the glass, remove the seal from the guide 1, Figure 5-3.
Unscrew bolts 2, remove guide 1 of the lowering glass.
Install the glass in such a position that the bolts securing the glass to the window lifter slider are positioned opposite the technological holes in the door panel.
Holding the glass, unscrew the two bolts 1, Figure 5-2, securing the glass frame to the window lifter slider.
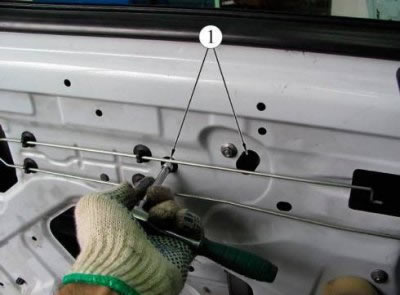
Figure 5-2 - Fastening the rear door glass to the window regulator slider: 1 - bolt securing the rear door glass to the window lifter slider
Remove the glass from the door cavity.
Unscrew the four nuts 3, Figure 5-3, securing the window lifter to the door and remove it through the opening in the inner door panel (replacement head 10, ratchet).
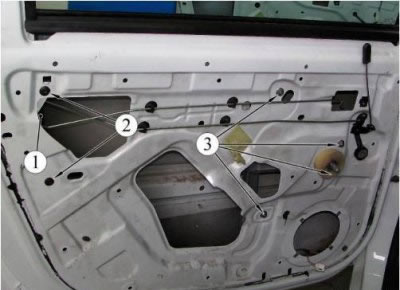
Figure 5-3 - Window regulator mounting: 1 - rear door glass guide; 2 - bolt for fastening the rear door glass guide; 3 - window regulator mounting nuts
Unscrew two nuts 1, Figure 5-4, remove the outer handle 2, disconnecting the door lock rods from it (10 mm spanner).
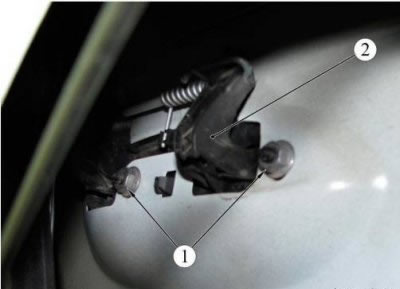
Figure 5-4 - Fastening the outer handle: 1 - outer handle fastening nut; 2 - outer handle of the front door
Disconnect from the lock rod, unscrew three bolts 1, figure 5-5, fastening the door lock, remove the lock 2 of the rear door (torx T30 screwdriver).
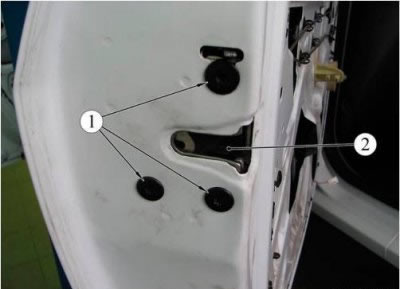
Figure 5-5 - Rear door lock mounting: 1 - rear door lock mounting bolt; 2 - rear door lock
Overcoming the resistance of the holders remove the molding 3 (see figure 4-9) back door.
Unscrew the two nuts 3, Figure 5-6, securing the limiter 2 to the door (replacement head 10, ratchet).
Remove the protective cover, 4 wire harnesses and wire harness from the door.
Unscrew the four nuts 1 securing the door to the hinge, remove the rear door (the operation should be performed with an assistant) (spanner 13).
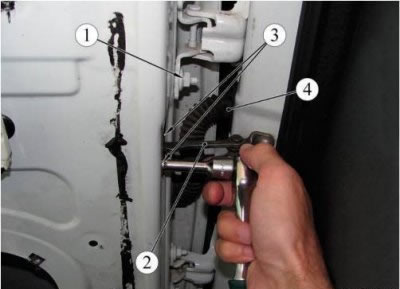
Figure 5-6 - Rear door mounting: 1 - door fastening nut to the hinge; 2 - door opening limiter; 3 - nut for fastening the limiter to the door; 4 - protective cover for wiring harness
Installation
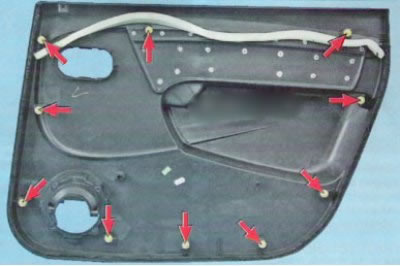
Location of the left rear door trim fastening clips (view from the inside)
Installation of units and parts is carried out in the reverse order of removal, while:
- lubricate the rubbing parts of the window lifter, sliding surfaces in the door lock, door opening limiter, rod and hinge joints (cIATIM-201 grease, consumption rate - 5 g);
- before installing the trim, connect the ground wire terminal to the battery, check and, if necessary, adjust the operation of the door lock, temporarily install the window lifter handle, check the operation of the window lifter, lift the lowering window up;
- if necessary, restore or replace the sealing gasket on the end of the trim;
- ensure a uniform gap between the door and the mating body panels.