



Attention! First and foremost, pay close attention to the road! The driver bears full responsibility for road safety. Use the radio so that the car remains under your control in any situation!
2.1 Getting Started
2.1.1 To turn on the radio, press the knob 5 (figure 1). To turn off, press knob 5 (figure 1) and hold it down for more than 2 seconds. To reset, hold down knob 5 (figure 1) before the appearance of the LADA logo.
Attention!
a) To prevent an accident while driving:
- do not tune the radio receiver;
- Do not make the sound too loud, as this may interfere with the perception of sound signals from other cars.
b) Avoid parking the vehicle in areas exposed to direct sunlight, which may cause the interior temperature to rise excessively. Allow the interior temperature to cool before starting playback.
c) The radio receiver is designed to operate at ambient temperatures from -20°C to +70°C. Before use, the temperature inside the vehicle must be within acceptable limits.
d) The radio receiver is designed to be connected to the vehicle's 12 V on-board network with a minus on the body. Do not connect the radio to vehicles with different power voltage.
d) USB and SD connectors are designed for connecting SD cards and USB flash drives. Connecting other devices may damage the radio or the connected device.
2.2 Turning off the sound
2.2.1 To turn off the sound, press the MUTE button (figure 1). To turn the sound back on, press the button again or turn the volume control knob.
2.3 MODE button
2.3.1 MODE button (figure 1) serves to switch the operating modes of the radio receiver, while only active modes will be displayed.
For example, if an SD card is inserted and it only contains video recordings, then using the MODE button you can enter the "Video" mode, but you cannot enter the "Audio" or "Photo" mode.
2.4 Volume control
The volume is adjusted by turning knob 5 to the right or left (figure 1).
2.5 Main menu
2.5.1 After the first time the radio is turned on or rebooted, the main menu is displayed on the radio display (figure 2).
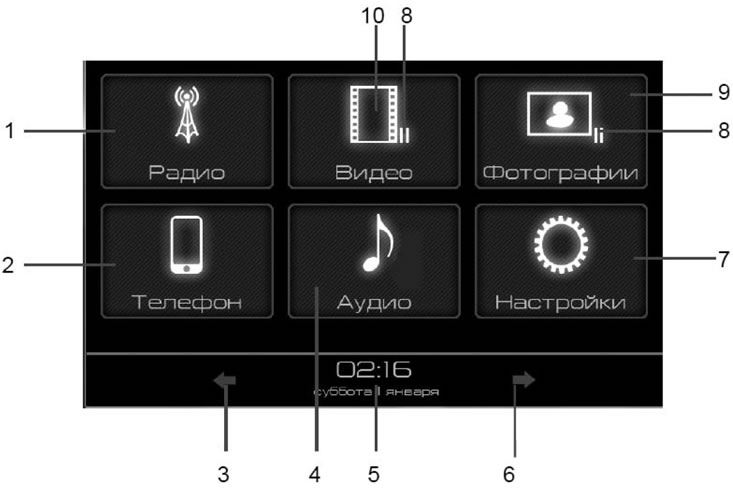
Figure 2. Main menu window
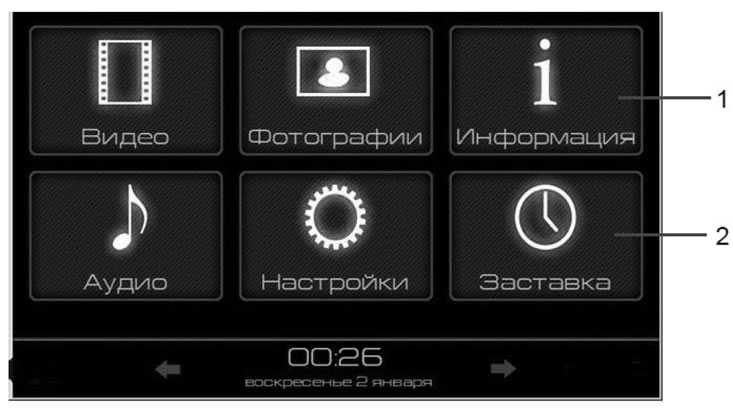
Figure 2.1. Main menu window (continuation)
2.5.2 By successively pressing the MODE button (figure 1) or by pressing the buttons displayed on the display, select the desired mode.
- 1 - Radio - switch to radio reception mode.
- 2 - Phone - switch to mobile phone mode.
- 3 - Go to the main menu.
- 4 - Audio - switch to audio file playback mode.
- 5 - Date, time.
- 6 - Go to the additional on-screen menu.
- 7 - Settings - go to the settings selection menu.
- 8 - Mode pause indicator¹.
- 9 - Photos - switch to image viewing mode.
- 10 - Video - switch to video file viewing mode.
¹ These indicators appear in the operating modes: "Audio", "Video", "Photos".
1. Information - displays information about the radio receiver software versions.
2. Screensaver - displaying the clock readings in the size of the display screen.
2.5.3 When the radio receiver is operating in different modes, the following information is displayed on the bottom panel of the screen, under the red line: date, time, information about the phone connected via Bluetooth®, and a sound mute indicator.
2.6 Installing and removing the memory card
2.6.1 Installing a memory card
Insert the memory card into the card reader with the beveled corner forward and up until it locks into place.
2.6.2 Removing the memory card
Click on the inserted memory card. The memory card "pops out".