



Open the hood and disconnect the ground wire terminal from the battery (spanner 10).
Loosen the front wheel mounting bolts and lift the vehicle (replacement head 17, extension, impact wrench).
Loosen the front wheel mounting bolts and remove the wheel (replacement head 17, extension, impact wrench).
Remove the front bumper in accordance with the requirements of Section 1 of this TI.
Loosen the headlight mounting bolts and remove the headlight in accordance with the requirements of TI 3100.25100.20597.
Loosen the three screws 6, Figure 7-1, securing the front wheel mudguard (torx T20 replaceable head, ratchet).
Remove the piston 7 securing the shield 2 of the front wing to the wing (flat head screwdriver).
Unscrew the clamp 5 of the shield fastening (flat head screwdriver).
Remove the 4 front fender shield holders and remove the shield (flat head screwdriver).
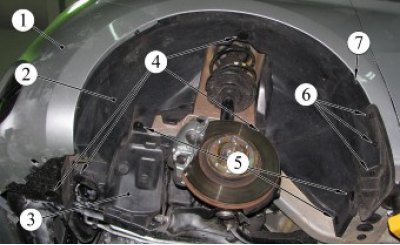
Figure 7-1 - Fastening the front fender shield: 1 - bumper: 2 - front wing shield; 3 - mudguard; 4 - Front fender shield holders; 5 - Front fender shield retainer; 6 - screw for fastening the front wheel mudguard; 7 - piston for fastening the front wing shield to the wing
Unscrew nut 2, figure 7-2, fastening the rear part of the front wing 3 (spanner 10).
Loosen bolt 1 securing the front part of the front wing to the side member bracket (replacement head 10, ratchet).
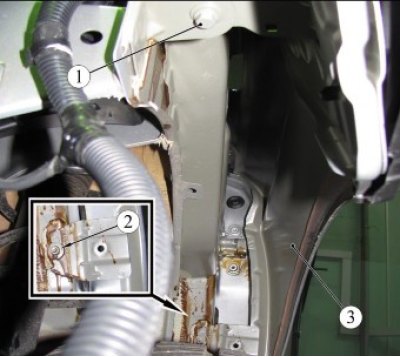
Figure 7-2 - Front Fender Fastening: 1 - front wing front mounting bolt; 2 - nut for fastening the rear part of the front wing; 3 - front wing
Information taken from the website: LadaMan.ru
Loosen bolt 4, Figure 7-3, of the lower fastening of the rear part of the front wing 2 (replacement head 10, ratchet).
Open the front door 1 and loosen the nut 3 securing the rear part of the front wing by several turns (spanner 10).
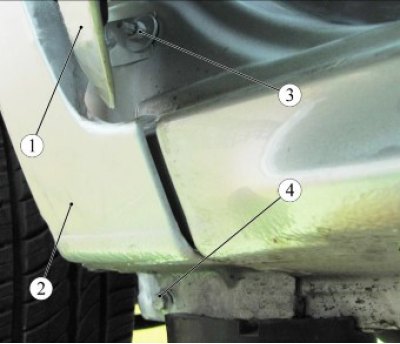
Figure 7-3 - Front fender rear lower mount: 1 - front door: 2 - front wing; 3 - lower front wing rear mounting nut; 4 - front wing lower mounting bolt
Loosen screw 5, Figure 7-4, fastening decorative trim 1 of front wing 2, remove the trim (torxT20 replaceable head, extension, ratchet).
Loosen nut 3 of the upper fastening of the rear part of the front wing by several turns (spanner 10).
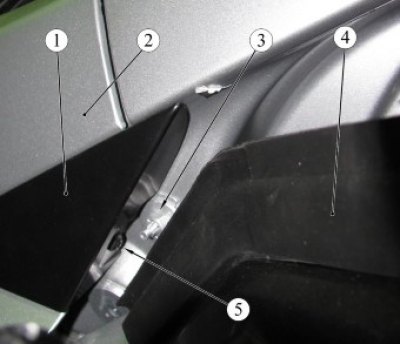
Figure 7-4 - Front fender rear upper mount: 1 - decorative trim of the front wing: 2 - front wing; 3 - Upper nut of the rear fastening of the front wing; 4 - front door; 5 - decorative trim fastening screw
Unscrew the three bolts 1, Figure 7-5, of the upper fastening of the front wing 2 to the body, remove the wing (replacement head 10, ratchet).
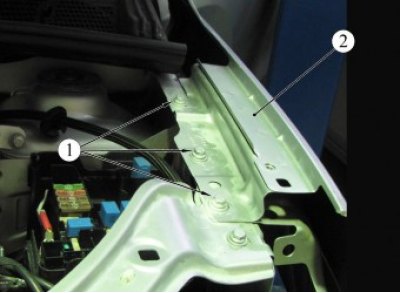
Figure 7-5 - Upper front wing mount: 1 - front wing mounting bolt; 2 - front wing
Install the front wing in the reverse order of removal, while;
- install and pre-tighten the wing mounting bolts (spanner 10, replaceable head 10, extension, ratchet).
- adjust the gaps (ensure uniform gaps) between the front wing, hood and front door (ruler, rubber hammer).
- perform final tightening of the wing mounting bolts, ensuring the requirements for the mating of the wing with the body panels (spanner 10, replaceable head 10, extension, ratchet).
Present the vehicle to the Quality Control Department. The Quality Control Department will check the vehicle for compliance with the requirements of this TI and TU 017200-254-0023934 in the scope of work performed.