
Car repair AvtoVAZ Car repair Renault Car repair Hyundai Car repair Ford Car repair Volkswagen Car repair Audi Car repair Chevrolet
English Русский
Български
Беларускі
Український
Српски
Hrvatski
Română
Polski
Slovenský
Magyar
articles sitemap contacts bookmark
LadaMan.ru


Kalina Granta Priora Vesta Largus XRAY
X-Ray 1 (2015-2022)

Hood, its parts and mechanisms — removal and installation (XRAY 1)

  • Main
  • XRAY
  • X-Ray 1
  • Body and interior
  • Exterior (external elements)
  • Hood, its parts and mechanisms — removal and installation
0
Place the vehicle in the work area. Open the hood and disconnect the ground wire terminal from the battery (spanner 10).

Disconnect tube 2, Figure 6-1, of the washer jets from the washer pump tube fitting.

Loosen the 4 bolts securing the hood to the hinges, remove the hood, perform the work with an assistant (replacement head 10, ratchet).
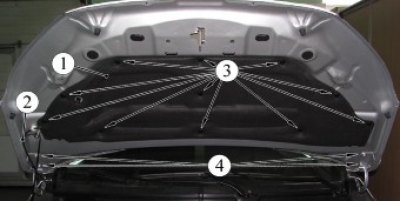
Figure 6-1 - Hood: 1 - hood trim; 2 - washer jet tube; 3 - Hood trim button; 4 - hood fastening…

Figure 6-1 - Hood: 1 - hood trim; 2 - washer jet tube; 3 - Hood trim button; 4 - hood fastening bolt to the hinge


If it is necessary to remove the bonnet hinge: remove the corresponding front wing, in accordance with the requirements of Section 7 of this TI; unscrew two bolts; remove the loop (replaceable head 10 or TorxT30, ratchet).

Remove buttons 3, remove trim 1 of the hood (device type 12770 f. "Stahlwille").

Disconnect the washer jet tube from the jets and remove the tube from the holders on the hood.

Squeeze the tabs and remove the windshield washer nozzle from the hole in the hood panel (pliers).

Remove the hood stop, washer tube holders, hood stops, plugs, hood buffers (flat head screwdriver).

Removing the hood lock is done with the front bumper removed. Removal and installation of the front bumper must be carried out in accordance with Section 1 of this TI.


Disconnect the hood lock wiring harness connector from the front wiring harness

Unscrew two nuts 2, Figure 6-2, remove the hood lock 1, disconnect the drive rod from it (replacement head 13, extension, ratchet).
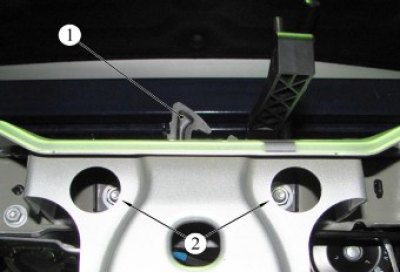
Figure 6-2 - Hood Lock: 1 - hood lock; 2 - bonnet lock fastening nut

Figure 6-2 - Hood Lock: 1 - hood lock; 2 - bonnet lock fastening nut


The installation of the hood, its parts and mechanisms is carried out in the reverse order of removal, while:
  • ensure uniformity of the gap between the hood and mating body panels;
  • lubricate the rubbing surfaces of the lock and rod. Movable parts must move freely without jamming (lSC-15 grease, consumption rate - 5 g);
  • adjust the position of the hood lock to ensure that the hood closes securely;
  • adjust the length of the hood rod so that when the hood is closed, the handle of the lock drive touches the stop on the bracket;
  • the hood hook must securely hold the hood when the latch is open.

Present the vehicle to the Quality Control Department. The Quality Control Department will check the vehicle for compliance with the requirements of this TI, TU 017200-255-0023934 in the scope of work performed.


This article is available at russian, bulgarian, belarusian, ukrainian, serbian, croatian, romanian, polish, slovak, hungarian
This article has been reviewed: Daniil Markelov
Share with friends:
◀ Previous
Lada X-Ray 1: Exterior (external elements)
Next ▶

Tailgate and its mechanisms — removal and installation
Rear door right and left — removal and installation
Front door right and left — removal and installation
Rear bumper — removal and installation
Front bumper — removal and installation
Front wing — removal and installation
Windscreen wiper — removal and installation
More articles with information from manuals for Lada:

• The hood lock does not open Lada Kalina Hatchback (2004-2013, VAZ-1119)
• Opening the hood Lada Granta 1 (2011-2023, VAZ-2190)
• Hood — opening and closing Lada Priora 1 (2007-2018, VAZ-2170)
• Opening the hood Lada Vesta 1 (2015-2023, VAZ-2180)
• Hood and its mechanisms — removal and installation Lada Largus 1 (2012-2023)
Link to this article in various formats
Reviews and comments of visitors
No comments yet


Add up two numbers: 22 + 30


X-Ray 1 (2015-2022) 
  • General information
  • User manual
  • Maintenance
  • Daily care
  • Troubleshooting
  • Power unit
  • Engine repair
  • Fuel system
  • Cooling system
  • Repair H4M engine
  • Transmission
  • Clutch and drive shafts
  • Transmission
  • Chassis (running gear)
  • Front suspension
  • Rear suspension
  • Brake system
  • Steering
  • Body and interior
  • Exterior (external elements)
  • Interior (internal elements)
  • Electrical equipment
  • Equipment and devices
  • Lighting and signaling
LadaMan.ru © 2018–2026 | Mobile version | About Lada | Sitemap: EN BG BY UA RS HR RO PL SK HU | Contacts with admin | | Add to bookmarks
Kalina Hatchback (2004-2013) | Kalina Sedan (2004-2013) | Granta 1 (2011-2023) | Priora 1 (2007-2018) | Vesta 1 (2015-2023) | Largus 1 (2012-2023) | X-Ray 1 (2015-2022) |
This site uses cookies to ensure everything runs smoothly.