
Car repair AvtoVAZ Car repair Renault Car repair Hyundai Car repair Ford Car repair Volkswagen Car repair Audi Car repair Chevrolet
English Русский
Български
Беларускі
Український
Српски
Hrvatski
Română
Polski
Slovenský
Magyar
articles sitemap contacts bookmark
LadaMan.ru


Kalina Granta Priora Vesta Largus XRAY
Priora 1 (2007-2018, VAZ-2170)

Features of the heater design (Priora 2170)

  • Main
  • Priora
  • Priora 1
  • Body and interior
  • Interior (internal elements)
  • Features of the heater design
0
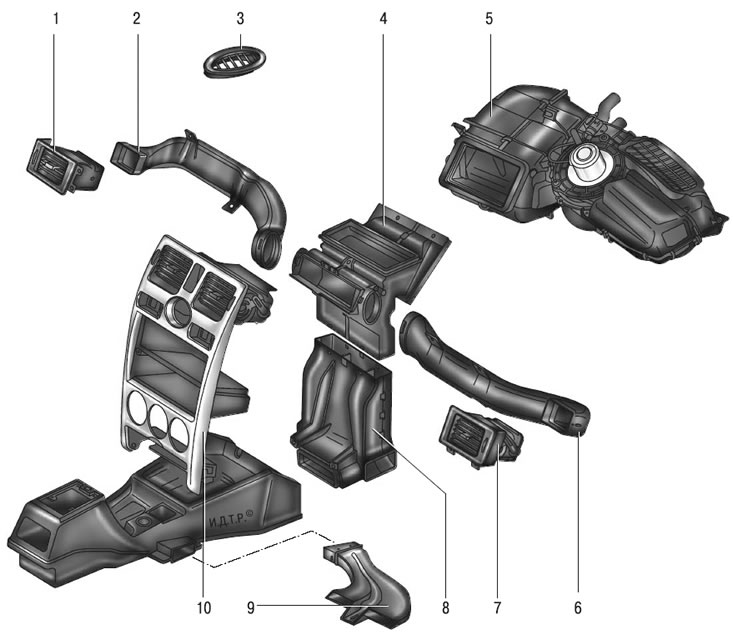
Figure 11.4. Vehicle interior ventilation and heating system: 1 – left side ventilation nozzle; 2 –…

Figure 11.4. Vehicle interior ventilation and heating system: 1 – left side ventilation nozzle; 2 – left ventilation air duct; 3 – side window heating nozzle; 4 – air heating distributor; 5 – heater; 6 – right ventilation duct; 7 – right side ventilation nozzle; 8 – foot heating air duct; 9 – cabin heating air duct; 10 – central ventilation nozzle


The car is equipped with a heater 5 (figure 11.4) liquid type, combined with the engine cooling system.

Main elements of the heater:
  • a heater heat exchanger (radiator) designed to heat the air entering the passenger compartment with the heat of the engine cooling liquid;
  • electric fan (supercharger), providing a controlled supply of outside air to the heater flaps;
  • a damper that regulates the temperature of the air coming from the heater into the passenger compartment, the position of which determines the amount of air passing through the heater heat exchanger and the outside air passing bypassing the heat exchanger;
  • 4 air heater distributor flaps, which distribute the air entering the passenger compartment from the heater through air ducts 2, 6, 8 and 9 or for blowing the windshield.


This article is available at russian, bulgarian, belarusian, ukrainian, serbian, croatian, romanian, polish, slovak, hungarian
This article has been reviewed: Vladislav Voloshin
Share with friends:
◀ Previous
Lada Priora 1: Interior (internal elements)
Next ▶

Disassembly and assembly of the instrument panel
Removal and installation the instrument panel
Removal and installation threshold trims
Removal the rear pillar trims
Removal and installation the luggage compartment shelf
Removal and installation the heater
Removal and installation the heater radiator
More articles with information from manuals for Lada:

• Features of the design of the engine power supply system Lada Kalina Sedan (2004-2013, VAZ-1118)
• Features of operation of a car with a fuel injection system Lada Granta 1 (2011-2023, VAZ-2190)
• Description of the design of the engine 21129 Lada Vesta 1 (2015-2023, VAZ-2180)
• Instrument panel design Lada Largus 1 (2012-2023)
• Rear suspension — design features Lada X-Ray 1 (2015-2022)
Link to this article in various formats
Reviews and comments of visitors
No comments yet


Add up two numbers: 23 + 42


Priora 1 (2007-2018) 
  • General information
  • Vehicle device
  • User manual
  • Faults en route
  • Maintenance
  • Power unit
  • Engine repair
  • Cooling and lubrication system
  • Supply system
  • Exhaust system
  • Transmission
  • Clutch
  • Car gearbox
  • Drive shafts
  • Chassis (running gear)
  • Car suspension
  • Steering
  • Brake system
  • Body and interior
  • Exterior (external elements)
  • Interior (internal elements)
  • Doors, locks and windows
  • Electrical equipment
  • Equipment and devices
  • Power devices
  • Lighting and signaling
  • Cooling and heating
  • Electrical circuits
LadaMan.ru © 2018–2026 | Mobile version | About Lada | Sitemap: EN BG BY UA RS HR RO PL SK HU | Contacts with admin | | Add to bookmarks
Kalina Hatchback (2004-2013) | Kalina Sedan (2004-2013) | Granta 1 (2011-2023) | Priora 1 (2007-2018) | Vesta 1 (2015-2023) | Largus 1 (2012-2023) | X-Ray 1 (2015-2022) |
This site uses cookies to ensure everything runs smoothly.