
Car repair AvtoVAZ Car repair Renault Car repair Hyundai Car repair Ford Car repair Volkswagen Car repair Audi Car repair Chevrolet
English Русский
Български
Беларускі
Український
Српски
Hrvatski
Română
Polski
Slovenský
Magyar
articles sitemap contacts bookmark
LadaMan.ru


Kalina Granta Priora Vesta Largus XRAY
X-Ray 1 (2015-2022)

Electric fuel pump module (EFP) — removal and installation (XRAY 1)

  • Main
  • XRAY
  • X-Ray 1
  • Power unit
  • Fuel system
  • Electric fuel pump module (EFP) — removal and installation
0
Contents: Removal ⇣ Installation ⇣

Removal


Place the vehicle in the work area and apply the parking brake. Fold the rear seat cushion forward.

Remove cover 1, Figure 8-1, of the fuel pump hatch.
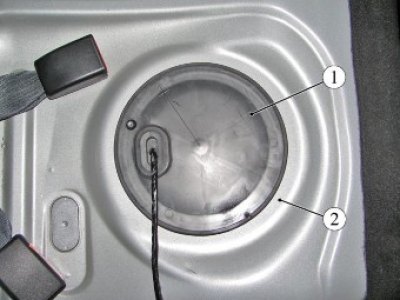
Figure 8-1 - Fuel pump hatch cover: 1 - fuel pump hatch cover; 2 - rear floor panel

Figure 8-1 - Fuel pump hatch cover: 1 - fuel pump hatch cover; 2 - rear floor panel


Disconnect connector 1, Figure 8-2, of the rear wiring harness from the MEBN 2.
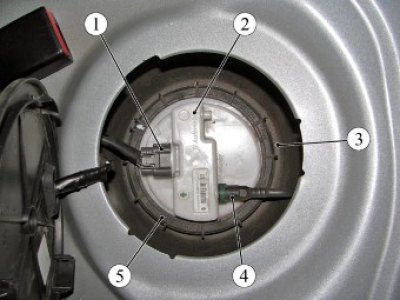
Figure 8-2 - Electric fuel pump module (EFP): 1 - rear wiring harness block to MEBN; 2 - MEBN; 3 -…

Figure 8-2 - Electric fuel pump module (EFP): 1 - rear wiring harness block to MEBN; 2 - MEBN; 3 - fuel tank; 4 - fuel pipe tip; 5 - pressure ring


Start the engine and let it run at idle speed until it stops completely to relieve pressure in the fuel system, ensuring the removal of exhaust gases (exhaust reel with fan type SERF/SP). Turn off the ignition.

Disconnect the ground wire terminal from the battery (spanner 10).


Press the spring clamps of the tip of tube 4 of the rear fuel line and, by moving along the axis of the fitting, disconnect the tube from the MEBN 1.

Turn the clamping ring 5 counterclockwise, remove the ring and the MEBN (key 67.7812-9704 L for removing and installing the clamping ring MEBN).

Remove the sealing ring.

Installation


Attention. Check the condition of the sealing ring and the nut securing the electric fuel pump, replace if necessary.

Install the sealing ring into the groove on the fuel tank 3.

Install the MEBN 2, Figure 8-2, into the fuel tank 3, aligning the marks.

Install the clamping ring 5 and turn it clockwise, aligning the mark on the clamping ring with the mark on the fuel tank (key 67.7812-9704 L for removing and installing the clamping ring MEBN).

Connect the rear fuel line tube 4 to the MEBN by moving it along the axis of the fitting until the spring lock of the connector clicks. Check the reliability of the tube fixation.

Connect block 1 of the rear wiring harness to the MEBN.

Install cover 1, Figure 8-1, of the fuel pump hatch.

Lower the rear seat cushion.

Connect the ground wire terminal to the battery in accordance with the requirements of TI 3100.25100.20597.


This article is available at russian, bulgarian, belarusian, ukrainian, serbian, croatian, romanian, polish, slovak, hungarian
This article has been reviewed: Daniil Markelov
Share with friends:
 
Lada X-Ray 1: Fuel system
Next ▶

 
Fuel tank — removal and installation
Engine Fuel Line — removal and installation
Fuel vapor recovery system steam lines
Engine Evaporative Canister Purge Valve — removal and installation
Engine Intake Module — removal and installation
More articles with information from manuals for Lada:

• Fuel module — removal and installation Lada Kalina Hatchback (2004-2013, VAZ-1119)
• Fuel module — removal and installation Lada Granta 1 (2011-2023, VAZ-2190)
• Removal and installation the fuel pump Lada Priora 1 (2007-2018, VAZ-2170)
• Fuel Module — Fuel Pump Replacement Lada Vesta 1 (2015-2023, VAZ-2180)
• Electric fuel pump module (EFP) — removal and installation Lada Largus 1 (2012-2023)
Link to this article in various formats
Reviews and comments of visitors
No comments yet


Add up two numbers: 24 + 21


X-Ray 1 (2015-2022) 
  • General information
  • User manual
  • Maintenance
  • Daily care
  • Troubleshooting
  • Power unit
  • Engine repair
  • Fuel system
  • Cooling system
  • Repair H4M engine
  • Transmission
  • Clutch and drive shafts
  • Transmission
  • Chassis (running gear)
  • Front suspension
  • Rear suspension
  • Brake system
  • Steering
  • Body and interior
  • Exterior (external elements)
  • Interior (internal elements)
  • Electrical equipment
  • Equipment and devices
  • Lighting and signaling
LadaMan.ru © 2018–2026 | Mobile version | About Lada | Sitemap: EN BG BY UA RS HR RO PL SK HU | Contacts with admin | | Add to bookmarks
Kalina Hatchback (2004-2013) | Kalina Sedan (2004-2013) | Granta 1 (2011-2023) | Priora 1 (2007-2018) | Vesta 1 (2015-2023) | Largus 1 (2012-2023) | X-Ray 1 (2015-2022) |
This site uses cookies to ensure everything runs smoothly.