



Removal
Place the vehicle in the work area, apply the parking brake, and turn off the ignition. Raise the hood, disconnect the ground wire terminal from the battery (spanner 10).
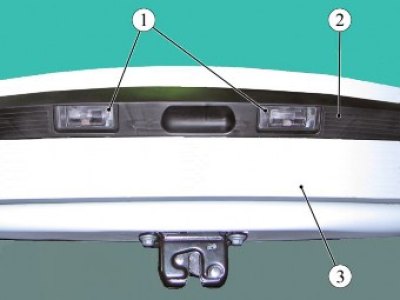
Figure 13-1 - Installing license plate lights on a vehicle: 1 - license plate light; 2 - trunk lid trim; 3 - trunk lid
The light is held in the socket of the trunk lid trim by a retainer and a spring latch.
Insert a flat-head screwdriver into the slot on the left side of lamp 1, Figure 13-1, carefully move it to the right, disengage the lock and remove the license plate light from the socket in trim 2 of the trunk lid (flat head screwdriver).
Disconnect block 1, Figure 13-2, of the rear additional wiring harness from socket 2 and remove lamp 4 for illuminating the license plate.
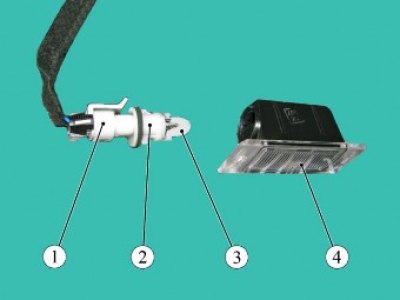
Figure 13-2 - License plate light: 1 - rear additional wiring harness connector; 2 - cartridge; 3 - W5W lamp; 4 - license plate light
Replacing the lamp
To replace the license plate light bulb, you must:
- remove lamp 1, figure 13-1, of the license plate light from the socket in trim 2 of the trunk lid 3 (flat head screwdriver);
- turn the socket 2, figure 13-2, counterclockwise and remove it together with the lamp from the housing of the license plate light 4;
- remove lamp 3 from the socket by pulling it towards you.
Install a new lamp in the license plate light in the reverse order of removal. The type of lamp to be installed is W5W.
Installation
Install lamp 1, Figure 13-1, for the license plate light in the reverse order of removal. When installing, ensure that the license plate light is securely fixed in the socket of the trunk lid trim.
Present the vehicle to the Quality Control Department. The Quality Control Department will check the vehicle for compliance with the requirements of TU 017200-254-00232934, paragraphs 1.19.21.3, 1.19.21.6 in the scope of work performed.