
Car repair AvtoVAZ Car repair Renault Car repair Hyundai Car repair Ford Car repair Volkswagen Car repair Audi Car repair Chevrolet
English Русский
Български
Беларускі
Український
Српски
Hrvatski
Română
Polski
Slovenský
Magyar
articles sitemap contacts bookmark
LadaMan.ru


Kalina Granta Priora Vesta Largus XRAY
X-Ray 1 (2015-2022)

Trunk light — removal and installation and replacement of the lamp (XRAY 1)

  • Main
  • XRAY
  • X-Ray 1
  • Electrical equipment
  • Lighting and signaling
  • Trunk light — removal and installation and replacement of the lamp
0
Contents: Removal ⇣ Replacing the lamp ⇣ Installation ⇣

Removal


Place the vehicle in a work area, apply the parking brake, turn off the ignition, lift the hood, and disconnect the ground wire from the battery (spanner 10).

Open the trunk lid.

Lamp 1, figure 14-1, of the trunk lighting is held by a retainer and a spring latch in the socket of panel 2 of the rear shelf.
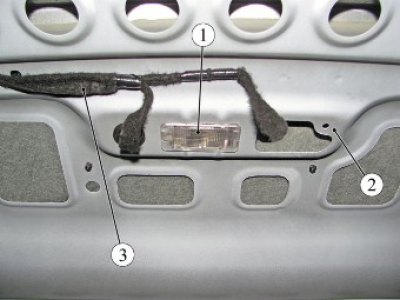
Figure 14-1 - Installing the trunk light on the vehicle: 1 - trunk light; 2 - rear shelf panel; 3 -…

Figure 14-1 - Installing the trunk light on the vehicle: 1 - trunk light; 2 - rear shelf panel; 3 - rear additional wiring harness


Insert a flat-head screwdriver into the slot on the right side of the trunk light, carefully press the light housing and remove it from the socket in the rear shelf panel (flat head screwdriver).

Disconnect connector 1, Figure 14-2, of the rear additional wiring harness from the connector and remove trunk light 2.
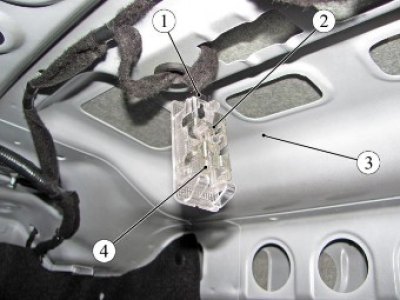
Figure 14-2 - Replacing the trunk light bulb: 1 - rear additional wiring harness connector; 2 -…

Figure 14-2 - Replacing the trunk light bulb: 1 - rear additional wiring harness connector; 2 - trunk light; 3 - rear shelf panel; 4 - W5W lamp


Replacing the lamp


To replace the trunk light bulb, you need to:
  • remove the lamp 2, figure 14-2, of the trunk lighting from the socket of the panel 3 of the rear shelf (flat head screwdriver);
  • remove lamp 4 from the spring contacts of the trunk light (flat head screwdriver).

Install a new lamp in the trunk light in the reverse order of removal. The type of lamp to be installed is W5W.

Installation


Install the lamp 1, Figure 14-1, for the trunk lighting in the reverse order of removal. When installing, ensure that the lamp is securely fixed in the socket of the rear shelf panel.

Present the vehicle to the Quality Control Department. The Quality Control Department will check the vehicle for compliance with the requirements of TU 017200-254-00232934, paragraphs 1.19.21.3, 1.19.21.6 in the scope of work performed.


This article is available at russian, bulgarian, belarusian, ukrainian, serbian, croatian, romanian, polish, slovak, hungarian
This article has been reviewed: Daniil Markelov
Share with friends:
◀ Previous
Lada X-Ray 1: Lighting and signaling
Next ▶

License Plate Light — removal and installation and bulb replacement
Additional brake light — removal and installation
Rear fog light — removal and installation
Rear outer light (on the rear wing)
Side direction indicator — removal and installation
Glove compartment light
Interior light — removal and installation
Sound signaling device — removal and installation
More articles with information from manuals for Lada:

• The battery charge indicator lamp does not light when the ignition is… Lada Kalina Hatchback (2004-2013, VAZ-1119)
• Trunk light — removal, replacement of the bulb and installation Lada Granta 1 (2011-2023, VAZ-2190)
• Trunk lid Lada Priora 1 (2007-2018, VAZ-2170)
• Opening the trunk Lada Vesta 1 (2015-2023, VAZ-2180)
• Additional brake light, trunk light Lada Largus 1 (2012-2023)
Link to this article in various formats
Reviews and comments of visitors
No comments yet


Add up two numbers: 20 + 32


X-Ray 1 (2015-2022) 
  • General information
  • User manual
  • Maintenance
  • Daily care
  • Troubleshooting
  • Power unit
  • Engine repair
  • Fuel system
  • Cooling system
  • Repair H4M engine
  • Transmission
  • Clutch and drive shafts
  • Transmission
  • Chassis (running gear)
  • Front suspension
  • Rear suspension
  • Brake system
  • Steering
  • Body and interior
  • Exterior (external elements)
  • Interior (internal elements)
  • Electrical equipment
  • Equipment and devices
  • Lighting and signaling
LadaMan.ru © 2018–2026 | Mobile version | About Lada | Sitemap: EN BG BY UA RS HR RO PL SK HU | Contacts with admin | | Add to bookmarks
Kalina Hatchback (2004-2013) | Kalina Sedan (2004-2013) | Granta 1 (2011-2023) | Priora 1 (2007-2018) | Vesta 1 (2015-2023) | Largus 1 (2012-2023) | X-Ray 1 (2015-2022) |
This site uses cookies to ensure everything runs smoothly.