



Removal
Place the vehicle in the work area, apply the parking brake, and turn off the ignition. Raise the hood, disconnect the ground wire terminal from the battery (spanner 10).
Open the trunk lid.
Open the window in the trim 1, Figure 10-1, of the trunk at the location where the rear light is attached.
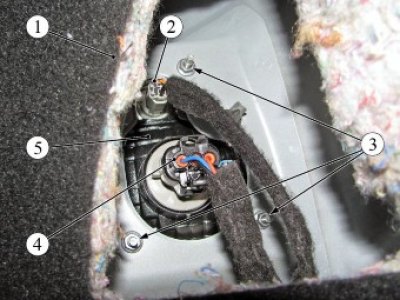
Figure 10-1 - Fastening the outer rear light (view from the trunk): 1 - trunk trim; 2 - connector of the rear wiring harness to the turn signal lamp; 3 - nut for fastening the outer rear light; 4 - connector of the rear wiring harness to the brake light / parking light lamp; 5 - outer rear light
Disconnect pads 2 and 4 of the rear wiring harness from the outer rear light.
Unscrew the three nuts 3 securing the outer rear light to the car body (8 mm socket head, ratchet wrench, extension).
Carefully, overcoming the resistance of the side retainer, remove lamp 1, Figure 10-2, rear outer assembly with the retainer.
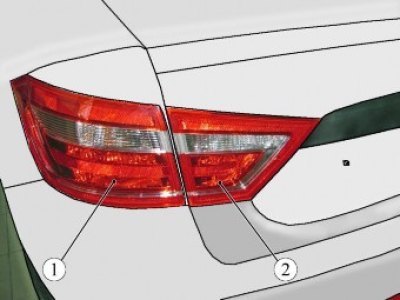
Figure 10-2 - Rear lights: 1 - outer rear light; 2 - rear inner light
Installation
Install the outer rear light in the reverse order of removal. When installing, ensure:
- insertion of retainer 2, Figure 10-3, into the hole in the rear wing;
- sealing the lantern at the junction with the body.
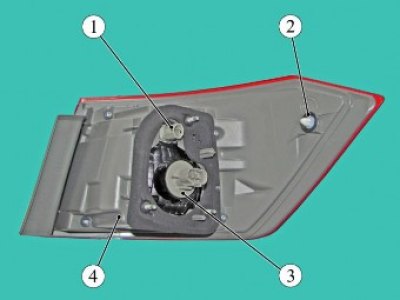
Figure 10-3 - Location of lamps and retainer on the rear side light: 1 - direction indicator lamp socket; 2 - retainer; 3 - Brake light/side light bulb socket; 4 - outer rear light
Tightening torque of nuts 2...3 Nm (0.2...0.3 kgf·m) (replaceable head 8, extension, torque wrench).
Replacing lamps
To replace the turn signal lamp on the outer lamp 1, Figure 10-2, located on the vehicle wing, you must:
- open the window in the trunk lining, providing access to the turn signal lamp socket;
- turn the cartridge 1, figure 10-3, counterclockwise and remove it from the seat together with the lamp;
- remove the lamp from the socket by pulling it towards you.
To replace the brake light/side light bulb on the exterior light located on the wing of the vehicle, you must:
- open the window in the trunk lining, providing access to the brake light/side light bulb socket;
- turn the cartridge 3 counterclockwise and remove it from the seat together with the lamp;
- remove the lamp from the socket by turning it counterclockwise.
Install new lamps in the outer rear lights in the reverse order of removal. The type of lamp to be installed must comply with Table 2.
Installation
Install the rear inner light in the reverse order of removal.
When installing, ensure that the light is sealed at the junction with the trunk lid.
Tightening torque of nuts 2...3 Nm (0.2...0.3 kgf·m) (replaceable head 8, extension, torque wrench).
Replacing lamps
For replacement side light bulbs on the interior light located on the trunk lid, it is necessary:
- remove 10 buttons 2, figure 10-4, trim fastenings and remove trim 3 of the trunk lid (device type 12770 f. "Stahlwille" or a flat screwdriver);
- turn cartridge 1 counterclockwise and remove it from the seat together with the lamp;
- remove the lamp from the socket by pulling it towards you.
For replacement reversing light bulbs on the internal lamp 2, Figure 10-2, located on the trunk lid, it is necessary:
- remove 10 buttons 2, figure 10-4, trim fastenings and remove trim 3 of the trunk lid (device type 12770 f. "Stahlwille" or a flat screwdriver);
- turn cartridge 1 counterclockwise and remove it from the seat together with the lamp;
- remove the lamp from the socket by pulling it towards you.
Install new lamps in the rear inner lights in the reverse order of removal. The type of lamp installed must correspond to Table 2.
Table 2
Place of installation of the lamp | Lamp type |
Outer rear light: | |
turn signal lamp | WY16W |
brake light/side light lamp | P21/5W |
Rear inner light: | |
reverse light | W16W |
parking light bulb | W5W |
Present the vehicle to the Quality Control Department. The Quality Control Department will check the vehicle for compliance with the requirements of this instruction and TU 017200-254-00232934 pp. 1.19.21.3, 1.19.21.6 in the scope of work performed.