



Removal
Place the vehicle in the work area, apply the parking brake, and turn off the ignition. Raise the hood, disconnect the ground wire terminal from the battery (spanner 10).
Remove the front bumper in accordance with the requirements of TI 3100.25100.20599.
Unscrew the four bolts 1, Figures 7-1 and 7-2, securing the headlight and disconnect the headlight from the car body (replacement head 10, extension, ratchet wrench).
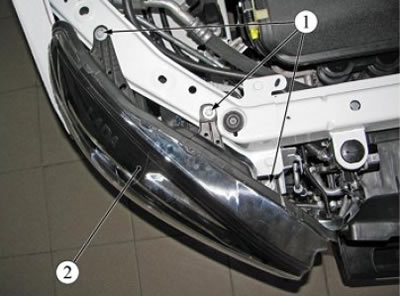
Figure 7-1 - Upper headlight mount: I - bolt; 2 - headlight
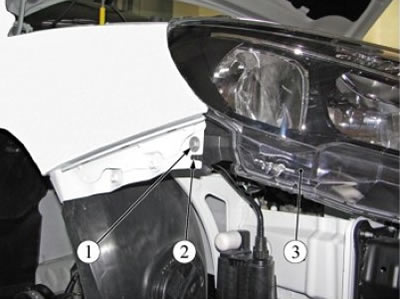
Figure 7-2 - Side mount headlight: 1 - bolt; 2 - guide: 3 - headlight
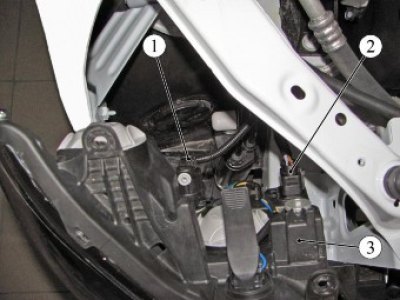
Figure 7-3 - Wiring harness connectors to the headlight: 1 - Wiring harness connector to headlight corrector; 2 - Wiring harness block for incandescent lamps; 3 - headlight
Installation
Install the headlight in the reverse order of removal.
When installing, ensure that the gaps between the headlight and the mating parts are uniform.
Tightening torque of bolts 1, figures 7-1 and 7-2, headlight fastenings 3...5 N·m (0.3...0.5 kgf·m) (replaceable head 10, extension, torque wrench).
Install the front bumper in accordance with the requirements of TI 3100.25100.20599.
Adjust the direction of the headlight beam in accordance with the requirements of TI 3100.25100.13054.
Replacing lamps
The headlight bulbs are replaced from the engine compartment without removing the headlight from the vehicle.
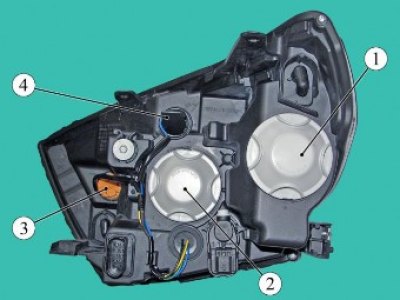
Figure 7-4 - Location of lamps in the headlight: 1 - High beam lamp cover; 2 - low beam lamp cover; 3 - direction indicator lamp socket; 4 - daytime running light and side light bulb socket
To replace the high beam lamp you need to:
- remove cover 1, figure 7-4, by turning it counterclockwise;
- disconnect connector 5, figure 7-5, of the wiring harness from lamp 4;
- remove the spring retainer 6 from the grooves;
- remove the lamp.
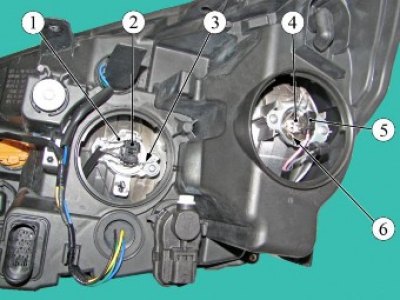
Figure 7-5 - Replacing the bulbs in the headlight: 1 - low beam lamp; 2 - wiring harness block to the low beam lamp; 3 - spring clip for mounting the low beam lamp; 4 - high beam lamp; 5 - wiring harness connector to the high beam lamp; 6 - spring clip for fastening the high beam lamp
To replace the low beam lamp, you need to:
- remove cover 2, figure 7-4, by turning it counterclockwise;
- disconnect connector 2, figure 7-5, wires from lamp 1;
- remove the spring retainer 3 from the grooves;
- remove the lamp.
To replace the turn signal lamp, you must:
- turn the cartridge 3, figure 7-4, counterclockwise and remove it from the seat together with the lamp;
- remove the lamp from the socket by turning it counterclockwise.
To replace the daytime running light and parking light bulbs, you must:
- turn the cartridge 4 counterclockwise and remove it from the seat together with the lamp;
- remove the lamp from the socket.
Install new lamps into the headlight in the reverse order of removal. The type of lamp to be installed must comply with Table 1.
Table 1
Place of installation of the lamp | Lamp type |
Headlight: | |
high beam lamp | H1 |
low beam lamp | H7 |
turn signal lamp | PY21W |
dRL and parking light lamp | W21/5W |
Present the vehicle to the Quality Control Department. The Quality Control Department will check the vehicle for compliance with the requirements of this instruction and TU 017200-254-00232934 pp. 1.19.21.3, 1.19.21.6 in the scope of work performed.