
Car repair AvtoVAZ Car repair Renault Car repair Hyundai Car repair Ford Car repair Volkswagen Car repair Audi Car repair Chevrolet
English Русский
Български
Беларускі
Український
Српски
Hrvatski
Română
Polski
Slovenský
Magyar
articles sitemap contacts bookmark
LadaMan.ru


Kalina Granta Priora Vesta Largus XRAY
Largus 1 (2012-2023)

Replacing the bulbs in the headlight (Largus 1)

  • Main
  • Largus
  • Largus 1
  • Electrical equipment
  • Lighting and signaling
  • Replacing the bulbs in the headlight
0
Contents: Headlight bulb replacement (near and…⇣ Replacing the turn signal lamp ⇣ Replacing the parking light bulb ⇣
The procedure for replacing the right and left headlight bulbs is the same.

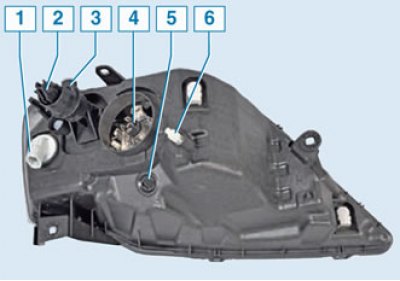
Location of lamps in the headlight: 1 – direction indicator lamp; 2 – headlight adjustment…

Location of lamps in the headlight: 1 – direction indicator lamp; 2 – headlight adjustment mechanism; 3 – screw for vertical adjustment of headlight beam; 4 – headlight bulb (near, far); 5 – side light lamp; 6 – handle for adjusting the headlight beam horizontally


Open the hood and disconnect the negative battery terminal.

Headlight bulb replacement (near and far) sveta


Headlight bulb H4 - halogen, two-filament.

Note: The headlights are equipped with halogen headlamps. A buffer gas - halogen vapor - is added to their cylinders (bromine or iodine), which increases the lamp life to 2000-4000 hours and allows to increase the temperature of the spiral. The working temperature of the spiral is approximately 3000°K. In a conventional lamp, the electric current passing through the tungsten spiral heats it to a high temperature. As it heats up, the coil begins to glow. However, due to the high operating temperature, tungsten atoms constantly evaporate from the surface of the coil and are deposited (condense) on cooler surfaces of the bulb, limiting the life of the lamp and causing it to darken. In a halogen lamp, the iodine surrounding the filament (together with residual oxygen) enters into a chemical combination with the evaporated tungsten atoms, preventing the latter from settling on the flask. This process is reversible: at high temperatures near the coil, the compound disintegrates into its constituent substances. Tungsten atoms are released either on the helix itself or near it. As a result, tungsten atoms return to the filament, which allows the lamp's operating temperature to be increased (to obtain brighter light) and extend its service life.


Turn the plastic cover, press the latch and remove it (in the photo, the headlight is extended from the cavity in the body for clarity).
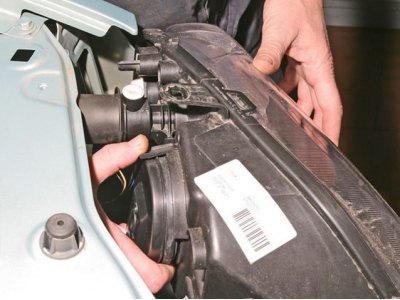
Turn the plastic cover, press the latch and remove it (in the photo, the headlight is extended from…


After pressing the lock, remove the wiring block from the lamp.
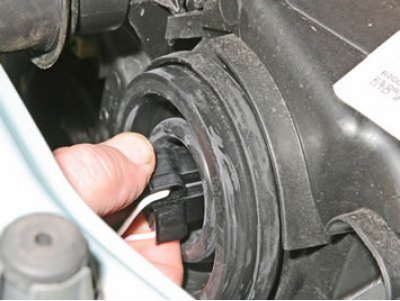
After pressing the lock, remove the wiring block from the lamp.


Pry the edge of the rubber sealing boot and remove it from the headlight.
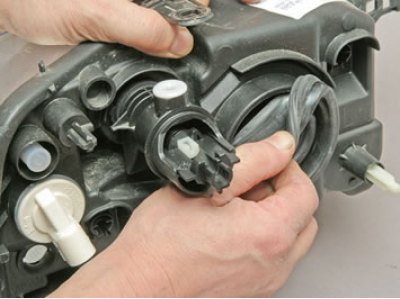
Pry the edge of the rubber sealing boot and remove it from the headlight.


Press the spring clip of the lamp to release it from engagement with the reflector.
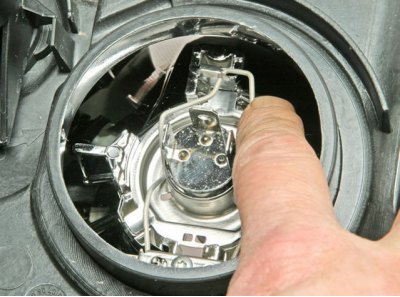


Press the spring clip of the lamp to release it from engagement with the reflector.


Lower the latch.
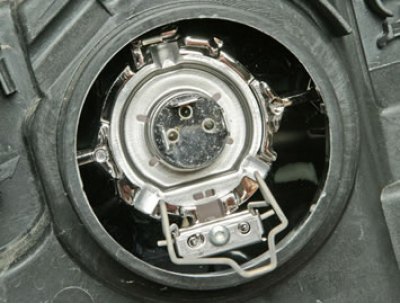
Lower the latch.


And remove the headlight bulb (near and far) light from the headlight housing.
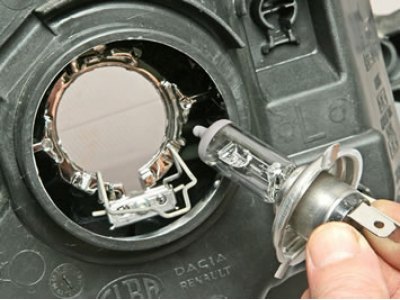
And remove the headlight bulb (near and far) light from the headlight housing.


And remove the headlight bulb (near and far) light from the headlight housing.


Insert the new bulb, secure it with the spring clip, install the rubber seal, attach the wiring connector to it and replace the plastic cover.


Replacing the turn signal lamp


Turn signal lamp PY21W (orange color).

Replacing the turn signal bulb in the front headlight without removing the fender liner or battery can be problematic due to difficult access. Some drivers can do this, some can't. If you can't make a replacement with direct access, follow these steps:

Jack up the car, remove the wheel, unscrew the two screws securing the mudguard liner from below to the bumper and one screw in the arch. Bend back the edge of the fender liner and place it behind the brake disc. Access is open.

Press the connector lock.
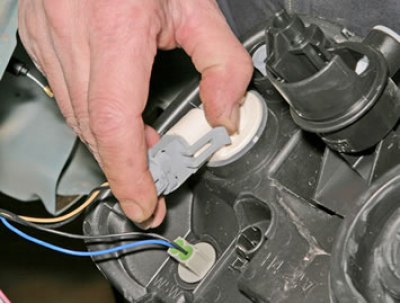
Press the connector lock.


And disconnect the wiring connector from the lamp socket.
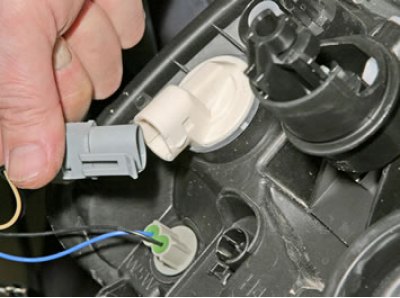
And disconnect the wiring connector from the lamp socket.


Grasp the socket, turn it and remove it from the headlight together with the bulb.
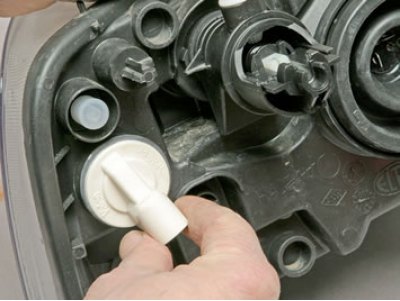


Grasp the socket, turn it and remove it from the headlight together with the bulb.


Press and turn the bulb to remove it from the socket.
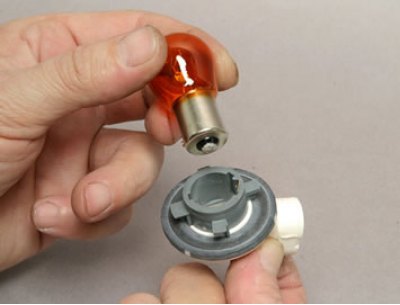
Press and turn the bulb to remove it from the socket.


Install the new lamp in reverse order.

Replacing the parking light bulb


Side light bulb - W5W.

Replacing a parking light bulb in a headlight directly can be problematic due to difficult access. Some drivers can do this, some can't, and some can only do it on one side. For an easy, albeit time-consuming, replacement, do the following:

Jack up the car, remove the wheel, unscrew the two screws securing the mudguard liner from below to the bumper and one screw in the arch. Bend back the edge of the fender liner and place it behind the brake disc. Access is open.

For convenience, you can disconnect the turn signal lamp connector (see above).

Turn the bulb socket (for the right headlight - counterclockwise, for the left - clockwise).
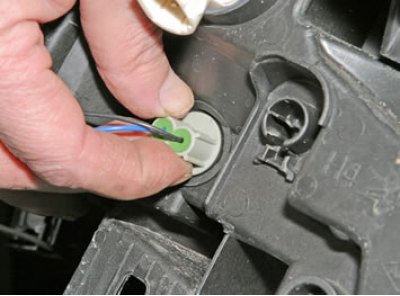


Turn the bulb socket (for the right headlight - counterclockwise, for the left - clockwise).


And remove it from the headlight housing.
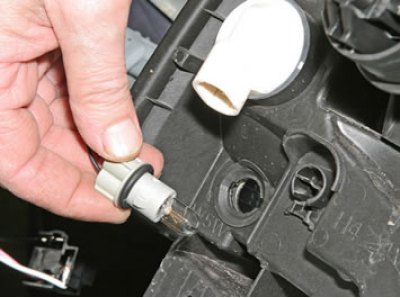
And remove it from the headlight housing.


Remove the baseless lamp from the socket and replace it with a new one.


This article is available at russian, bulgarian, belarusian, ukrainian, serbian, croatian, romanian, polish, slovak, hungarian
This article has been reviewed: Daniil Markelov
Share with friends:
◀ Previous
Lada Largus 1: Lighting and signaling
Next ▶

Adjusting the light of the main and fog lights
Headlight — removal and installation
Headlight corrector and corrector regulator — removal and installation
Replacing the fog light bulb
Replacing fog lights, adjusting light
Side direction indicator — removal, installation and replacement of the…
More articles with information from manuals for Lada:

• Headlight — replacing bulbs Lada Kalina Hatchback (2004-2013, VAZ-1119)
• Headlight — replacing bulbs Lada Granta 1 (2011-2023, VAZ-2190)
• Replacing the alternator drive belt Lada Priora 1 (2007-2018, VAZ-2170)
• Headlight — replacing bulbs Lada Vesta 1 (2015-2023, VAZ-2180)
• Bleeding the hydraulic brake system, replacing the fluid Lada X-Ray 1 (2015-2022)
Link to this article in various formats
Reviews and comments of visitors
No comments yet


Add up two numbers: 50 + 42


Largus 1 (2012-2023) 
  • General information
  • Vehicle device
  • User manual
  • Maintenance
  • Power unit
  • Engine repair
  • Cooling and lubrication system
  • Supply system
  • Ignition system
  • Exhaust system
  • Spare parts catalog
  • Transmission
  • Clutch
  • Car gearbox
  • Drive shafts
  • Spare parts catalog
  • Chassis (running gear)
  • Suspension and wheels
  • Steering
  • Brake system
  • Spare parts catalog
  • Body and interior
  • Exterior (external elements)
  • Interior (internal elements)
  • Doors, locks and windows
  • Heating and ventilation
  • Spare parts catalog
  • Electrical equipment
  • Equipment and devices
  • Power devices
  • Lighting and signaling
  • Spare parts catalog
  • Electrical circuits
LadaMan.ru © 2018–2026 | Mobile version | About Lada | Sitemap: EN BG BY UA RS HR RO PL SK HU | Contacts with admin | | Add to bookmarks
Kalina Hatchback (2004-2013) | Kalina Sedan (2004-2013) | Granta 1 (2011-2023) | Priora 1 (2007-2018) | Vesta 1 (2015-2023) | Largus 1 (2012-2023) | X-Ray 1 (2015-2022) |
This site uses cookies to ensure everything runs smoothly.