
Car repair AvtoVAZ Car repair Renault Car repair Hyundai Car repair Ford Car repair Volkswagen Car repair Audi Car repair Chevrolet
English Русский
Български
Беларускі
Український
Српски
Hrvatski
Română
Polski
Slovenský
Magyar
articles sitemap contacts bookmark
LadaMan.ru


Kalina Granta Priora Vesta Largus XRAY
Largus 1 (2012-2023)

Front suspension arm ball joint — removal and installation (Largus 1)

  • Main
  • Largus
  • Largus 1
  • Chassis (running gear)
  • Suspension and wheels
  • Front suspension arm ball joint — removal and installation
0
Contents: Removal ⇣ Installation ⇣
Please note: The ball joint of the front suspension arm can only be replaced once. For this purpose, the ball joints from spare parts are marked with the letter "R" and are equipped with a locking spring 4, Figure 6-1. A ball joint not marked with the letter "R" and without a locking spring is a standard part and can be replaced.

Part numbers: Spare ball joint (R), Lever assembly with ball joint.

The ball joint marked with the letter "R" and with a retaining spring is a replacement part and cannot be replaced. In addition, it should be borne in mind that by the time the second set of ball joints (R) wears out, the silent blocks of the lever will already be worn out. If it is necessary to replace the ball joint again replace front suspension arm assembly.
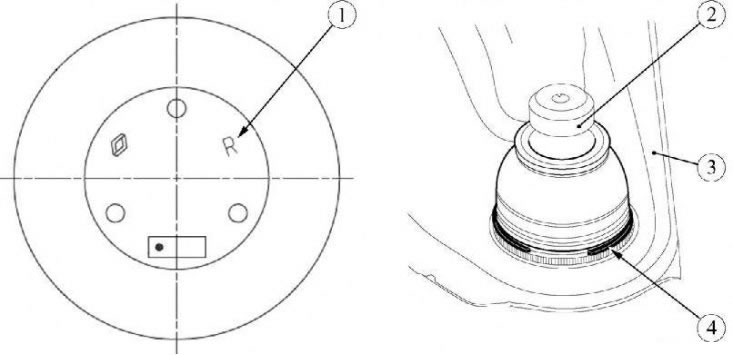
Figure 6-1 - Distinctive features of the ball joint supplied as spare parts: 1 - marking of the…

Figure 6-1 - Distinctive features of the ball joint supplied as spare parts: 1 - marking of the ball joint supplied as spare parts "R"; 2 - ball joint; 3 - front suspension arm; 4 - locking spring


Removal


Jack up or place the vehicle on a two-post lift, apply the parking brake and turn off the ignition.

Remove the front wheel.

Remove the front suspension arm (see here).


Clean the front suspension arm from dirt (metal brush).

Material was taken from the website LadaMan.ru

If there is no special equipment for pressing out.

Evenly (from different sides) we use a powerful slotted screwdriver to pry the support body under the flange and, leaning on the edge of the lever...
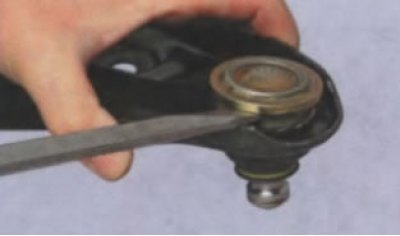
Evenly (from different sides) we use a powerful slotted screwdriver to pry the support body under…


...we press the ball joint out of the lever hole.
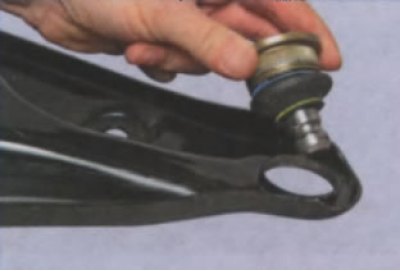
...we press the ball joint out of the lever hole.


We inspect the lever eye - there should be no cracks or breaks around the hole.
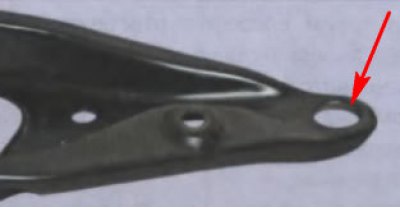
We inspect the lever eye - there should be no cracks or breaks around the hole.


Before pressing in a new ball joint, carefully clean the seating surface of the lever hole from dirt and corrosion.
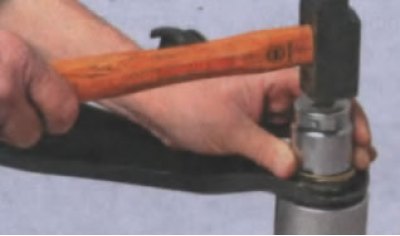


Before pressing in a new ball joint, carefully clean the seating surface of the lever hole from…


Having placed a tool head or a piece of pipe of a suitable diameter under the lever, we insert a new ball joint into the hole. By striking the mandrel with a hammer (you can use a tool head), resting on the flange of the support body...we press the support into the hole of the lever until it stops.

Please note: The lower control arm ball joint is supplied in a protective cover. Remove the cover only after pressing the ball joint into the front suspension arm and installing the locking spring 4, Figure 6-1.

If there is special equipment


Remove the ball joint boot clamps and boot (flat head screwdriver).

Install the stop marked "D1" on the press table, install the front suspension arm on the stop, install the mandrel marked "D2" for pressing out on the ball joint housing and press out the ball joint from the front suspension arm (hydraulic press type KS-124 (Kochubeyevsky Plant "Avtospetsoborudovaniye"), stop marked "D1" and mandrel marked "D2" for pressing out from the Tav. 1929 set).

Installation


Install the stop marked "R1" on the press table, install the front suspension arm on the stop, install a new ball joint in the arm hole, install the mandrel marked "R2" for pressing on the ball joint housing and press the ball joint into the front suspension arm (hydraulic press type KS-124 (Kochubeyevsky Plant "Avtospetsoborudovaniye"), stop marked "R1" and mandrel marked "R2" for pressing out from the Tav. 1929 set).


Other operations


Install the retaining spring into the ball joint groove using the protective cover as a guide.

Remove the transport cover from the ball joint.

Install the front suspension arm.

Install the front wheel.

Check and adjust if necessary front wheel alignment angles.


This article is available at russian, bulgarian, belarusian, ukrainian, serbian, croatian, romanian, polish, slovak, hungarian
This article has been reviewed: Daniil Markelov
Share with friends:
◀ Previous
Lada Largus 1: Suspension and wheels
Next ▶

Front suspension arm and subframe brace — removal and installation
Shock absorber defects — manifestation and causes
Removal, disassembly and repair of the front shock absorber
Front shock absorber strut — removal, disassembly and replacement
Diagnostics of bearing faults and their installation
Front Suspension Subframe — Removal and Installation
Front suspension anti-roll bar — removal and installation
Rear suspension — design description
Rear shock absorber — removal and installation
Rear suspension spring — removal and installation
More articles with information from manuals for Lada:

• Front suspension: reference data Lada Kalina Hatchback (2004-2013, VAZ-1119)
• Front Suspension Reference Data Lada Granta 1 (2011-2023, VAZ-2190)
• Replacing the front ball joint Lada Priora 1 (2007-2018, VAZ-2170)
• Description of the front suspension design Lada Vesta 1 (2015-2023, VAZ-2180)
• Front Suspension Subframe — removal and installation Lada X-Ray 1 (2015-2022)
Link to this article in various formats
Reviews and comments of visitors
No comments yet


Add up two numbers: 18 + 26


Largus 1 (2012-2023) 
  • General information
  • Vehicle device
  • User manual
  • Maintenance
  • Power unit
  • Engine repair
  • Cooling and lubrication system
  • Supply system
  • Ignition system
  • Exhaust system
  • Spare parts catalog
  • Transmission
  • Clutch
  • Car gearbox
  • Drive shafts
  • Spare parts catalog
  • Chassis (running gear)
  • Suspension and wheels
  • Steering
  • Brake system
  • Spare parts catalog
  • Body and interior
  • Exterior (external elements)
  • Interior (internal elements)
  • Doors, locks and windows
  • Heating and ventilation
  • Spare parts catalog
  • Electrical equipment
  • Equipment and devices
  • Power devices
  • Lighting and signaling
  • Spare parts catalog
  • Electrical circuits
LadaMan.ru © 2018–2026 | Mobile version | About Lada | Sitemap: EN BG BY UA RS HR RO PL SK HU | Contacts with admin | | Add to bookmarks
Kalina Hatchback (2004-2013) | Kalina Sedan (2004-2013) | Granta 1 (2011-2023) | Priora 1 (2007-2018) | Vesta 1 (2015-2023) | Largus 1 (2012-2023) | X-Ray 1 (2015-2022) |
This site uses cookies to ensure everything runs smoothly.