
Car repair AvtoVAZ Car repair Renault Car repair Hyundai Car repair Ford Car repair Volkswagen Car repair Audi Car repair Chevrolet
English Русский
Български
Беларускі
Український
Српски
Hrvatski
Română
Polski
Slovenský
Magyar
articles sitemap contacts bookmark
LadaMan.ru


Kalina Granta Priora Vesta Largus XRAY
Largus 1 (2012-2023)

Front suspension anti-roll bar — removal and installation (Largus 1)

  • Main
  • Largus
  • Largus 1
  • Chassis (running gear)
  • Suspension and wheels
  • Front suspension anti-roll bar — removal and installation
0
Contents: Removal ⇣ Installation ⇣
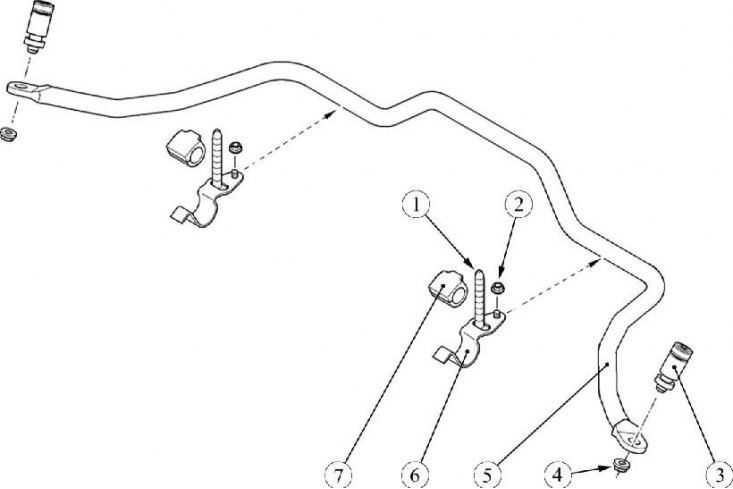
Figure 8-1 - Front suspension anti-roll bar: 1 - stabilizer cushion bracket mounting bolt (subframe…

Figure 8-1 - Front suspension anti-roll bar: 1 - stabilizer cushion bracket mounting bolt (subframe mounting bolt); 2 - stabilizer cushion bracket mounting nut; 3 - stabilizer strut; 4 - stabilizer bar mounting nut; 5 - stabilizer bar for lateral stability; 6 stabilizer cushion mounting bracket; 7 - stabilizer cushion


Removal


Place a transmission stand under the rear of the subframe and press the subframe down (transmission rack type OMA 604).

Loosen nuts 2, Figure 8-1, securing the stabilizer bar cushion brackets (replacement head 10, extension and ratchet).

Loosen bolts 1 securing the stabilizer bar cushion brackets and remove brackets 6 (rear subframe mounting bolts) (replacement head 18, extension and ratchet).

Loosen the nut 4 bolts securing the anti-roll bar to the front suspension arm (torx T40 angle wrench, 13 mm replaceable head, ratchet wrench).

Remove the stabilizer bar components from the front suspension arm: lower rubber-metal hinge 5, Figure 8-2, mounting bolt 1, two rubber bushings 4, upper rubber-metal hinge 2 and washer 3.
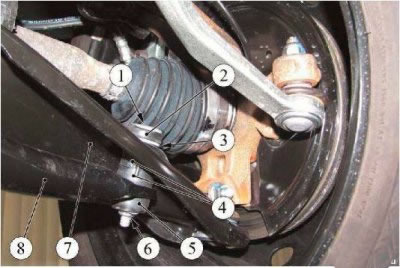
Figure 8-2 - Removing the anti-roll bar: 1 - stabilizer bar mounting bolt; 2 - upper rubber-metal…

Figure 8-2 - Removing the anti-roll bar: 1 - stabilizer bar mounting bolt; 2 - upper rubber-metal hinge; 3 - washer; 4 - rubber bushings; 5 - lower rubber-metal hinge; 6 - stabilizer bar mounting nut; 7 - front suspension arm; 8 - stabilizer bar for lateral stability


Disconnect the anti-roll bar from the front suspension arm on the other side.

Remove the anti-roll bar from the vehicle.

Installation


Caution: Use stabilizer pad bracket mounting bolts (front suspension subframe mounting bolts) no second time! Bolts must be replaced!


Check the condition of the anti-roll bar struts and cushions and replace if necessary.

Install the anti-roll bar on the vehicle, install the stabilizer cushion brackets and tighten the bracket mounting nuts (10 mm socket).

Tighten, but do not tighten, the bolts securing the stabilizer bar cushion brackets (rear subframe mounting bolts) (head "18").
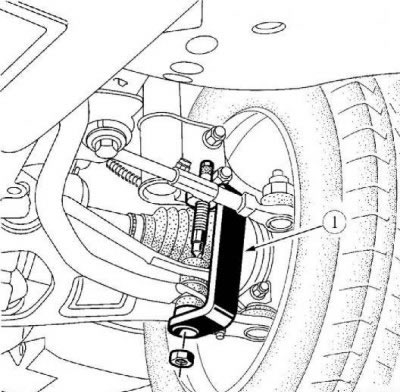
Figure 8-3 - Installing the anti-roll bar: 1 - Sus clamp. 1413 or Sus. 1734

Figure 8-3 - Installing the anti-roll bar: 1 - Sus clamp. 1413 or Sus. 1734


Install the anti-roll bar strut elements on the lever: washer, upper rubber-metal hinge, install two rubber bushings between the lever and the stabilizer. Install the mounting bolt, the lower rubber-metal hinge, tighten the package of rack elements with a clamp and screw on the nut without tightening (clamp Sus. 1413 or Sus. 1734, Torx T40 angle wrench, "13" head).

Remove the clamp.

Install the anti-roll bar on the other side.


The order of tightening the anti-roll bar fastening elements:
  • 1 - stabilizer strut mounting nuts. Tightening torque of nuts 14 Nm (1.4 kgf·m) (torx T40 angle wrench, replaceable head 13, torque wrench);
  • 2 - bolts for fastening the anti-roll bar cushion brackets. Tightening torque of bolts 105 Nm (10.5 kgf·m) (18 mm head).


This article is available at russian, bulgarian, belarusian, ukrainian, serbian, croatian, romanian, polish, slovak, hungarian
This article has been reviewed: Daniil Markelov
Share with friends:
◀ Previous
Lada Largus 1: Suspension and wheels
Next ▶

Front Suspension Subframe — Removal and Installation
Front suspension arm ball joint — removal and installation
Front suspension arm and subframe brace — removal and installation
Shock absorber defects — manifestation and causes
Removal, disassembly and repair of the front shock absorber
Rear suspension — design description
Rear shock absorber — removal and installation
Rear suspension spring — removal and installation
Rear Wheel Hub Bearing — Checking, Removing and Installing
Rear Wheel Hub Axle — Removal and Installation
More articles with information from manuals for Lada:

• Front suspension: reference data Lada Kalina Hatchback (2004-2013, VAZ-1119)
• Front Suspension Reference Data Lada Granta 1 (2011-2023, VAZ-2190)
• Possible faults of the front suspension Lada Priora 1 (2007-2018, VAZ-2170)
• Anti-roll bar strut — replacement Lada Vesta 1 (2015-2023, VAZ-2180)
• Front suspension anti-roll bar — removal and installation Lada X-Ray 1 (2015-2022)
Link to this article in various formats
Reviews and comments of visitors
No comments yet


Add up two numbers: 41 + 24


Largus 1 (2012-2023) 
  • General information
  • Vehicle device
  • User manual
  • Maintenance
  • Power unit
  • Engine repair
  • Cooling and lubrication system
  • Supply system
  • Ignition system
  • Exhaust system
  • Spare parts catalog
  • Transmission
  • Clutch
  • Car gearbox
  • Drive shafts
  • Spare parts catalog
  • Chassis (running gear)
  • Suspension and wheels
  • Steering
  • Brake system
  • Spare parts catalog
  • Body and interior
  • Exterior (external elements)
  • Interior (internal elements)
  • Doors, locks and windows
  • Heating and ventilation
  • Spare parts catalog
  • Electrical equipment
  • Equipment and devices
  • Power devices
  • Lighting and signaling
  • Spare parts catalog
  • Electrical circuits
LadaMan.ru © 2018–2026 | Mobile version | About Lada | Sitemap: EN BG BY UA RS HR RO PL SK HU | Contacts with admin | | Add to bookmarks
Kalina Hatchback (2004-2013) | Kalina Sedan (2004-2013) | Granta 1 (2011-2023) | Priora 1 (2007-2018) | Vesta 1 (2015-2023) | Largus 1 (2012-2023) | X-Ray 1 (2015-2022) |
This site uses cookies to ensure everything runs smoothly.