



Note: There are rechargeable batteries available for sale. These batteries have holes for adding water and checking the density of the electrolyte.
To complete the work you will need:
- fine-grained sandpaper;
- voltmeter;
- hydrometer;
- charger.
Warning! When servicing the battery, it is necessary to observe safety regulations and work in rubber gloves.
Regular battery maintenance
1. Prepare the car for work ("Preparing the car for maintenance and repair").
2. Wipe the battery case with a cloth soaked in a 10% solution of baking soda or ammonia, and then with clean water.
3. Check the reliability of the battery fastening on the car (see "Battery - Removal and Installation").
[The material was taken from a website: LadaMan.ru]
4. Check the condition of the battery terminals and power cable terminals. If the terminals are covered with a layer of oxides, remove the terminals from the battery terminals. Using sandpaper, clean the battery terminals and wire terminals until they shine.
5. Check the electrolyte level in each battery; for this purpose, the battery case is marked with MIN and MAX marks. If the level is below the norm, use a hydrometer (or a medical syringe) we add distilled water to the batteries.
Note: In a battery that has been in use for several years, the electrolyte level is poorly visible through the case wall. In this case, you can check the level through the battery filler holes. The electrolyte should completely cover the battery separators and just slightly fall short of the lower edges of the filler hole wells.
Checking and charging
1. Remove the battery from the car or disconnect the wire terminals from the battery terminals and remove the pressure plate (see above).
2. Unscrew the battery caps (it's convenient to do this with a coin).
3. Using the bulb of the hydrometer, we collect some of the electrolyte into the flask of the device and, without removing the spout of the flask from behind the wonderful opening of the battery, we determine the density of the electrolyte in each battery using the floats. Each float is labeled with the minimum density at which it will float.
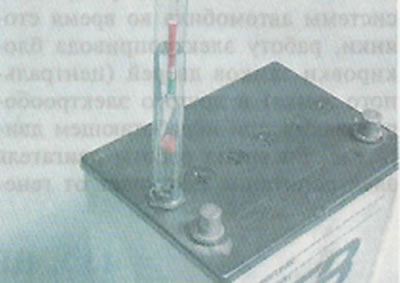
Note: After adding distilled water, until the solution in the battery is completely mixed, the hydrometer readings will be incorrect. In a single-float hydrometer, the density is determined from a scale printed on the float and depends on the depth of its immersion.
The density of the electrolyte in a fully charged battery should be close to that indicated in the table. 13.4.1. in accordance with the climate zone of vehicle operation.
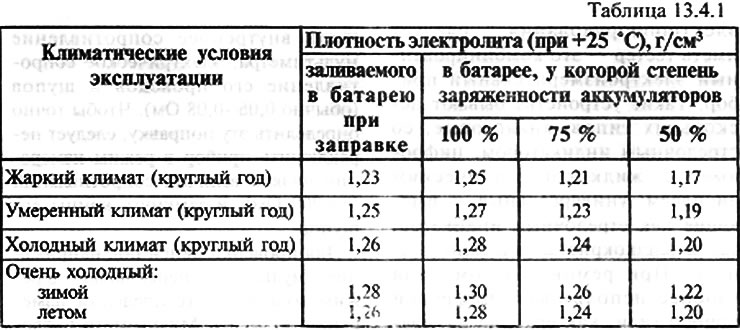
When taking hydrometer readings, it is necessary to take into account the temperature correction. When the electrolyte temperature decreases by one degree, the battery capacity decreases by 1-2%.
Note: If you don't have a hydrometer, you can check the battery's charge level with a voltmeter by measuring the voltage at the battery terminals. By comparing the obtained result with the values indicated in the table, determine the contamination of the battery.
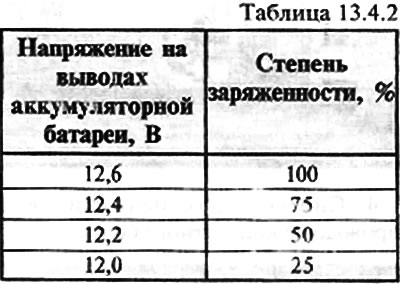
Recommendation. A battery that is discharged by 50% or more must be charged.
4. Connect the charger to the battery terminals, observing the polarity, and only then plug the charger into the power supply. The charging current should not exceed 10% of the battery capacity in amperes, i.e. the maximum charging current is 5.5 A.
5. Charge the battery. We control the process by measuring the density of the electrolyte. The charging time for a completely discharged battery is at least ten hours at a charging current of 5.5 A.
6. Stop charging the battery after all of its batteries begin to emit gas: first, disconnect the charger from the power supply, and only then disconnect the wires from the battery terminals.
7. Screw the battery caps back into place.
8. Place the power cable terminals on the battery terminals. Using a 10 mm open-end wrench, tighten the terminal mounting bolts and apply a thin protective layer of technical petroleum jelly or plastic grease to the terminals and battery posts.