



Removal
Attention. To prevent damage to the rubber-metal hinges of the rear suspension arms, do not hang the rear suspension arms with the hinges tightened by an amount greater than the position of the arms with the rear suspension springs fully unloaded.
Attention: When removing, note the color of the spring markings so as not to mix them up when installing.
Place the vehicle on a two-post lift, apply the parking brake and turn off the ignition (electro-hydraulic lift type P-3.2G with a lifting capacity of 3.2 t).
Remove the rear wheels in accordance with the requirements of Section 14 of this TI.
Remove the rear wheel speed sensor wiring harnesses from the holders on the rear suspension arms.
Raise the vehicle, install a transmission stand under the rear suspension arm and lower the vehicle until the spring begins to compress (transmission stand type OMA 604, "Avtospetsoborudovaniye").
Mark the position of the spring on the rear suspension arm support cup.
Loosen the bolt securing the shock absorber to the rear suspension arm (replacement head 21, ratchet).
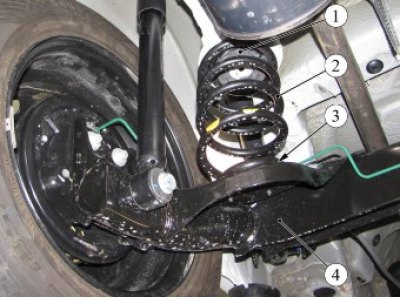
Figure 9-1 - Removing the rear suspension spring: 1 - upper spring gasket; 2 - rear suspension spring; 3 - lower spring gasket; 4 - rear suspension arms
Raise the vehicle until the rear suspension arm clears the transmission strut and remove spring 2, Figure 9-1, together with lower gasket 3.
Attention: If the upper gasket 1 of the spring has become detached, it must be replaced.
Installation
Caution: Re-use of the shock absorber mounting bolt to the rear suspension arm is not permitted. The bolt must be replaced.
Install the lower spring pad onto the rear suspension arm bearing surface.
Install the spring together with the upper gasket on the vehicle in the position marked during removal. Start installation from the top of the spring.
(Original is available on this resource: Ladaman.ru)
Lower the car until the spring begins to compress, connect the shock absorber to the rear suspension arm and screw in the new mounting bolt without tightening it (replacement head 21, ratchet).
Repeat the removal and installation operations for the second spring.
Install the rear wheel speed sensor wiring harnesses into the holders on the rear suspension arms.
Install the rear wheels in accordance with the requirements of Section 14 of this TI.
Attention. The final tightening of the bolts securing the shock absorbers to the rear suspension arms must be performed with the vehicle standing on its wheels.
Finally tighten the bolts securing the shock absorbers to the rear suspension arms. Tightening torque of bolts 105 Nm (10.5 kgf·m) (replaceable head 21, torque wrench).
Present the vehicle to the Quality Control Department. The Quality Control Department will check the vehicle for compliance with the requirements of TU 017200-254-00232934, paragraph 1.19.19 in the scope of work performed.