



Removal the front seat belt
Place the vehicle in the work area.
Open the hood and disconnect the ground wire terminal from the battery (spanner 10).
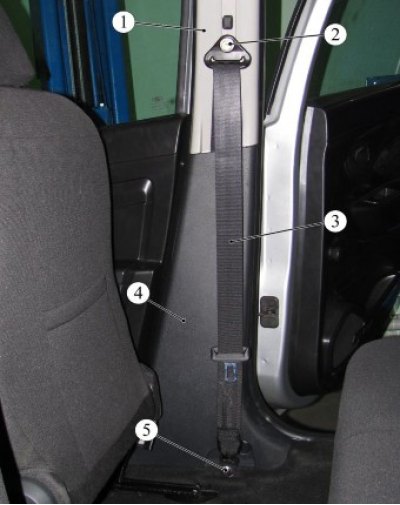
Figure 9-1 - Front seat belt: 1 - upper center pillar trim; 2 - front seat belt upper mounting bolt; 3 - seat belt; 4 - lower center pillar trim; 5 - lower seat belt mounting bolt
Remove the cap from the head of bolt 5, Figure 9-1, securing the lower point of the seat belt 3, unscrew the bolt (flat screwdriver, replaceable head 16, ratchet).
Remove the cap from the head of bolt 2 securing the upper seat belt point to the center pillar, unscrew the bolt (replacement head 17, ratchet).
Remove the upper 1 and lower 4 center pillar trims in accordance with section 10 of this TI.
Loosen bolt 3, Figure 9-2, securing reel 2 of the seat belt (replaceable head 17 or Torx T50, ratchet).
Remove the seat belt reel by disconnecting connector 1 of the wiring harness from the reel.
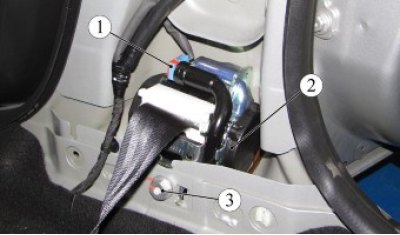
Figure 9-2 - Fastening the front seat belt reel: 1 - Wiring harness connector; 2 - front seat belt inertia reel; 3 - seat belt reel mounting bolt
The front seat belt buckle is mounted on the front seat frame.
To remove the front right seat belt buckle, move the front right seat to its rearmost position.
Loosen bolt 2, Figure 9-3, securing lock 1 of the seat belt to the seat frame, remove the lock (torx T50 replaceable head, ratchet).
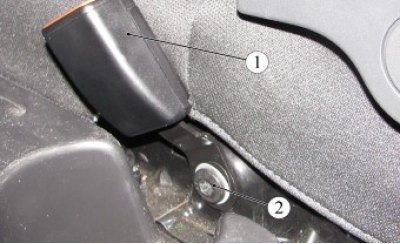
Figure 9-3 - Front right seat belt buckle: 1 - seat belt buckle; 2 - front seat belt lock mounting bolt
To remove the front left seat belt buckle, it is necessary to remove the front left seat in accordance with section 8 of this TI.
Loosen screw 2, figure 9-4, fastening trim 1, remove trim (torx T20 replaceable head, ratchet).
Disconnect the fastening of the wire 4 of the lock 5 of the belt from the seat frame (flat head screwdriver).
Loosen bolt 3 securing the seat belt lock to the seat frame and remove the lock (torx T50 replaceable head, ratchet).
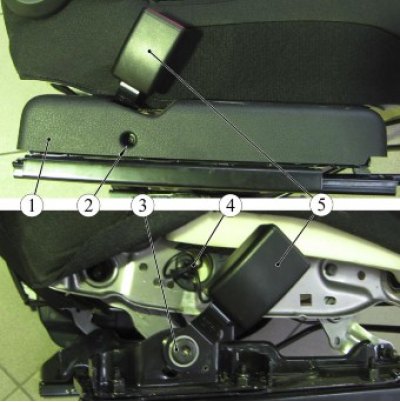
Figure 9-4 - Front left seat belt buckle: 1 - seat frame trim; 2 - screw for fixing the trim; 3 - left belt lock mounting bolt; 4 - wire of the left seat belt lock; 6 - seat belt lock
Removal the rear seat belts right, left
Raise the rear seat cushion.
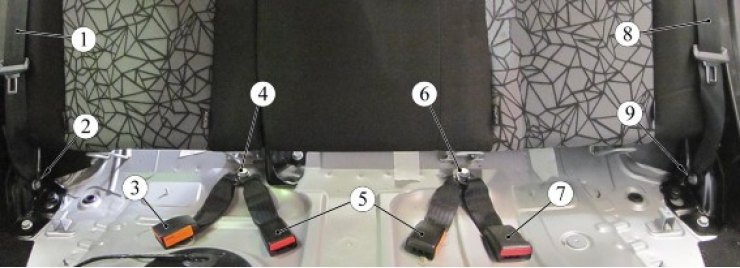
Figure 9-5 - Rear seat belts: 1 - right seat belt; 2 - bolt for fastening the lower point of the right seat belt; 3 - right seat belt lock; 4 - bolt for fastening the right and middle seat belt lock; 5 - middle seat belt lock; 6 - bolt for fastening the middle and left seat belt lock; 7 - left seat belt lock; 8 - left seat belt; 9 - bolt for fastening the lower point of the left seat belt
Loosen bolt 2, Figure 9-5, securing the lower point of the right 1 or left 8 side seat belt (replacement head 17, ratchet, extension).
Loosen bolt 4 for fastening the middle and right or bolt 6 for fastening the middle and left seat belt buckles (replacement head 17, ratchet, extension).
Remove the side panel trim assembly, upper and lower, in accordance with section 10 of this TI.
Loosen bolt 1, Figure 9-6, securing the right or left inertia reel 2 of the seat belt, remove the reel (replaceable head 17 or TorxT50, ratchet, extension).
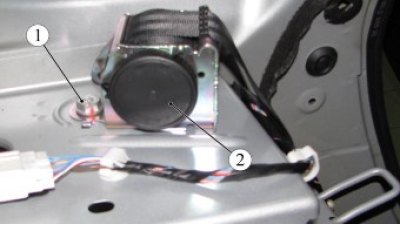
Figure 9-6 - Fastening the rear side seat belt inertia reel: 1 - coil mounting bolt; 2 - seat belt inertia reel
Removal the rear middle seat belt
Remove the cap from the head of bolt 1, Figure 9-7, securing the upper point of the seat belt 2, unscrew the bolt (flat screwdriver, replaceable head 16 or Torx T40, ratchet).
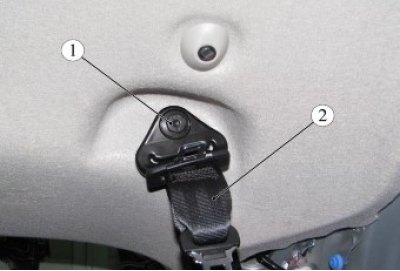
Figure 9-7 - Fastening the middle seat belt: 1 - bolt of the upper fastening of the middle seat belt; 2 - middle seat belt
Remove the left side panel trim assembly, upper and lower, in accordance with section 10 of this TI.
Loosen bolt 1, figure 9-8, securing guide 2 of seat belt strap 4, remove strap (replaceable head 17 or Torx T50, ratchet, extension).
Loosen bolt 3 of the inertia reel 5 of the middle seat belt, remove the reel by threading the seat belt tape through the hole in the side shelf (replaceable head 17 or Torx T50, ratchet, extension).
Raise the rear seat cushion.
Loosen bolts 4 and 6, see figure 9-5, securing the seat belt buckles, remove buckles 5 of the middle seat belt (replacement head 17, ratchet, extension).
Install the seat belts in the reverse order of removal. The front and rear seat belts must return from the working position to the original position freely, without jamming, after the locks are opened.
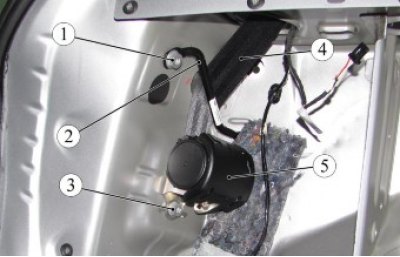
Figure 9-8 - Fastening the center seat belt reel: 1 - seat belt guide fastening bolt; 2 - seat belt guide; 3 - bolt for fastening the middle seat belt reel; 4 - seat belt; 5 - middle seat belt reel
Tightening torque of seat belt mounting bolts from 38 to 50 N·m (from 3.8 to 5.0 kgf·m) (ratchet, head 14, 17, torque wrench, extension).
Present the vehicle to the Quality Control Department. The Quality Control Department will check the vehicle for compliance with the requirements of this TI and TU 017200-254-0023934 in the scope of work performed.