



Removal the front right or left seat belt
Place the vehicle in the work area. Remove the covers and caps from the heads of the seat belt mounting bolts (flat head screwdriver).
Loosen bolt 3, Figure 10-1, of the lower belt attachment point 1 (replacement head 17, ratchet, extension).
Unscrew two self-tapping screws 4, remove the trim 2 of the lower central pillar (phillips screwdriver).
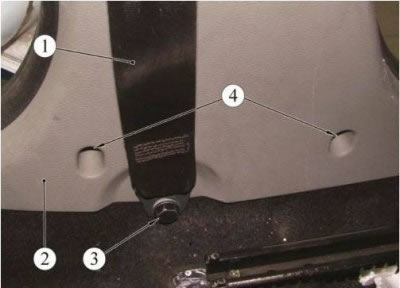
Figure 10-1 - Lower front seat belt anchorage: 1 - front seat belt; 2 - lower center pillar trim; 3 - front seat belt lower mounting point bolt; 4 - self-tapping screw for fastening the trim of the lower central pillar
Loosen bolt 2, Figure 10-2, of the upper front seat belt mount on the center pillar (replacement head 17, ratchet).
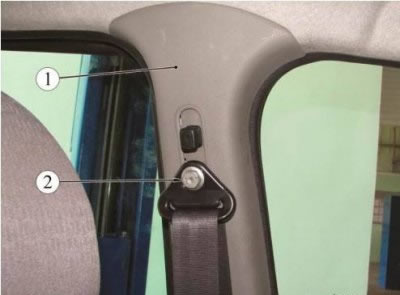
Figure 10-2 - Upper front seat belt anchorage: 1 - upper center pillar trim; 2 - front seat belt upper mounting bolt
Unscrew the self-tapping screw 1, Figure 10-3, securing the center pillar trim.
Overcoming the resistance of the holders, detach the upholstery 2 from the pillar, remove the seat belt 3 from the hole in the upholstery, remove the upholstery (flat head screwdriver).
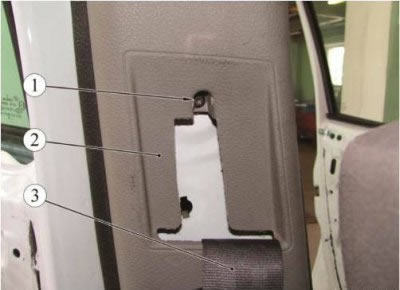
Figure 10-3 - Fastening the center pillar trim: 1 - self-tapping screw for fastening the trim of the central pillar; 2 - center pillar trim; 3 - front seat belt
Loosen bolt 2, figure 10-4, securing inertia reel 1 of seat belt, remove belt (replacement head 17, ratchet, extension).
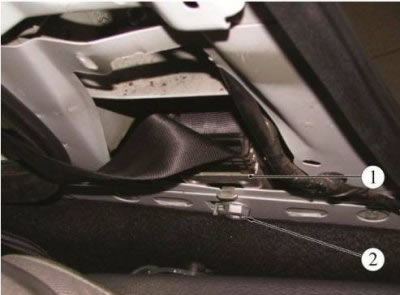
Figure 10-4 - Fastening the front seat belt inertia reel: 1 - seat belt inertia reel; 2 - bolt for fastening the inertia reel of the seat belt
Removal the front seat belt buckle, right or left
Note: Depending on the year of manufacture of the vehicle, the fastening of the seat belt buckle (latch) may differ.
Option 1
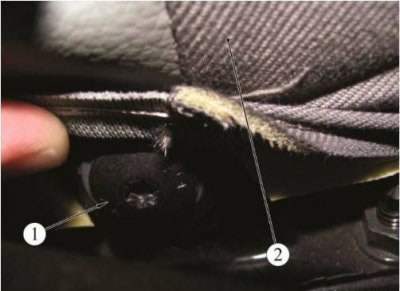
Figure 10-5 - Front seat belt buckle: 1 - seat belt buckle mounting bolt; 2 - front right seat
Move the seat upholstery, unscrew bolt 1, Figure 10-5, securing the seat belt buckle, remove the buckle (torx T30 replaceable head, ratchet).
Option 2
Note: Shown with seat removed for clarity.
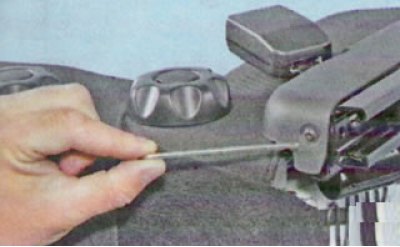
Remove the screw securing the right side panel of the slide...
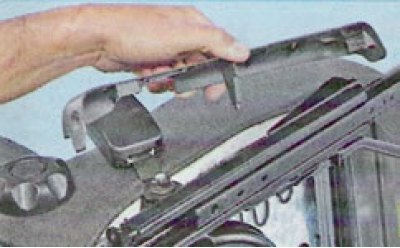
And remove the trim panel.
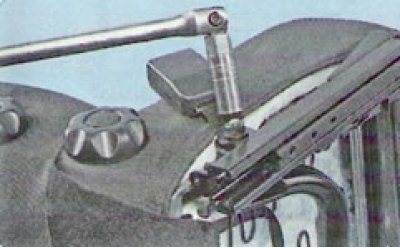
Loosen the nut securing the seat belt buckle to the seat rails...
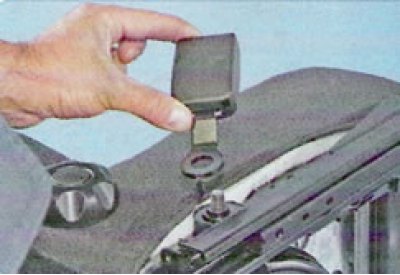
... remove the lock...
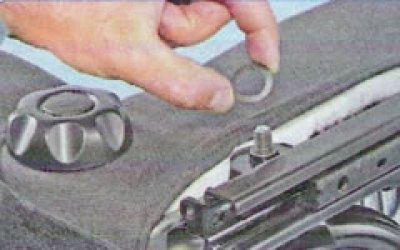
... and a wave spring washer installed underneath it.
Install the seat belt and removed parts in the reverse order of removal.
Removal the rear right or left seat belt
Remove the covers and caps from the heads of the seat belt mounting bolts (flat head screwdriver).
Loosen bolt 2, Figure 10-6, of the lower rear belt attachment point 1 (replacement head 17, ratchet, extension).
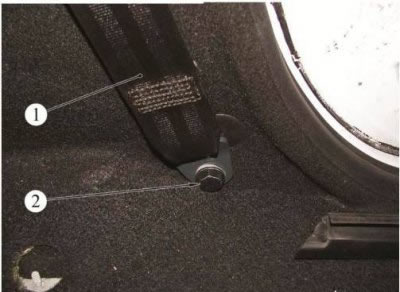
Figure 10-6 - Lower rear seat belt anchorage: 1 - rear seat belt; 2 - rear seat belt lower mounting bolt
Remove screen 4, Figure 10-7, from the luggage compartment, overcoming the resistance of its extension spring.
Loosen bolt 1 of the upper rear seat belt mount 2 on the right or left on the tail pillar (replacement head 17, ratchet).
Open the plugs and unscrew the two self-tapping screws 5 securing the rear pillar trim, remove the trim 3.
Loosen the lock 6 of the rear seat backrest lock (torx T30 replaceable head, ratchet).
Remove button 8, move the luggage compartment floor trim 7 to the side (device 7711238605).
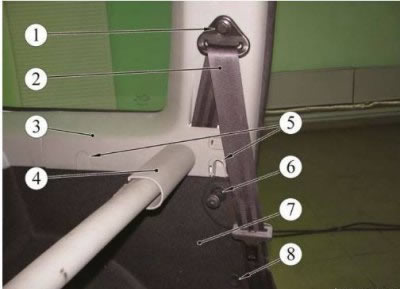
Figure 10-7 - Fastening the rear pillar trim: 1 - Rear seat belt upper mounting bolt; 2 - rear seat belt; 3 - rear pillar trim; 4 - luggage compartment screen; 5 - self-tapping screws for fastening the upholstery; 6 - rear seat back lock retainer; 7 - luggage compartment floor trim; 8 - upholstery fastening button
Loosen bolt 2, figure 10-8, securing inertia reel 1 of seat belt, remove belt (replacement head 17, ratchet, extension).
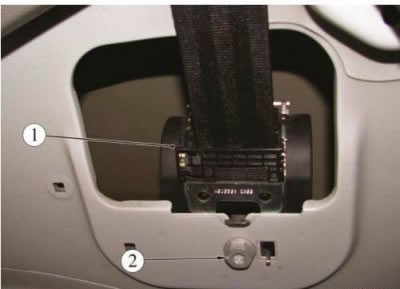
Figure 10-8 - Fastening the inertia reel of the rear seat belt, right or left: 1 - seat belt inertia reel; 2 - seat belt inertia reel mounting bolt
Removal the rear center seat belt
On the right or left side, open the plugs and unscrew the two self-tapping screws 2, Figure 10-9, securing the trim, remove the trim 1 of the right or left loading door pillar.
For the vehicle with a third row of seats:
- on the right or left side, unscrew the three screws 4, figure 10-10, securing the side window vent lock;
- on the right or left side, unscrew bolt 3 of the upper seat belt mount on the loading door pillar (replacement head 17, ratchet);
- on the right or left side, open the plugs and unscrew the two self-tapping screws 2, securing the trim;
- remove the trim of the 1st pillar of the loading door, right or left.
Unscrew two self-tapping screws 8, (see figure 10-9), fastening the trim, remove the trim 7.
Remove the trim 3 (flat head screwdriver).
Remove the holders 5 of the roof trim 4 from the right and left sides (device 7711238605).
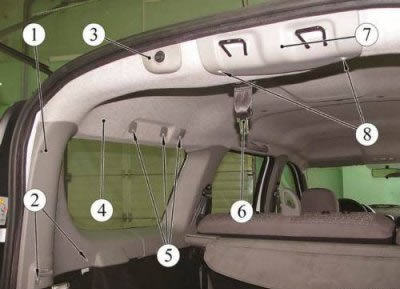
Figure 10-9 - Fastening the rear part of the roof lining: 1 - loading door pillar upholstery; 2 - self-tapping screws for fastening the upholstery; 3 - loading door opening button trim; 4 - roof lining; 5 - Roof trim holders; 6 - middle seat belt; 7 - lining of loading door lock latches; 8 - self-tapping screws for fastening the cladding
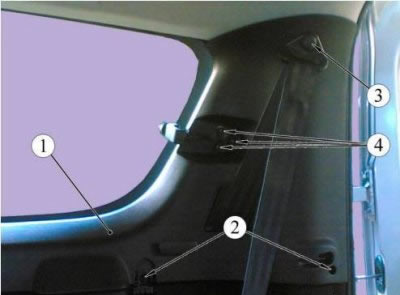
Figure 10-10 - Fastening the loading door pillar trim: 1 - loading door pillar upholstery; 2 - self-tapping screws for fastening the upholstery; 3 - bolt of the upper fastening of the seat belt of the third row of seats; 4 - side window vent lock fastening screws
Move the roof trim 4 downwards, remove the seat belt pad together with the seat belt 6 from the hole in the roof trim.
Loosen bolt 1, Figure 10-11, fastening the inertia reel 2 of the middle seat belt on the roof in the loading door opening, remove the seat belt (replacement head 17, ratchet, extension).
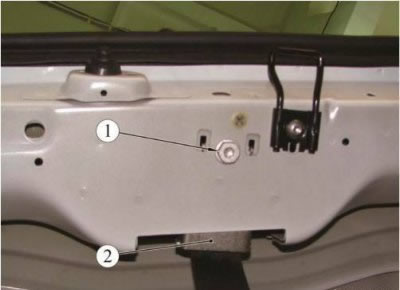
Figure 10-11 - Fastening the inertia reel of the middle rear seat belt: 1 - seat belt inertia reel mounting bolt; 2 - seat belt inertia reel
Fold the rear seat. On the back side of the rear seat cushion, unscrew bolts 4, Figure 10-12, securing the seat belt buckles (torx T30 replaceable head, ratchet).
Fold down the rear seat and remove the rear seat belt buckles 1 from the slots in the seat cushion.
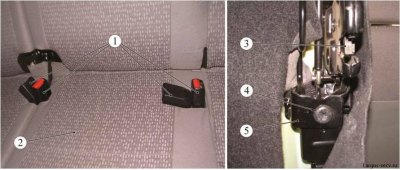
Figure 10-12 - Rear seat belt buckles: 1 - rear seat belt buckles; 2 - rear seat cushion; 3 - rear seat lock; 4 - seat belt buckle mounting bolt; 5 - lock bracket
Removal the third row seat belts (for a seven-seater vehicle)
Move the luggage compartment floor trim aside, unscrew bolt 2, Fig. 10-13, of the lower seat belt mount 1 of the third row of seats (replacement head 17, ratchet, extension).
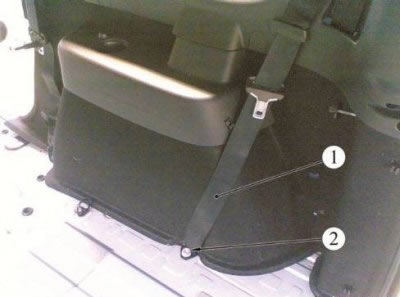
Figure 10-13 - Third Row Lower Seat Belt Anchor: 1 - third row seat belt; 2 - third row seat belt lower mounting bolt
Remove the trim of the 3 rear pillar (see figure 10-7), remove the trim of the 1st pillar of the loading door (see figure 10-10), move the side panel trim aside, unscrew bolt 1, figure 1014, securing the inertia reel 2 of the seat belt, remove the belt (replacement head 17, ratchet, extension).
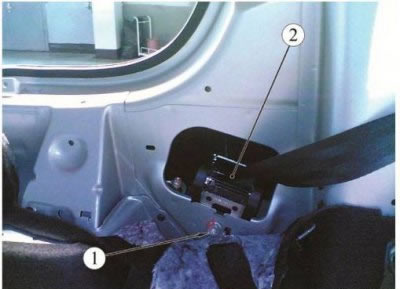
Figure 10-14 - Fastening the third row seat belt inertia reel: 1 - seat belt inertia reel mounting bolt; 2 - seat belt inertia reel
Installation
Install the seat belts in the reverse order of removal. After opening the locks, the seat belts must return from the working position to the original position freely, without jamming.
Tightening torque of seat belt mounting bolts 21 N·m (2.1 kgf·m) (ratchet, replaceable head 17, torque wrench).