



Windscreen pillar trim
The windshield pillar trim is secured with three plastic clips. To dismantle the cladding, it is necessary to remove the doorway seal in the area where it meets the cladding, carefully grasp the upper edge of the cladding and pull with a force that overcomes the force of the holders.
Upper and lower middle pillar trim
The dismantling of the lower middle pillar trim must be carried out after the upper middle pillar trim has been removed.
Remove the door frame seal of the front and rear doors in the area where it meets the pillar trim.
Remove the cap from the head of bolt 8, Figure 10-1, securing the lower point of the seat belt, unscrew the bolt (flat screwdriver, replaceable head 16, ratchet).
Remove the cap from the head of bolt 3 of the upper seat belt fastening point, unscrew the bolt (flat screwdriver, replaceable head 1 7, ratchet)
Remove plug 5 of handle 2 for adjusting the seat belt position, remove handle (flat head screwdriver).
Loosen screw 4 securing the upper trim, remove the trim (torx T20 replaceable head, ratchet).
Loosen screw 7 securing the lower trim, remove the trim, threading the belt tape through the opening in the trim. (torx T20 replaceable head, ratchet).
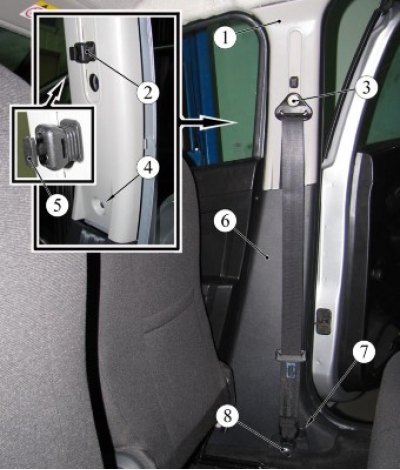
Figure 10-1 - B-pillar trims: 1 - upper middle pillar trim; 2 - seat belt adjustment handle; 3 - bolt for fastening the upper point of the seat belt; 4 - screw for fastening the trim of the middle pillar of the upper body; 5 - Seat belt adjustment handle plug; 6 - lower middle pillar trim; 7 - screw for fastening the trim of the lower middle pillar; 8 - lower seat belt mounting bolt
Side paneling
The side panel trim is attached to the body using self-tapping screws and plastic pins.
Open the tailgate and remove the rear shelf from the vehicle interior.
Press the release button and tilt the rear seat back forward.
Remove the rear door opening seal and the tailgate in the area where it meets the side panel trim.
Unscrew the seven screws 1, Figure 10-2, self-tapping fastenings of the side panel trim 2 (torx T20 replaceable head, ratchet).
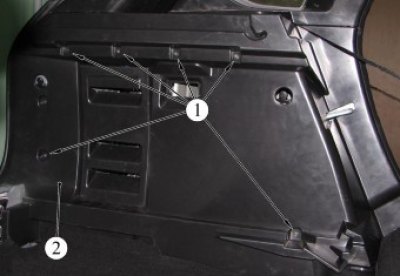
Figure 10-2 - Side paneling: 1 - side panel fastening screw; 2 - side paneling
Side window trim
The side window trim is attached to the body using plastic pins. Installation and dismantling of the side window trim is carried out after the side trim has been removed.
Floor Tunnel Lining
Raise the parking brake lever 4, Figure 10-3, to the upper position.
Remove from the seat in the trim 2 of the floor tunnel, cover 1 of the gearshift lever (flat head screwdriver).
Take the edge of the floor tunnel trim panel and pull it upwards with a force that overcomes the force of the holders, remove the panel, disconnecting the instrument panel wiring harness connectors from switches 3 located on the panel (flat head screwdriver).
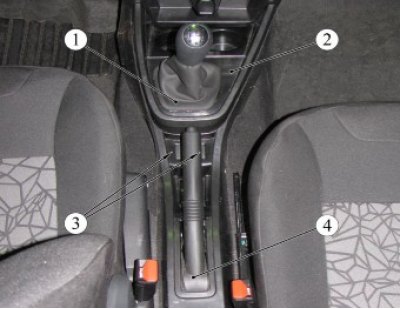
Figure 10-3 - Floor Tunnel Lining: 1 - gear shift lever cover; 2 - floor tunnel lining overlay; 3 - seat heating switch; 4 - parking brake lever
Unscrew the five screws 2, Figure 10-4, securing the lining 3 of the floor tunnel (torX T20 replaceable head, ratchet).
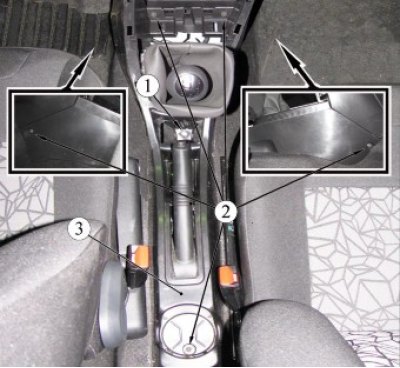
Figure 10-4 - Fastening the floor tunnel lining: 1 - floor tunnel lining fastening nut; 2 - self-tapping screw for fastening the floor tunnel lining; 3 - floor tunnel lining
Unscrew nut 1, remove the trim (replacement head 10, ratchet, extension).
Roof lining
The ceiling trim must be removed after the windshield pillar trims, upper middle pillar trims, and side window trims have been removed.
On the right and left sides, unscrew two self-tapping screws for fastening the left 7 and right 10, Figure 10-5, sun visors and their holders, remove the visors and holders (torx T20 replaceable head, ratchet).
Remove the trim of the interior lighting lamp 9 (flat head screwdriver).
Unscrew the two screws 5 self-tapping ceiling light fasteners, remove the ceiling light, disconnecting the interior wiring harness connector (torx T20 replaceable head, ratchet).
Remove microphone 2 from the hole in the roof trim, disconnecting the microphone wire from the interior wiring harness.
Remove decorative plugs 13 of ceiling handrails 3, 11, 12 and using a special device, remove the handrails (flat head screwdriver, tool 67.7812-9711).
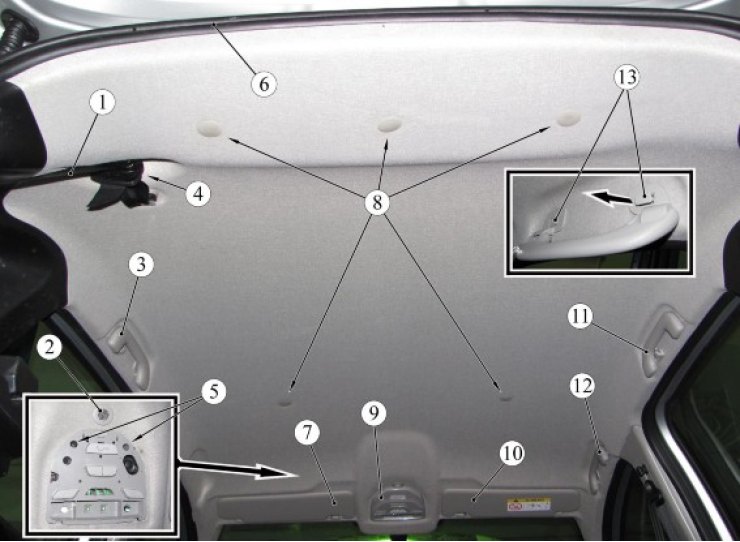
Figure 10-5 - Roof Trim: 1 - rear middle seat belt; 2 - microphone; 3 - rear left handrail; 4 - bolt for fastening the upper attachment point of the middle seat belt; 5 - screw for fastening the interior light; 6 - tailgate seal; 7 - left sun visor; 8 - Roof trim holder; 9 - interior light; 10 - right sun visor; 11 - rear right handrail; 12 - front right handrail; 13 - handrail plug
Remove the decorative cap of bolt 4 securing the upper point of the seat belt 1, unscrew the bolt (flat screwdriver, replaceable head 16 or Torx T40, ratchet).
Remove the door seals in the area where they meet the roof trim.
Remove the holders 8, roof trim, remove the trim and remove it through the rear door opening (device type 12770 f. "Stahlwille").
Install the trim and upholstery in the reverse order of removal.
Present the vehicle to the Quality Control Department. The Quality Control Department will check the vehicle for compliance with the requirements of TU 017200-254-0023934 in the scope of work performed.