
Car repair AvtoVAZ Car repair Renault Car repair Hyundai Car repair Ford Car repair Volkswagen Car repair Audi Car repair Chevrolet
English Русский
Български
Беларускі
Український
Српски
Hrvatski
Română
Polski
Slovenský
Magyar
articles sitemap contacts bookmark
LadaMan.ru


Kalina Granta Priora Vesta Largus XRAY
Largus 1 (2012-2023)

Replacing the left inner CV joint boot (Largus 1)

  • Main
  • Largus
  • Largus 1
  • Transmission
  • Drive shafts
  • Replacing the left inner CV joint boot
0
Contents: Removal ⇣ Installation ⇣
Catalog numbers of dust boots and replaceable drive parts see here.

Note: Replacing the dust cover (without special devices) shown also in section Replacement of CV joints.


Removal


Remove the left front wheel drive shaft (see left hand drive or right hand drive).

Install the front wheel drive with the middle part of the shaft in a vise (a locksmith's vise with aluminum linings, a locksmith's workbench of the SHP-17 "GARO" type).

Remove the retaining ring (external snap ring pliers).

Remove grease (technological spatula, rags).

Mark the position of the three-pin joint on the drive shaft by any means except mechanical.

Press the three-pin hinge hinge 1, Figure 13-6, with a press, using puller 2 as a stop (hydraulic press type KS-124, puller type 71 03 00 01 f. "Stahlwille").

ATTENTION! Do not remove the rollers from the hinge pins, as the rollers and bearing needles are worn to each other and should not be swapped.

Press the bearing and protective cover with a press, using a puller as a stop (hydraulic press type KS-124, puller type 71 03 00 01 f. "Stahlwille").

Wash the drive parts and blow them with compressed air (high-pressure washing unit with water heating type HDS 895 S "Karcher" (Germany), gun type AH 050101 "ANI" (Italy) for blowing with compressed air).

Installation


Install puller 1, Figure 13-7, into the groove on drive shaft 2 for support so as not to damage the oil seal on the wheel side (puller type 71 03 00 01 f. "Stahlwille").

Press bearing 3 together with protective cover 4 onto the drive shaft using mandrel 5 so that the distance between the bearing guide and the end of the wheel drive shaft is 115.4±0.2 mm (hydraulic press type KS-124, mandrel for pressing bearings - self-made).


Press the three-pin joint onto the drive shaft. When assembling, ensure that the marks applied before disassembly match (plastic-head hammer).

Install a new retaining ring on the drive shaft (external snap ring pliers).

Fill the internal cavity of the half-axle gear housing in the gearbox and the protective cover with grease for the joints of the front wheel drive shafts in equal quantities (grease for the joints of the front wheel drive shafts 77 11 420 011 according to the current "Codifier of the main and auxiliary materials used in the maintenance and repair of LADA vehicles" K 3100.25100.00018, technological blade).
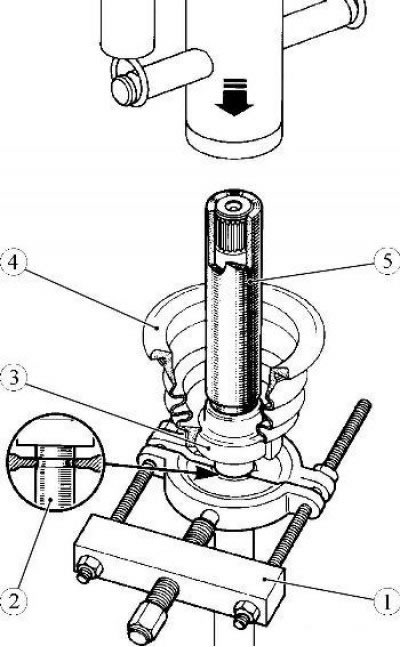
Figure 13-7 - Pressing the bearing assembly with the protective cover of the inner joint onto the…

Figure 13-7 - Pressing the bearing assembly with the protective cover of the inner joint onto the drive shaft for the JH3 gearbox: 1 - puller; 2 - wheel drive shaft; 3 - bearing; 4 - protective cover of the inner hinge; 5 - mandrel
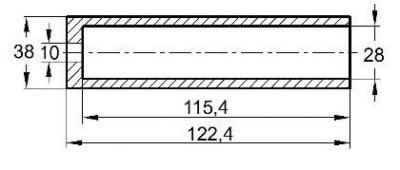

Figure 13-8 - Mandrel for pressing the bearing onto the drive shaft

Figure 13-8 - Mandrel for pressing the bearing onto the drive shaft


Install the left front wheel drive shaft.


This article is available at russian, bulgarian, belarusian, ukrainian, serbian, croatian, romanian, polish, slovak, hungarian
This article has been reviewed: Daniil Markelov
Share with friends:
◀ Previous
Lada Largus 1: Drive shafts
Next ▶

Replacing the right inner CV joint boot
Replacing the outer joint boot of the front wheel drive
Right Front Wheel Drive Shaft — Removal and Installation
Left Front Wheel Drive Shaft — Removal and Installation
Replacing outer and inner CV joints (JR5)
Disassembling the left inner CV joint of a car with a JH3 gearbox
Disassembling the right inner CV joint of a car with a JH3 gearbox
Replacing outer CV joint boots on a car with a JH3 gearbox
Replacing the outer CV joint and boot of a car with a JR5 gearbox
More articles with information from manuals for Lada:

• Removal and installation the outer tie rod end and replacing the ball… Lada Kalina Sedan (2004-2013, VAZ-1118)
• Replacing the remote control battery Lada Granta 1 (2011-2023, VAZ-2190)
• Replacing the front ball joint Lada Priora 1 (2007-2018, VAZ-2170)
• Replacing the battery in the remote control Lada Vesta 1 (2015-2023, VAZ-2180)
• Bleeding the hydraulic brake system, replacing the fluid Lada X-Ray 1 (2015-2022)
Link to this article in various formats
Reviews and comments of visitors
No comments yet


Add up two numbers: 42 + 42


Largus 1 (2012-2023) 
  • General information
  • Vehicle device
  • User manual
  • Maintenance
  • Power unit
  • Engine repair
  • Cooling and lubrication system
  • Supply system
  • Ignition system
  • Exhaust system
  • Spare parts catalog
  • Transmission
  • Clutch
  • Car gearbox
  • Drive shafts
  • Spare parts catalog
  • Chassis (running gear)
  • Suspension and wheels
  • Steering
  • Brake system
  • Spare parts catalog
  • Body and interior
  • Exterior (external elements)
  • Interior (internal elements)
  • Doors, locks and windows
  • Heating and ventilation
  • Spare parts catalog
  • Electrical equipment
  • Equipment and devices
  • Power devices
  • Lighting and signaling
  • Spare parts catalog
  • Electrical circuits
LadaMan.ru © 2018–2026 | Mobile version | About Lada | Sitemap: EN BG BY UA RS HR RO PL SK HU | Contacts with admin | | Add to bookmarks
Kalina Hatchback (2004-2013) | Kalina Sedan (2004-2013) | Granta 1 (2011-2023) | Priora 1 (2007-2018) | Vesta 1 (2015-2023) | Largus 1 (2012-2023) | X-Ray 1 (2015-2022) |
This site uses cookies to ensure everything runs smoothly.