



Removal
For vehicles with JH3 gearbox
Place the vehicle on a two-post lift, apply the parking brake, turn off the ignition and disconnect the ground wire from the battery.
Loosen nut 1, Figure 11-1, securing rod 2 of the gear shift drive to gear shift lever 3 (replacement head 10, ratchet).
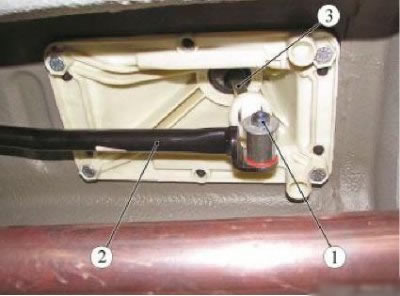
Figure 11-1 - Disconnecting the gear shift rod: 1 - Nut securing the drive rod to the gear shift lever; 2 - gear shift drive rod; 3 - gear shift lever
For cars with K7M engine
Remove the engine crankcase guard.
Disconnect the oxygen sensor connectors.
Unscrew the two nuts 1, Figure 11-2, studs securing the catalytic converter to the exhaust manifold 3, remove the springs 2 (replacement head 10, extension, ratchet).
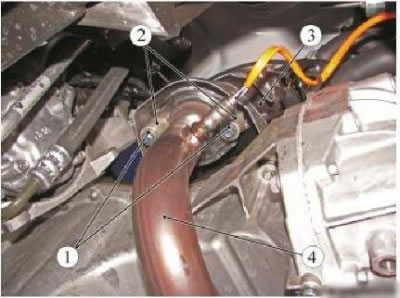
Figure 11-2 - Removing the catalytic converter on a vehicle with a K7M engine: 1 - nut; 2 - spring; 3 - exhaust manifold; 4 - catalytic converter
Disconnect the downstream oxygen sensor connector.
Unscrew the two nuts 1, Figure 11-3, of the studs securing the catalytic converter to the exhaust manifold, remove the springs (replacement head 10, extension, ratchet).
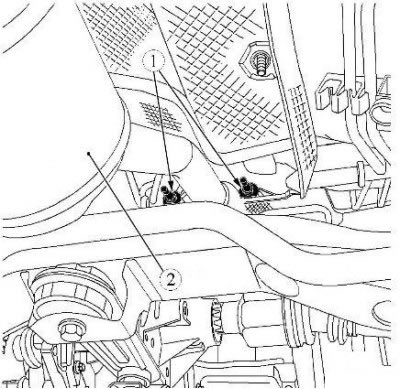
Figure 11-3 - Removing the catalytic converter on a vehicle with a K4M engine: 1 - nut; 2 - catalytic converter
Operations for all vehicle configurations
Remove the catalytic converter from the suspension mount. Move the exhaust pipe to the side.
Remove the floor tunnel lining.
Loosen nuts 1, Fig. 11-4, securing the gear shift lever (replacement head 13, extension, ratchet).
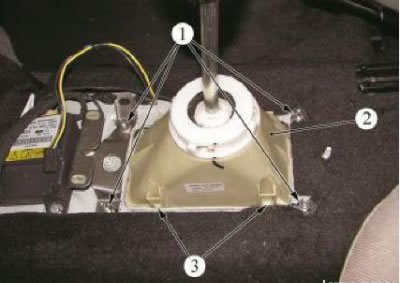
Figure 11-4 - Removing the gear shift lever: 1 - gear shift lever mounting nut; 2 - gear shift lever; 3 - gear shift lever mounting latch
Disconnect gear shift lever 2 from the floor by pressing four latches 3.
Lower the gear shift lever so that it rests on the exhaust pipe.
Remove the gearshift lever by passing it between the exhaust pipe and the floor tunnel.
Installation
For vehicles with JH3 gearbox
Install gear shift lever 2, Figure 11-4, by passing it between the exhaust pipe and the floor tunnel and securing it with latches to the body floor.
Install and tighten nuts 1 of the gearshift lever with a torque of 21 N·m (2.1 kgf·m) (replaceable head 13, extension, ratchet, torque wrench).
Apply silicone-containing grease to the drive rod mounting shaft on the gearshift lever (silicone-containing grease 77 11 419 216 according to the current "Codifier of main and auxiliary materials used in maintenance and repair of LADA vehicles" K 3100.25100.00018, consumption rate 1 g)
Connect the rod 2, Figure 11-1, of the gear shift drive to the gear shift lever 3 and secure with the rod mounting nut 1 (replacement head 10, ratchet).
Tighten the gearshift linkage mounting nut to 27.5 N·m (2.75 kgf·m) (replaceable head 10, torque wrench).
Check the functionality of the gear shift drive.
Install the floor tunnel lining.
Install the catalytic converter.
Install the springs and tighten the nuts of the studs securing the catalytic converter to the exhaust manifold with a torque of 21 N·m (2.1 kgf·m) (replaceable head 10, extension, torque wrench).
For vehicles with engine. K7M
Connect the oxygen sensor connectors
Install the engine crankcase guard.
For cars with K4M engine
Connect the lower oxygen sensor connector.
Removal
For vehicles with JR5 gearbox
Place the vehicle on a two-post lift, apply the parking brake, turn off the ignition and disconnect the ground wire from the battery.
For cars with K4M engine
Remove the intake silencer.
Operations for all vehicle configurations
Unscrew the two nuts 1, Figure 11-4, securing the expansion tank.
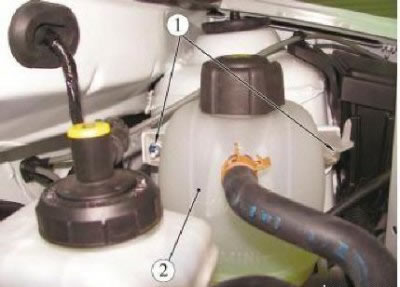
Figure 11-4 - Removing the expansion tank: 1 - expansion tank mounting nut; 2 - expansion tank
Remove and set aside expansion tank 2 without disconnecting the hoses.
Disconnect the joints 1, Fig. 11-5, of the gear selection and shift cables from the gearbox levers 2 (flat head screwdriver).
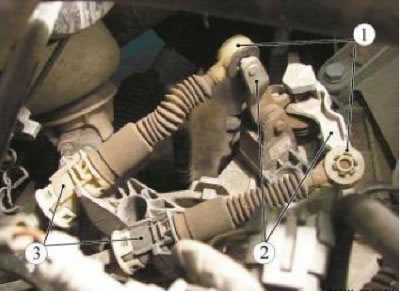
Figure 11-5 - Disconnecting the gear selector and shift cables from the transmission: 1 - cable hinge; 2 - gearbox lever; 3 - cable sheath stopper
Disconnect the 3 locks of the gear selection and shift cable housings from the brackets on the gearbox by pressing on the locks from both sides.
For cars with K7M engine
Remove the engine crankcase guard.
Disconnect the oxygen sensor connectors.
Unscrew the two nuts 1, Figure 11-2, studs securing the catalytic converter to the exhaust manifold 3, remove the springs 2 (replacement head 10, extension, ratchet)
For cars with K4M engine
Disconnect the downstream oxygen sensor connector.
Unscrew the two nuts 1, Figure 11-3, of the studs securing the catalytic converter to the exhaust manifold, remove the springs (replacement head 10, extension, ratchet).
Operations for all vehicle configurations
Remove the catalytic converter from the suspension mount.
Move the exhaust pipe to the side.
For cars with K4M engine
Loosen nuts 1, Fig. 11-6, securing the heat shield and remove the heat shield 2 of the catalytic converter (replacement head 18, extension, ratchet).
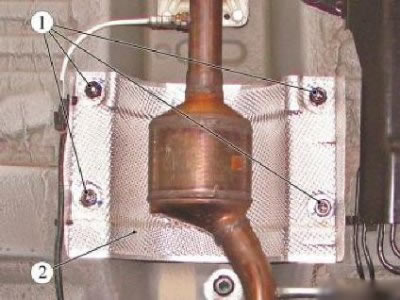
Figure 11-6 - Removing the catalytic converter heat shield: 1 - heat shield mounting nut; 2 - heat shield of the catalytic converter
Operations for all vehicle configurations
Remove the floor tunnel lining.
Loosen bolts 1, Fig. 11-7, securing the gear shift lever (replacement head 13, extension, ratchet).
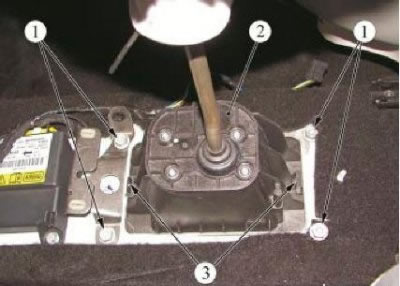
Figure 11-7 - Removing the gear shift lever: 1 - gear shift lever mounting bolt; 2 - gear shift lever; 3 - gear shift lever mounting latch
Disconnect gear shift lever 2 from the floor by pressing the two latches 3.
Lower the gear shift lever so that it rests on the exhaust pipe.
Remove the gearshift lever by passing it between the exhaust pipe and the floor tunnel.
Installation
For vehicles with JR5 gearbox
Install and secure gear shift lever 2 to the floor with latches 3, Figure 11-7.
Install and tighten the gearshift lever mounting bolts 1 to 21 N·m (2.1 kgf·m) (replaceable head 13, extension, ratchet, torque wrench).
Install the floor tunnel lining.
Install stoppers 3, Figure 11-5, of the gear selection and shift cable casings into the gearbox brackets.
Connect the joints 1 of the gear selection and shift cables to the levers 2 of the gearbox.
Check the functionality of the gear shift drive.
Install the heat shield 2, Figure 11-6, of the catalytic converter and the nuts 1 securing the heat shield (replacement head 18, extension, ratchet).
Operations for all vehicle configurations
Install the catalytic converter.
Install the springs and tighten the nuts of the studs securing the catalytic converter to the exhaust manifold with a torque of 21 N·m (2.1 kgf·m) (replaceable head 10, extension, torque wrench).
For cars with K7M engine
Connect the oxygen sensor connectors.
Install the engine crankcase guard.
For cars with K4M engine
Connect the lower oxygen sensor connector.
Operations for all vehicle configurations.
Install the expansion tank and tighten the expansion tank mounting nuts to a torque of 8 N·m (0.8 kgf·m) (spanner 10, replaceable head 10, extension, torque wrench).
For cars with K4M engine
Install the intake noise muffler.