
Car repair AvtoVAZ Car repair Renault Car repair Hyundai Car repair Ford Car repair Volkswagen Car repair Audi Car repair Chevrolet
English Русский
Български
Беларускі
Український
Српски
Hrvatski
Română
Polski
Slovenský
Magyar
articles sitemap contacts bookmark
LadaMan.ru


Kalina Granta Priora Vesta Largus XRAY
Largus 1 (2012-2023)

Wheel — removal and installation (Largus 1)

  • Main
  • Largus
  • Largus 1
  • Chassis (running gear)
  • Suspension and wheels
  • Wheel — removal and installation
0
Contents: Removal ⇣ Bolts ⇣ Installation ⇣
See also Spare wheel.

Removal


Place the vehicle on a two-post lift, apply the parking brake and turn off the ignition.

Remove the decorative wheel cap (flat head screwdriver).

Loosen the wheel mounting bolts while the vehicle stands on its wheels (replacement head 17, ratchet).

Raise the car, loosen the wheel mounting bolts and remove the wheel (replacement head 17, ratchet).

Bolts


Attention. Previously, two types of bolts were used to fasten the wheels on the Lada Largus: for light-alloy wheels (longer) and for stamped steel wheels (shorter). The bolts are not interchangeable. This was extremely inconvenient for owners of models equipped with alloy wheels, since the spare wheel was stamped and was additionally equipped with the appropriate bolts later, bolts began to be produced in a unified form, without washers (figure B) (see dimensions. in table 1).
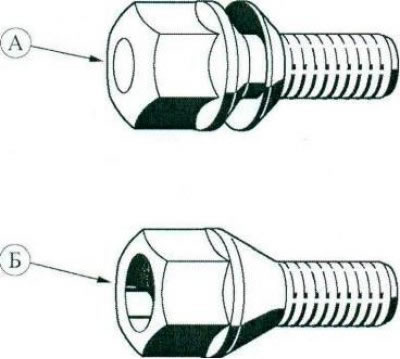

Figure 1-1 - Wheel mounting bolts: A - bolt for fastening a wheel with a light alloy disk (catalog…

Figure 1-1 - Wheel mounting bolts: A - bolt for fastening a wheel with a light alloy disk (catalog number); B - bolt for fastening a wheel with a stamped steel disk (catalog number)


Characteristics of bolts previously installed on Lada Largus.


402226088R – for stamped disks of modifications.

Thread size: M 12 x 1.5 mm, Length: 50 mm, Thread length: 26 mm, Quality/class: 10.9, Spanner width: 17.

402227272R – for alloy wheels modifications are not permitted for spare wheels with stamped wheels.

Thread size: M 12 x 1.5 mm, Length: 53 mm, Thread length: 29 mm Quality/class: 8.8, Conical belt F, Spanner width: 17.

Table 1. Characteristics of new unified wheel fastening bolts


Number of bolts, pcs. Bolt thread Length of the cylindrical part of the bolt, mm Hexagon size of the head of the bolt, mm Bolt strength class, not less than Wheel tightening torque, N
4 M12x1.5 24,5±0,5 17 9,8 105±15%

Installation


Clean the mating surfaces of the wheel and hub (metal brush).

Apply grease to the hub seating belt (US-A graphite grease or LSC-15 grease, consumption rate 2 g, according to the current "Codifier of main and auxiliary materials used in maintenance and repair of LADA vehicles" K 3100.25100.00018).

Install the wheel on the car and tighten it without tightening the mounting bolts (replacement head 17, ratchet).

Pre-tighten the wheel mounting bolts on the suspended wheel, starting with the bottom bolts. Pre-tightening torque of bolts 30 Nm (3.0 kgf·m) (replaceable head 17, torque wrench).

Turn the wheel 180° and lower the car onto its wheels.
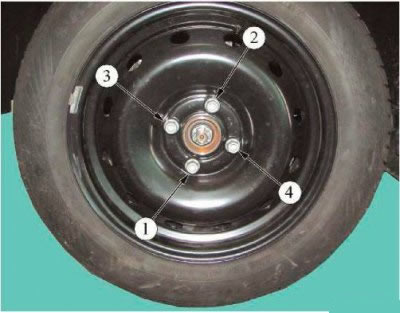
Figure 1-2 - Final tightening sequence for wheel mounting bolts: 1-4 wheel mounting bolts (the…

Figure 1-2 - Final tightening sequence for wheel mounting bolts: 1-4 wheel mounting bolts (the tightening sequence corresponds to the bolt numbering)


Finally tighten the wheel mounting bolts in the order shown in Figure 1-2. Bolt tightening torque 105 N·m (10.5 kgf·m) (replaceable head 17, torque wrench).


This article is available at russian, bulgarian, belarusian, ukrainian, serbian, croatian, romanian, polish, slovak, hungarian
This article has been reviewed: Daniil Markelov
Share with friends:
◀ Previous
Lada Largus 1: Suspension and wheels
Next ▶

Rear suspension arm joints (silent blocks) — replacement
Rear suspension arms — removal and installation
Rear Wheel Hub Axle — Removal and Installation
Rear Wheel Hub Bearing — Checking, Removing and Installing
Rear suspension spring — removal and installation
Adjusting the front wheel alignment angles
More articles with information from manuals for Lada:

• Front Wheel Drive Seals — Replacement Lada Kalina Hatchback (2004-2013, VAZ-1119)
• Adjusting the position of the steering wheel Lada Granta 1 (2011-2023, VAZ-2190)
• Adjusting the position of the steering wheel Lada Priora 1 (2007-2018, VAZ-2170)
• Adjusting the seat and steering wheel position Lada Vesta 1 (2015-2023, VAZ-2180)
• Checking the condition of the front wheel brakes Lada X-Ray 1 (2015-2022)
Link to this article in various formats
Reviews and comments of visitors
No comments yet


Add up two numbers: 11 + 23


Largus 1 (2012-2023) 
  • General information
  • Vehicle device
  • User manual
  • Maintenance
  • Power unit
  • Engine repair
  • Cooling and lubrication system
  • Supply system
  • Ignition system
  • Exhaust system
  • Spare parts catalog
  • Transmission
  • Clutch
  • Car gearbox
  • Drive shafts
  • Spare parts catalog
  • Chassis (running gear)
  • Suspension and wheels
  • Steering
  • Brake system
  • Spare parts catalog
  • Body and interior
  • Exterior (external elements)
  • Interior (internal elements)
  • Doors, locks and windows
  • Heating and ventilation
  • Spare parts catalog
  • Electrical equipment
  • Equipment and devices
  • Power devices
  • Lighting and signaling
  • Spare parts catalog
  • Electrical circuits
LadaMan.ru © 2018–2026 | Mobile version | About Lada | Sitemap: EN BG BY UA RS HR RO PL SK HU | Contacts with admin | | Add to bookmarks
Kalina Hatchback (2004-2013) | Kalina Sedan (2004-2013) | Granta 1 (2011-2023) | Priora 1 (2007-2018) | Vesta 1 (2015-2023) | Largus 1 (2012-2023) | X-Ray 1 (2015-2022) |
This site uses cookies to ensure everything runs smoothly.