
Car repair AvtoVAZ Car repair Renault Car repair Hyundai Car repair Ford Car repair Volkswagen Car repair Audi Car repair Chevrolet
English Русский
Български
Беларускі
Український
Српски
Hrvatski
Română
Polski
Slovenský
Magyar
articles sitemap contacts bookmark
LadaMan.ru


Kalina Granta Priora Vesta Largus XRAY
Largus 1 (2012-2023)

Anti-corrosion treatment of the body (Largus 1)

  • Main
  • Largus
  • Largus 1
  • Body and interior
  • Exterior (external elements)
  • Anti-corrosion treatment of the body
0

Hidden cavities for anti-corrosion treatment
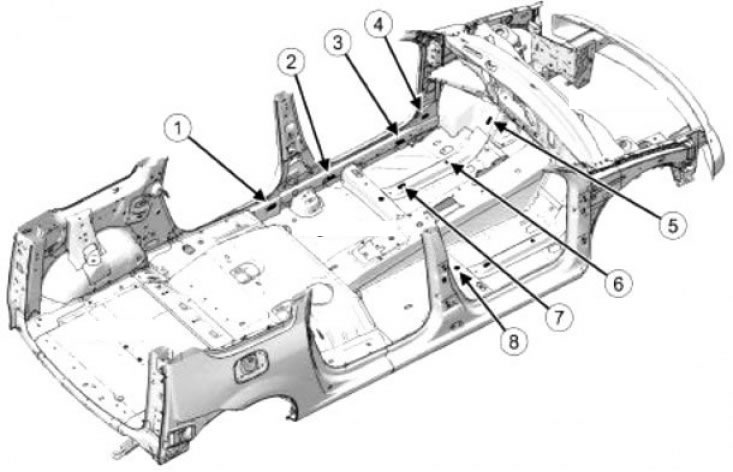


The anti-corrosion compound is injected at the points shown in the figures:

The anti-corrosion compound is injected at the points shown in the figures:
1, 2, 3 and 4 - to protect the connection of the lower section of the body side panel lining with the lower section of the body side panel reinforcement.
5, 6 and 7 - to protect the connection of the floor with the side member reinforcement.
8 - to protect the connection of the floor with the front seat mounting crossbar.
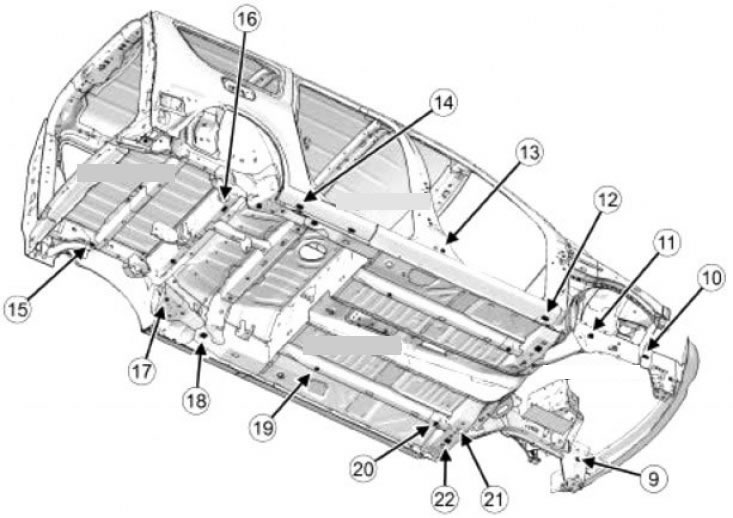

12, 13 and 14 - to protect the connection of the threshold panel with the threshold panel…

12, 13 and 14 - to protect the connection of the threshold panel with the threshold panel reinforcement.


An anti-corrosion compound is also injected into all other points. All holes are covered with rubber plugs. After processing, do not forget to put the plugs back in place. Replace torn or missing plugs with new ones (see catalog numbers. here).
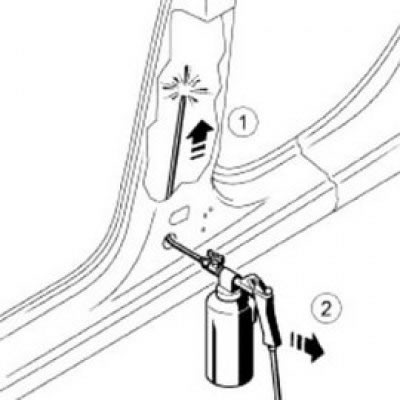


An anti-corrosion compound is also injected into all other points. All holes are covered with…


Anti-corrosion treatment of hidden cavities is carried out using an extension hose, which is inserted into the cavity to the maximum possible depth, after which the composition is injected with the simultaneous, gradual removal of the hose from the cavity.


This article is available at russian, bulgarian, belarusian, ukrainian, serbian, croatian, romanian, polish, slovak, hungarian
This article has been reviewed: Daniil Markelov
Share with friends:
◀ Previous
Lada Largus 1: Exterior (external elements)
 

Engine Crankcase Guard — Removal and Installation
Rear bumper — removal and installation
Front bumper — removal and installation
Front wing — removal and installation
Removal mudguards and fender liners of the front and rear wheel arches
 
More articles with information from manuals for Lada:

• Anti-roll bar — replacement of struts Lada Kalina Hatchback (2004-2013, VAZ-1119)
• Body maintenance and care Lada Granta 1 (2011-2023, VAZ-2190)
• Anti-corrosion protection of the body Lada Priora 1 (2007-2018, VAZ-2170)
• Immobilizer (anti-theft device) Lada Vesta 1 (2015-2023, VAZ-2180)
• Protecting your car from corrosion Lada X-Ray 1 (2015-2022)
Link to this article in various formats
Reviews and comments of visitors
No comments yet


Add up two numbers: 31 + 37


Largus 1 (2012-2023) 
  • General information
  • Vehicle device
  • User manual
  • Maintenance
  • Power unit
  • Engine repair
  • Cooling and lubrication system
  • Supply system
  • Ignition system
  • Exhaust system
  • Spare parts catalog
  • Transmission
  • Clutch
  • Car gearbox
  • Drive shafts
  • Spare parts catalog
  • Chassis (running gear)
  • Suspension and wheels
  • Steering
  • Brake system
  • Spare parts catalog
  • Body and interior
  • Exterior (external elements)
  • Interior (internal elements)
  • Doors, locks and windows
  • Heating and ventilation
  • Spare parts catalog
  • Electrical equipment
  • Equipment and devices
  • Power devices
  • Lighting and signaling
  • Spare parts catalog
  • Electrical circuits
LadaMan.ru © 2018–2026 | Mobile version | About Lada | Sitemap: EN BG BY UA RS HR RO PL SK HU | Contacts with admin | | Add to bookmarks
Kalina Hatchback (2004-2013) | Kalina Sedan (2004-2013) | Granta 1 (2011-2023) | Priora 1 (2007-2018) | Vesta 1 (2015-2023) | Largus 1 (2012-2023) | X-Ray 1 (2015-2022) |
This site uses cookies to ensure everything runs smoothly.