
Car repair AvtoVAZ Car repair Renault Car repair Hyundai Car repair Ford Car repair Volkswagen Car repair Audi Car repair Chevrolet
English Русский
Български
Беларускі
Український
Српски
Hrvatski
Română
Polski
Slovenský
Magyar
articles sitemap contacts bookmark
LadaMan.ru


Kalina Granta Priora Vesta Largus XRAY
Largus 1 (2012-2023)

Roof Rack Crossbars (Largus 1)

  • Main
  • Largus
  • Largus 1
  • General information
  • User manual
  • Roof Rack Crossbars
0
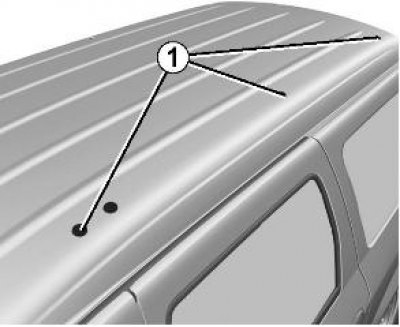
When installing the roof rack crossbars, remove the threaded plugs and replace them with the screws provided with the roof rack crossbars.

When installing the roof rack crossbars, remove the threaded plugs and replace them with the screws…


Access to mounting sockets


Depending on the vehicle configuration, unscrew the threaded plugs 1, which protect the places for installing the roof rack mounting screws from dirt and dust.

Never leave any openings unsealed after removing the threaded plugs 1.

Source link - website [ladaman.ru]

If you remove the crossbars from the vehicle, reinstall the threaded plugs immediately after removing the crossbars.

To attach the roof rack crossbars, use only the screws supplied with the roof rack crossbars from the manufacturer.

Installation of roof rack crossbars, conditions of use of the roof rack and its mass characteristics can be read in the instructions attached to the product.

To avoid losing these instructions (and the information from them may sooner or later be needed again), we recommend storing them together with other vehicle documentation.

Permissible load on roof rack: see section "Mass characteristics".


This article is available at russian, bulgarian, belarusian, ukrainian, serbian, croatian, romanian, polish, slovak, hungarian
This article has been reviewed: Daniil Markelov
Share with friends:
◀ Previous
Lada Largus 1: User manual
Next ▶

Storage compartments/interior equipment
Passive safety system
Luggage compartment shelf
Recommendations for operation and driving
Adjusting headlight beams with a corrector in the vertical plane
Folding the rear seats
Instructions for the standard audio system (radio)
Setting the time on the clock
More articles with information from manuals for Lada:

• Ball joint of the rack — removal and installation Lada Kalina Hatchback (2004-2013, VAZ-1119)
• Ball joint of the rack — removal and installation Lada Granta 1 (2011-2023, VAZ-2190)
• Checking the gap between the rack stop and the stop nut Lada Priora 1 (2007-2018, VAZ-2170)
Link to this article in various formats
Reviews and comments of visitors
No comments yet


Add up two numbers: 42 + 16


Largus 1 (2012-2023) 
  • General information
  • Vehicle device
  • User manual
  • Maintenance
  • Power unit
  • Engine repair
  • Cooling and lubrication system
  • Supply system
  • Ignition system
  • Exhaust system
  • Spare parts catalog
  • Transmission
  • Clutch
  • Car gearbox
  • Drive shafts
  • Spare parts catalog
  • Chassis (running gear)
  • Suspension and wheels
  • Steering
  • Brake system
  • Spare parts catalog
  • Body and interior
  • Exterior (external elements)
  • Interior (internal elements)
  • Doors, locks and windows
  • Heating and ventilation
  • Spare parts catalog
  • Electrical equipment
  • Equipment and devices
  • Power devices
  • Lighting and signaling
  • Spare parts catalog
  • Electrical circuits
LadaMan.ru © 2018–2026 | Mobile version | About Lada | Sitemap: EN BG BY UA RS HR RO PL SK HU | Contacts with admin | | Add to bookmarks
Kalina Hatchback (2004-2013) | Kalina Sedan (2004-2013) | Granta 1 (2011-2023) | Priora 1 (2007-2018) | Vesta 1 (2015-2023) | Largus 1 (2012-2023) | X-Ray 1 (2015-2022) |
This site uses cookies to ensure everything runs smoothly.