



Description of control buttons
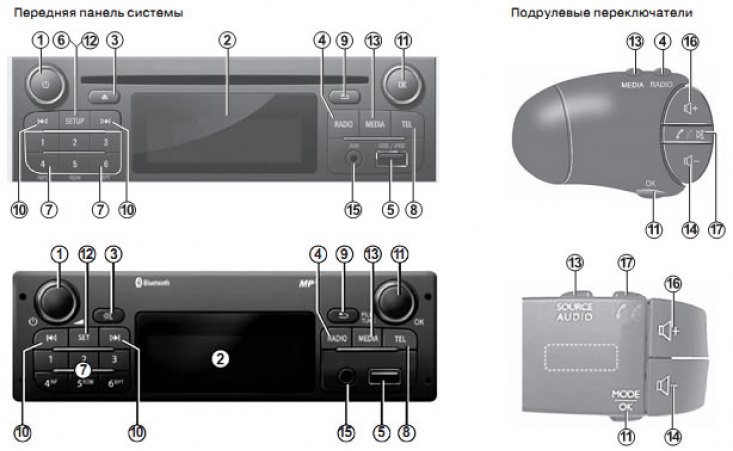
Front panel of the audio system without CD player (in a variant design)
| Function "AUDIO" | "TELEPHONY" function (depending on the vehicle configuration) | |
| 1 | Short press: on, off | |
| 2 | Information display | |
| 3 | - Eject CD/CD MP3 (front panel with CD player) -Turn off sound (front panel without CD player) | |
| 4 | Selecting a radio receiver and radio broadcasting range | |
| 5 | USB connector for iPod or other auxiliary audio equipment (depending on the vehicle configuration) | |
| 6 | Short press: AST mode on (automatic saving of stations). Long press: stores 6 radio stations with the strongest reception signals into memory | |
| 7 | Short press: select a radio station stored in memory. Long press: save radio station into memory | |
| 8 | Entering the phone menu | |
| 9 | Return to the previous menu/previous level while navigating tracks, navigating menus, etc. | |
| 10 | Short press: change track (CD/CD MP3, for some player models) or automatically change the radio station. Long press: fast forward/rewind CD/CD MP3 track for some player models or scroll through radio stations until the button is released | |
| 11 | Short press: confirm action. Rotation: -movement in the menu vertically; - select the desired option; -increase frequency in 0.5 Hz steps | |
| 12 | Enter the individual settings menu | |
| 13 | Select a music device (if it is connected): CD/CD MP3→iPod→USB→AUX→Bluetooth | |
| 14 | Reduce the volume of the source during playback | |
| 15 | Additional input | |
| 16 | Increase the volume of the source sound during playback | |
| 14+16 | Turn off sound | |
| 17 | - Turn off the radio sound during operation - Turn off sound and stop playback of CD/CD MP3, USB, iPod, Bluetooth player | - Pick up the phone/hang up the phone (short press) -Reject the call (long press) |
Precautions for use
For safety reasons and to avoid property damage, be sure to follow the instructions below when using the system. Strictly comply with the applicable laws of the country where you are located.
Precautions when handling the audio system:
- Use the controls (on the panel and on the steering wheel) and review the information on the screen when traffic conditions permit.
- Adjust the volume to a moderate level that allows you to hear surrounding noises,
- Precautions to avoid equipment damage
- To avoid property damage and fire, do not disassemble or modify the system in any way.
- To troubleshoot or dismantle the audio system, please contact a representative of the manufacturer.
- Do not insert foreign objects, damaged or dirty CD/CD MP3 into the player.
- Use only round CD/CD MP3 with a diameter of 12 cm.
- When handling discs, hold them by the inner and outer edges, avoiding touching the surface of the CD/CD MP3.
- Do not stick paper on CD/CD MP3,
- When using for a long time, remove the CD/CD MP3 from the player carefully as it may be hot.
- Do not leave CD/CD MP3 near heat sources or in direct sunlight.
Precautions when using the phone:
There are laws regulating the use of phones in cars. Some laws prohibit the use of a hands-free phone system while driving: the driver must be focused on driving. -Talking on the phone while driving is a distraction and a dangerous factor at all stages of phone use (dialing a number, making a phone call, searching for a number in a phone book...).
Front panel care:
- Use a soft cloth and a little soapy water if necessary, Rinse with a damp soft cloth and wipe dry with a soft dry cloth.
- Do not press the system panel screen or wipe it with alcohol-based cleaning agents.
This operating manual contains descriptions of models based on their technical characteristics existing at the time of preparation of the document. The manual covers all types of equipment installed on cars of this model. However, its availability on your vehicle depends on the configuration, selected options and country of delivery. Also in the manual you may find information about the equipment that is supposed to be installed on cars over the next year,
In this manual, when referring to a manufacturer's representative, the manufacturer refers to the vehicle manufacturer.
General description of the audio system (radio)
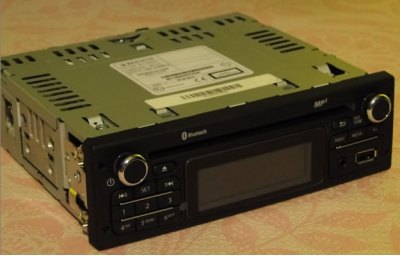
The audio system provides the following functions:
- rDS radio;
- cD/CD MP3 player;
- control additional audio devices;
- bluetooth hands-free phone system.
Radio and CD/CD MP3 functions
The audio system allows you to listen to radio stations and play audio CDs and MP3, WMA, AAC, and WAV. Radio stations are located in the following frequency ranges: FM (frequency modulation) и AM (amplitude modulation).
The RDS system allows you to display the names of some stations and follow stations by genre (RTU) or receive text information transmitted by FM radio stations:
- information on the general state of road traffic (TA);
- emergency messages.
Additional audio devices function
You can listen to music recorded on the player through the speakers installed in the car. Depending on the type of player and the vehicle configuration, there are several options for connecting it:
- uSB connector;
- jack connector;
- bluetooth connection.
For detailed information on the list of compatible devices, please contact the manufacturer.
Bluetooth hands-free telephony function
Depending on the vehicle's equipment, the Bluetooth hands-free system allows you to access the following phone functions via the audio system:
- connection of up to 5 phones;
- call/accept/reject call;
- transferring a list of contacts from the phone book and from the SIM card (depending on the type of phone);
- display list of recent calls;
- access to messages.
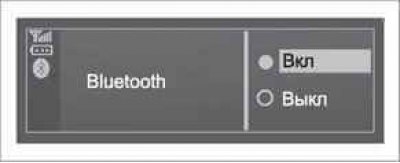
Bluetooth function
This function allows the audio system to recognize and control a player or phone when a Bluetooth connection is established.
You can enable or disable the "Bluetooth" function from the "Bluetooth" menu:
- enter the settings menu by pressing button 8;
- select Bluetooth by turning and pressing button 11,
- select ON/OFF.
The hands-free system is designed to make telephone communication easier and reduce risks, but it cannot eliminate them completely. Be sure to comply with the applicable laws of the country in which you are located.
Turning on and off
Press button 1 briefly to turn on the audio system.
The audio system can operate even when the engine is off. The audio system will operate for 10 minutes. Press button 1 to extend the operating time by 10 minutes. Turn off the audio system by briefly pressing button 1.
Selecting an audio device
Browse through the audio devices by pressing button 13 in sequence. The devices are arranged in the following order: CD/CD MP3 → iPod →USB →AUX→BIuetooth.
Note: Press button 8 to display the phone menu.
When you place a CD/CD MP3 in the player while the radio is on, the sound source changes automatically and CD playback begins.
You can also select the radio mode by pressing button 4. Press button 4 repeatedly to scroll through the radio bands in the following order: FM1→FM2→AM→FM1...
Sound volume
Adjust the sound volume by pressing button 14 or 16.
The screen will display the inscription "VOLUME" and the adjustable volume level (from 00 to 31).
Turn off sound
Press button 17 briefly. The message "MUTE" will appear on the screen.
To resume sound, press and release button 17.
You can deactivate the mute by pressing button 14 or 16.
Radio receiver mode (radio setup)
Select broadcast range
Press button 4 to select the desired range: FM1, FM2, AM, FM1...
Search radio station
There are several ways to select a radio station.
Automatic search
In this mode, the search for available radio stations is carried out automatically. To switch radio stations, press and release button 10.
To stop searching for radio stations, press and release buttons 4, 10 or any button on the keyboard 7.
Search in manual mode
This mode allows you to manually search for radio stations by scanning the selected broadcast range. To access radio stations, press and hold button 10. Release button 10 to switch to step-by-step search. When you turn button 11, the frequency increases or decreases by a step of 0.5 Hz (depending on the direction of rotation).
Saving radio stations to memory
In this mode you can switch radio stations stored in memory.
Follow the instructions above to select the broadcast band and radio station.
To store the selected radio station in the audio system's memory, press and hold one of the buttons on the keypad 7 until you hear a beep, confirming that the station has been successfully stored in memory.
You can save up to 6 stations in each broadcast range.
The stored radio stations can be selected using the keypad buttons 7.
Note: Some buttons may remain empty if less than 6 radio stations were found during automatic scanning.
AST function (automatic saving of stations)
With the radio on, press and release button 6 to turn on AST mode. The system will turn on the last AST radio station you listened to.
Press and hold button 6 to store the six stations with the strongest signal in the area you are in.
Note: The strongest frequency will be stored in memory as P1.
Search in AST mode
Press and hold button 6 to search for the strongest frequencies. To switch from one saved frequency to another, press and hold the buttons on the keyboard 7.
Note: Up to 18 stations can be stored in the FM1, FM2 and AST bands.
AF-RDS frequency tracking
The frequency of FM stations varies depending on geographic location. Some stations use the frequency tracking RDS system. The audio system can track changes in the broadcast frequency of such stations.
Note: If the radio station does not have the RDS frequency tracking function, the AF message will flash on the screen.
If the signal reception is poor, the system can switch frequencies automatically.
In this case, please disable the frequency tracking function. To enable/disable this function, enter the RDS menu by pressing button 72. Select the "RDS SETUP" section and press button 11.
CD/MP3 playback
Characteristics of playable formats
Only files with MP3/WMA/MC/WAV extension can be played on the system.
If a CD contains both regular CD audio files and compressed audio files, the system will only play the regular audio files.
Note: Some files are protected (copyright) may not be readable.
Note: For ease of reading, we recommend that you do not use special characters in directory and file names, and try not to exceed the maximum length of 64 characters.
CD/CD MP3 Care
Do not leave CD/CD MP3 near heat sources or in direct sunlight as they may deteriorate.
To clean CD/CD MP3, wipe with a soft cloth from the center to the edge of the CD.
In general, you should follow the manufacturer's recommendations for storing CDs.
Note: Some CDs may not be readable if they are scratched or dirty.
CD/CD MP3 Input
See the section "Precautions for Use".
Make sure there is no CD in the player, then insert a new CD with the printed side facing up.
Play CD/CD MP3
When loading CD/CD MP3 (with the side with the text information facing up) the audio system automatically switches to CD/CD MP3 playback mode and starts reading the first music track.
If the audio system is off and the ignition is on, loading a CD/CD MP3 turns on the audio system and starts playing the CD/CD MP3. If the ignition is off, the audio system does not turn on.
If the radio is on and a CD/CD MP3 is in the player, you can select CD/CD MP3 playback by pressing button 13. Reading starts from the moment the system switches to the CD/CD MP3 source.
Search track
To switch from one audio track to another, briefly press button 10.
Fast forward
Hold down the 10 button to fast forward or rewind.
The disc will resume playing as soon as you release the button.
Play tracks in random order (MIX)
After placing the CD/CD MP3 in the player, press and hold button 4 on the keyboard 7 to activate the random play mode for all tracks on the CD/CD MP3.
The MIX indicator will light up on the screen. Tracks will be played in random order. The transition from one track to another will occur in random order. Press button 4 again to turn off random play mode, the MIX indicator will go out.
This function does not turn off when you turn off the car radio or change the source.
On the contrary, when you eject a CD/CD MP3, the random play mode is automatically turned off.
Note: On MP3 CDs, random play will only apply to the active directory. Change directory to play files contained in it in random order.
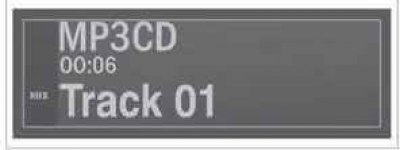
Pause
Press button 17 to instantly mute the sound. This function will be turned off automatically when any sound changes, when switching the audio device, and when information is received automatically.
Displaying text information (if available) (CD-Text or ID3 tags)
Press and release button 5 on keyboard 7 to display ID3 tag information (artist name, album title or song title). To display all SW tag information on one page, press and hold button 5 on keypad 7. To stop the function, press button 9 again.
Note: After a few seconds of inactivity, the system will automatically return to the previous menu.
CD/CD MP3 extraction
Eject the CD/CD MP3 from the player by pressing button 3.
Note: If you do not pick up the ejected disc within 20 seconds, it will automatically return to the CD player.
Connecting additional audio devices
The system has an additional input for connecting an external audio device (uSB flash drive, MP3 player, iPod, Bluetooth player...).
There are several options for connecting the player:
- uSB connector;
- jack connector;
- bluetooth connection.
Note: The device can play MP3, WMA and AAC formats from additional audio devices.
Data obtained from the website [LADAman.ru]
Additional input: USB connector
Connect the iPod connector or USB flash drive to the auxiliary USB input.
Once the device's connector is connected to the USB port, the track will start playing automatically.
Note: When you first turn on the system, disc playback will begin from the first track in the first directory of the device. In other cases, playback will start from the last played track (provided that the same device is connected twice in a row).
Note: Once connected to the audio system, you will no longer be able to control playback directly through the digital player. The device can only be controlled through the audio system.
iPod:
Once your iPod is connected, the available audio system menus will be displayed on the screen.
The system will save playlists identical to those on your iPod.
uSB flash drive:
Playback of the first audio file from the first directory of the USB flash drive will start automatically.
When in the tree menu, you can switch tracks or directories by turning and pressing button 11. When in any other menu, turning the button will not change anything.
Note: To enter the device menu (iPod or USB flash drives) while the track is playing, press button 9 or 11.
Note. Random playback for a USB flash card is performed in the same way as for a CD MP3. See the section "CD/CD MP3 playback", the item "Random playback (MIX)".
Additional input: Jack connector
Using a special cable (not included in the kit) connect the Jack connector of the auxiliary input 15 to the headphone connector of the player (typically a 3.5mm diameter connector is used).
Note: You cannot select a track directly from the audio system. You can only select a track using the player on a stopped vehicle.
The system will display the text "AUX". The artist name or track title is not displayed.
Auxiliary input: Bluetooth audio playback
To use a Bluetooth music player in your car, you must first connect the player to the audio system. The connection will allow the audio system to recognize and remember the Bluetooth player.
Note: If the Bluetooth digital device has both phone and audio player functions, connecting one function will automatically connect the other function.
Activate the Bluetooth connection of the player (see the player's operating instructions).
Select the Bluetooth audio device by pressing button 13, or turn and press button 11 to confirm.
Enter the Bluetooth playback menu.
Note: When you disconnect the AUX device, the system will automatically return to the previous menu.
Set up your portable audio device when driving conditions permit.
Hide your audio player while driving (it can fly forward during sudden braking or impact).
To access all the player's functions, it must be connected to the system.
Note: The player cannot be connected to the system without prior connection.
Once a Bluetooth digital player is connected, it can be controlled directly from the audio system.
Press button 11 to pause during audio track playback (pressing again will resume playback).
Depending on your device type, press the 10 button to fast forward or rewind.
Note: The number of available functions depends on the type of player and its compatibility with the audio system.
Note: If you have any problems connecting, please read the player's operating instructions.
Connect to phone / disconnect from phone
Connecting to a phone
To use the hands-free phone system, you must pair your Bluetooth mobile phone with your vehicle the first time you use it. The created connection to the hands-free system will allow the phone to be recognized and remembered.
You can connect up to five phones to the system, but only one of them will be able to operate in hands-free mode.
The connection is made in the system and on the phone. The audio system and telephone must be turned on.
Note: Once the phone is connected, the phone will be recognized automatically for all subsequent connections.
To connect your phone, follow these instructions:
- activate the phone's Bluetooth connection (see the mobile phone operating instructions);
- enter the phone menu by pressing button 8;
- select "Connect Device" by turning and pressing button 11;
- the "Ready to connect" screen will turn on;
- activate the search for available Bluetooth devices located near the phone;
- from the list in the phone menu, select the name of the radio system "My Radio";
- enter the connection code displayed on the system screen on your phone.
Detailed information is provided in the phone's operating instructions.
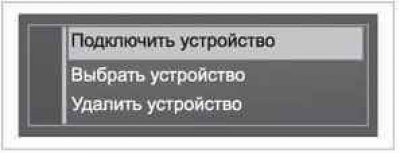
After connection is made:
- the name of the phone that was connected to will appear on the screen;
- the phone will automatically connect to the car system.
If the connection is unsuccessful, the phone menu will appear on the system screen.
If the list of connections to the system phones is full, then to create a connection to a new phone you need to delete one of the existing connections.
The hands-free system is designed to make telephone communication easier and reduce risks, but it cannot eliminate them completely. Be sure to comply with the applicable laws of the country in which you are located.
Disconnecting the connection to the phone
When you disconnect your phone, it is deleted from the hands-free phone system's memory.
Enter the settings menu by pressing button 8 and select the menu "Delete device". Select the phone from the list that you want to disconnect by pressing button 11 and selecting "YES".
Connecting/disconnecting the phone
Connecting a pre-paired phone
The phone must be connected to a hands-free phone system to ensure access to all its features.
The phone cannot be connected to the hands-free phone system without first being connected.
See the "Creating a connection to a phone" section of the "Connecting/disconnecting a connection to a phone" section.
Note: Your phone's Bluetooth connection must be turned on.
Automatic connection
When the vehicle ignition is turned on, the hands-free phone system will begin searching for nearby phones that have been pre-connected.
Note: The last phone connected to the system will take priority.
The search will continue until the phone is found (the search can take up to 5 minutes).
Notes:.
- 1) After turning on the ignition, the phone will be automatically connected. In some cases, it will be necessary to activate the automatic Bluetooth connection function of the phone with the hands-free phone system. To do this, see the operating instructions for the phone.
- 2) When reconnecting and if there are two phones in the coverage area with an existing connection to the hands-free telephony system, the last connected phone will have priority, even if it is not in the car, but outside it, but within the coverage area of the system.
Note: If the phone is in talk mode when connecting to the hands-free phone system, it will connect automatically and the conversation will continue through the vehicle's speakers.
Manual connection
(changes to the connected phone)
Enter the settings menu by pressing the 8 button and select the "Select device" menu. A list of phones that have been connected will appear on the screen.
Select a phone from the list and confirm your choice by pressing button 11. A message will appear on the screen confirming the connection of the phone.
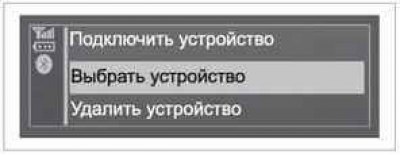
Connection failed
If the connection fails, make sure that:
- the phone is on;
- the phone battery is charged;
- for the phone, there is a pre-made connection with the "hands-free" system;
- bluetooth connections of phone and system are enabled;
- the phone is configured to accept requests to connect to the system.
Note: Long-term use of the hands-free phone system will quickly drain the phone's battery.
Turning off the phone
Enter the settings menu by pressing the 12 or 8 button, then select the "Bluetooth Connection" menu.
Select the phone you want to disconnect from the list, then select "Remove connected device" by turning and pressing button 11.
Turning off the phone also disconnects it from the system.
A message will appear on the screen confirming that the phone has been disconnected from the system.
Note: If the phone is in talk mode when you turn it off, the conversation will automatically switch from the car speakers to the phone.
You can also turn off your phone as follows:
- turn off the system's Bluetooth function;
- turn off phone bluetooth;
- remove phone connection from phone menu. For detailed information on disabling the Bluetooth audio system, see "Bluetooth function" in the "General Description" section.
For details on disconnecting a Bluetooth phone, see "Disconnecting the connection to a phone" in the "Connecting to/disconnecting from a phone" section.
Make/Receive Call
Call a contact from your phone book
When you connect to a phone, its phone book is automatically downloaded to the system.
To enter the phone menu, press button 8 and select "Phonebook" by turning button 11. To display the contact list, press button 11.
Select the name of the contact you want to call from the list and press button 11 to call.
Note: To return to the previous menu, press button 9.
It is recommended to stop the car to dial a number or search for a contact.
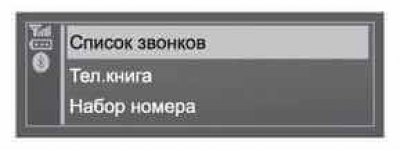
Calling a contact from your recent calls list
To display a list of recent calls, press the 8 button and select "Call list".
Select the menu "Recent calls", "Incoming calls" or "Missed calls". After the list of recent calls is displayed, select the name or number of the contact, press the 11 button to confirm the selection and make the call.
Call by dialing a number
Enter the phone menu by pressing button 8 and selecting the "Dialing" section. Dial the desired number using the numeric keypad by pressing and turning button 11, then select

To call the last number dialed, press and hold button 8.
When connecting a phone to the system, the dual line call reception function will be disabled. A call received during a telephone conversation will be automatically rejected.
Accept the challenge
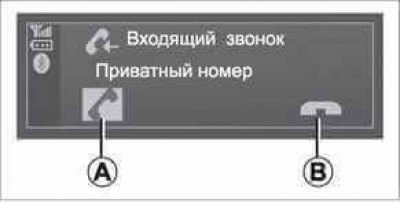
When you receive an incoming call, the subscriber's number will be displayed on the screen (this function depends on the service package provided by your mobile operator). If the number of the received call is entered into the phone book, the subscriber's name will appear on the screen instead of the number. When calling from a hidden number, the message "Private number" will appear on the screen.
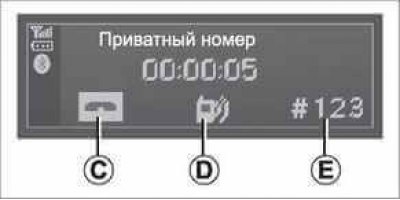
To accept a call, select A by turning and pressing button 11. To reject a call, turn button 11 and select B.
During a telephone conversation
You can:
- change the volume by pressing buttons 14 and 16;
- pick up the phone by pressing button 8.
By turning button 11 you can:
- hang up (press C);
- transfer the conversation from the audio system to the phone by turning the 7 7 button (press D);
- control the phone keypad using the audio system (press E).
Note: To answer an incoming call, press and release button 17, located under the steering wheel. To reject a call, press and hold button 17. To answer a call, press and release button 17.
System setup
Displaying text information received via radio
Enter the menu of text information received via radio by pressing button 12. Select "Radio" and press button 11.
Only information up to 64 characters long can be displayed on the screen.
Note: If there is no information, the screen will display "No messages".
Audio system settings
Enter the settings menu by pressing button 12. Select "Settings", then press button 11 to display the audio system settings menu. Select "Audio" to access the different sections in the following order:
- low sounds;
- high sounds;
- distribution (sound distribution to front and rear speakers);
- balance (sound distribution between left and right speakers).
You can change the selected parameters of each setting by turning button 11. Press button 11 to confirm and return to the previous menu.
The screen displays the type of settings ("Bass", "Treble", "Sound Distribution", "Balance"),
The menu exits automatically after a few seconds of inactivity. You can also exit the menu by pressing button 9.
AUX settings
Enter the "Settings" menu, turn button 11 and select the "AUX IN" section to access the settings in the following order:
- HI (high);
- MID (medium);
- LO (low).
The following values are selected for each setting:
- HI (300 mV);
- MID (600 mV);
- LO (1200 mV).
Select language
Select the "Language" section in the "Settings" menu, then select the desired language.
Default settings
Enter the settings menu by pressing button 12. Select "Settings", then press button 11 to display the settings menu, then select "Errors". A message will appear on the screen asking you to confirm your choice. After selecting this section, all system settings will be reset to default values.
Telephony settings
Enter the settings menu by pressing button 8.
After a few seconds of inactivity, the system will automatically return to the previous menu.
You can also exit the menu by pressing button 8 or 9.
Radio code (security code)
Your audio system has a security code (the code is provided by a representative of the manufacturing company). It provides electronic locking of the audio system when the power supply is disconnected (disconnection of the battery, disconnection of the audio system, blown fuse, etc.).
To turn on the audio system, you must enter a secret security code consisting of four digits.
Write down this code and keep it in a safe place. If you lose it, please contact the manufacturer's representative (call the dealer).
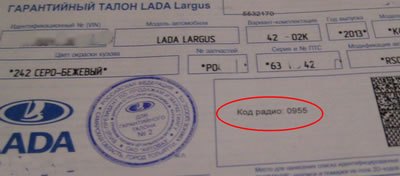
The code for your radio can be written in the warranty card or service book.
Entering the code
Press button 1 to turn on the audio system. The words "CODE" and the numbers "0000" will appear on the screen.
Enter the first flashing digit by pressing button 1 on keypad 7 until the desired number is displayed. In the same way, enter the values of the next numbers using buttons 2, 3 and 4 on keyboard 7.
After entering the value of the fourth digit, press and hold button 6 on keypad 7.
Code entry is complete and the audio system will be unlocked immediately.
Error entering code
If an error occurs when entering the code, a message appears "CODE ERROR... WAIT".
Wait 60 seconds and enter the code again.
The waiting time doubles with each new error.
Radio malfunctions
| Description | Possible reasons | Solutions |
| No sound | The volume level is set to minimum | Increase volume or unpause |
| The audio system does not work, the display does not turn on | There is no voltage supplied to the audio system | Apply voltage to the audio system |
| The audio system fuse has blown | Replace the fuse (see the Fuses section in your vehicle's owner's manual) | |
| The audio system does not work when the display is on | The volume level is set to minimum | Press button 16 |
| Short circuit in the speaker circuit | Contact the manufacturer's representative | |
| When playing a CD or using the radio, the left or right speaker does not work | The sound balance is not adjusted correctly (sound distribution to the right and left speakers of the car) | Adjust the sound balance |
| The loudspeaker is off | Contact the manufacturer's representative | |
| Poor or no radio reception | The vehicle is located at a great distance from the radio station's repeater antenna (noise and interference) | Choose another wave with a better signal or turn off the "RDS-AF" function |
| The interference is caused by the engine running | Contact the manufacturer's representative | |
| The antenna is damaged or not connected | Contact the manufacturer's representative | |
| CD/CD MP3 first play time seems too long | CD is dirty | Remove and clean the CD |
| CD MP3 | Please wait: the first play time of such MP3 CDs is longer | |
| "Error reading from CD" appears on the screen or CD/CD MP3 is ejected from the audio system | CD is not inserted correctly/dirty/damaged/not suitable | Remove CD/CD MP3. Insert correct/blank/compatible CD/CD MP3 in good condition |
| Some CD MP3 files cannot be played by the system | One CD contains audio files and files of another format | Burn audio files and other formats to different CDs |
| The audio system cannot read the MP3 CD | The CD was burned at a speed lower than 8x or higher than 16x | Rewrite the CD at 3x speed |
| The CD was recorded in multisession mode | Rewrite your CD in disc-at-a-time mode or rewrite your CD in track-at-a-time mode and finish the recording after the last session | |
| Poor CD MP3 playback | The CD is black or has a low memory color, which reduces the reading quality | Copy your CD to a white or light colored CD |
| The phone does not connect to the system | -The phone is turned off - The phone battery is dead - The phone was not connected to the "hands-free" telephony system - Bluetooth connections of phone and system are not enabled - The phone is not configured to accept requests to connect to the system | - Turn on your phone - Charge your phone's battery - Connect your phone to the "hands-free" telephony system - Turn on the Bluetooth connection between your phone and the system - Set up your phone to accept requests to connect to the system |
| Bluetooth audio player does not connect to the system | - The player is turned off - The player's battery is low - The player has not been pre-connected to the audio system - Bluetooth player and audio system connections were not enabled - The player is not configured to accept requests to connect to the system - Music does not play from the player | - Turn on the player - Charge the player's battery - Set up the connection of the player to the audio system - Turn on Bluetooth of the player and audio system - Configure the player to accept requests to connect to the system - Depending on the compatibility level of the phone, turning on music may only be possible using the player |
| The message "Battery level is low" is displayed on the screen | Long-term use of the hands-free phone system quickly drains the phone battery | Charge your phone's battery |